What is a VMware Template?
Do you need to deploy new virtual machines (VMs) several times per day? Is the manual creation of each instance becoming tedious? If that is the case, then VMware templates are for you!
A VMware template is a master copy of a virtual machine and includes things like the:
- Guest operating system.
- Virtual disks.
- Software that you want to use.
- Configuration files.
Using VMware templates configured within your vCenter server environment helps quickly deploy new virtual machines with the configuration and settings you need.
How to Create a Template in VMware
A virtual machine is required to create a template. You have two options when it comes to VMware template creation:
- Clone to Template
- Convert to Template
VMware Clone to Template Method (7 Steps)
The clone to template method will copy the original virtual machine and make an exact copy. Thus, the template will be a fully functional virtual machine instance.
Note that all images are from a test environment. While the IP addresses and directory names may be different, all options within the template will be the same.
Step 1: Log into Your vSphere Account
First, log into your vSphere account and navigate to your virtual machines.
Next, right-click on the VM you want to clone.
Then, hover over the Clone option and select Clone Virtual Machine… from the drop-down menu.

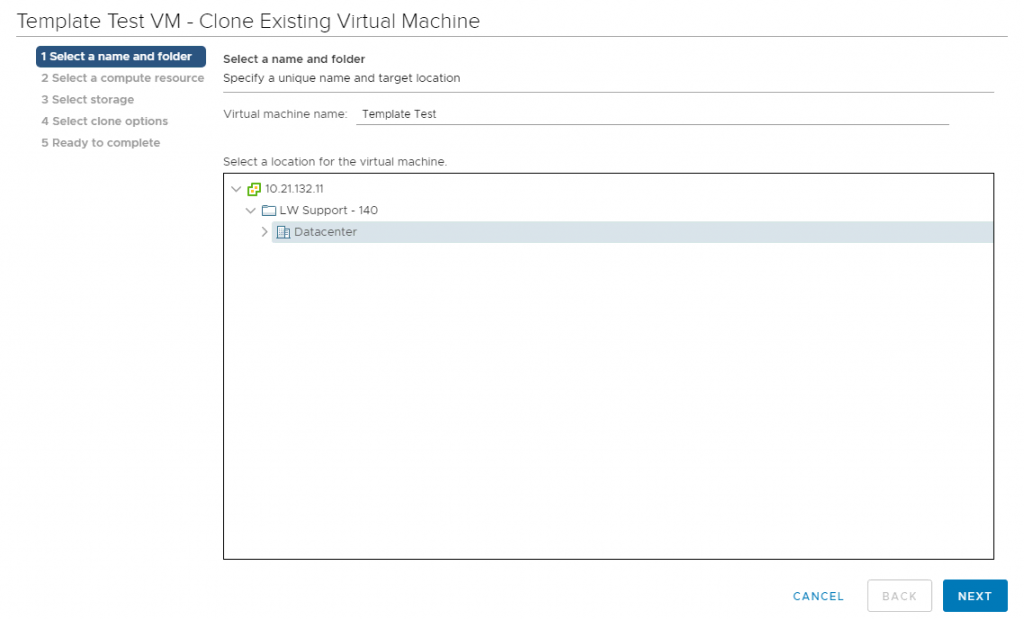
Step 2: Select a Name and Folder
In Select a name and folder, name your template (we have used Template Test) and select the target location folder. Click Next once done.
Step 3: Select a Compute Resource
In Select a compute resource, select your preferred destination compute resource for your template and click Next once done.

Step 4: Select Your Preferred Storage
Select your preferred storage for the configuration and disk files in Select storage and then click Next.

Step 5: Select Clone Options
There are three options available to select when in the Select clone options section:
- Customize the operating system.
- Customize the virtual machine’s hardware.
- Power on virtual machine after creation.
The second option is the only one selected by default, but you can choose whichever options you feel are appropriate for your VMware clone.
Click Next after selecting your preferred options.

Step 6: Allocate Template Resources
Allocate template resources in Customize hardware. All future virtual machines created from this template will allocate the same resource settings for CPU, memory, virtual disk space, etc. Click Next once your configurations are set.

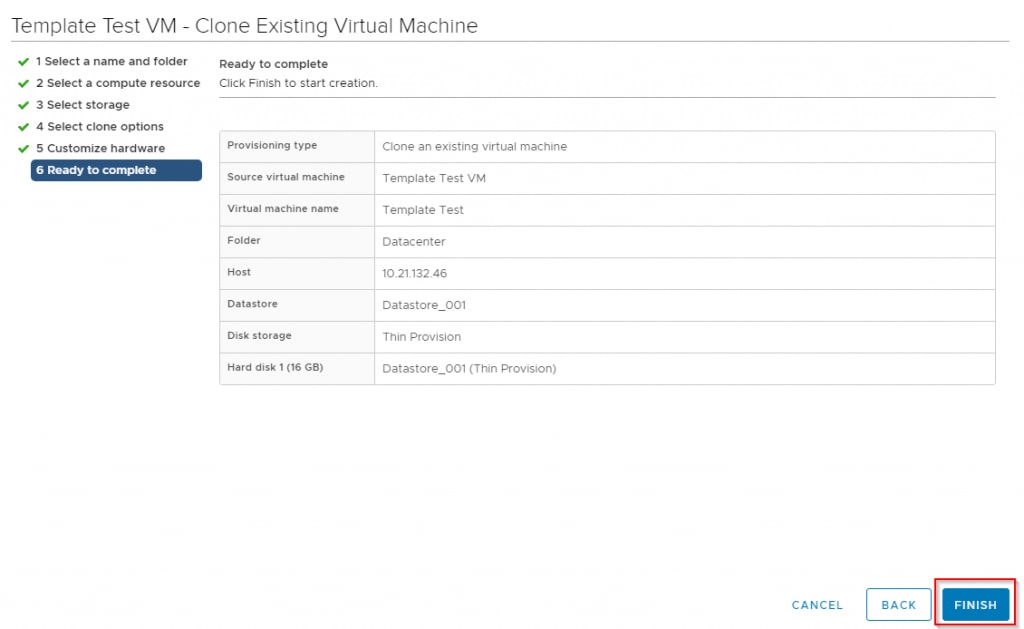
Step 7: Review Your Settings
A summary of your settings will appear in Ready to complete. If everything looks good, click Finish.
You have now created a VMware template using the clone to template method. Now we’ll show you how to use the convert to template method.
VMware Convert to Template Method (3 Steps)
The convert to template method is similar to the cloning process, but you convert the existing virtual machine into the template instead of creating a copy of the VM.
Step 1: Navigate to Your Virtual Machines
Navigate to your virtual machines after logging into vSphere.
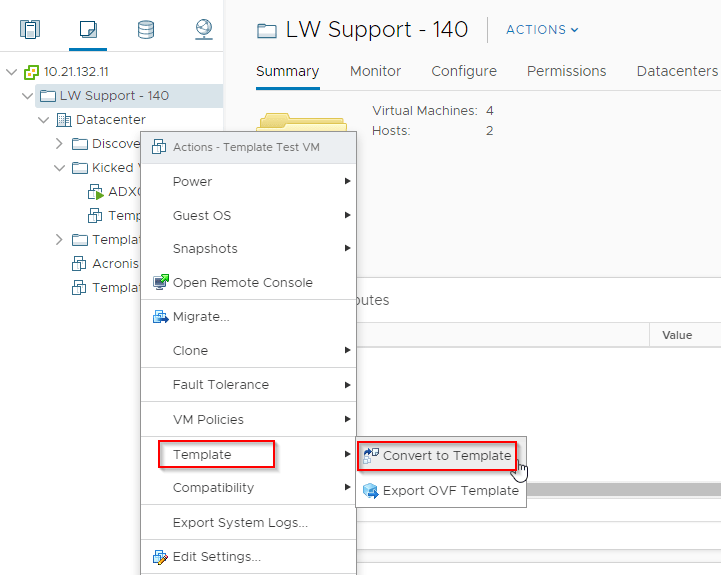
Step 2: Select the Virtual Machine to Convert
Right-click on the virtual machine you want to convert to the template. Then, under Template, select the Convert to Template option.
Step 3: Convert Your VM into a Template
Click Yes to convert your VM into a template.

The status of your VM conversion into a template will show under Status in the Recent Tasks section. The Status column will also indicate if an unexpected issue occurred during the cloning.

Conclusion
Creating VMware templates is easy and straightforward. Templates are a perfect solution when deploying a cluster of virtual machines on the fly.
Interested in your own virtual server? Try Liquid Web’s Private Cloud powered by VMware. Its scalable, redundant, and fully customizable environment comes with DDoS protection, secure firewall, and integrated Acronis backups. Reach out to us today and talk to discuss the best solution for you!