
 Jain Thomas
 Webmin is a control panel that helps you administer your Linux servers using a browser-based interface. Using Webmin control panel features, you can manage DNS settings and user accounts and configure and change settings for standard packages.
In this article, you’ll install and configure Webmin on your Ubuntu 20.04 server.
Requirements
To complete the Webmin installation, you will need the following:
- An Ubuntu 20.04 server with sudo user privileges, along with the Uncomplicated Firewall (UFW) configured.
- Apache web server installed on the servers with a configured virtual configuration host.
- A Fully-Qualified Domain Name (FQDN) with a DNS A record pointing to the IP address of your server.
How Do I Install Webmin on Ubuntu 20.04?
Method 1
Step 1: Update the Package List
Update the installed server packages to the latest version using the following command from the terminal.
ubuntu@jain:~# sudo apt-get update -y && sudo apt-get upgrade -yStep 2: How to Enable the Webmin Repository on Ubuntu
Add the Webmin repository (repo) by adding the code below on the repository /etc/apt/sources.list file to install and update Webmin using the package manager.
ubuntu@jain:~$ sudo vi /etc/apt/sources.listThen, save the repo details.
deb https://download.webmin.com/download/repository sarge contribStep 3: Add the Webmin PGP Key and Installing Gnupg1 Package
You need to add the Webmin PGP key so that Ubuntu trusts the new repository you added. To do that, install the gnupg1 package, GNU’s tool for secure data storage and communication. In most cases, it is enabled on the Ubuntu server by default.
Use this command to search for and list files containing gnupf1.
ubuntu@jain:~$ sudo apt list | grep gnupg1

gnupg1-l10n/focal 1.4.23-1 all
gnupg1/focal 1.4.23-1 amd64
If it is not visible from the above step, install the package using the following command.
sudo apt install gnupg1Once that is verified, use the following command to download the Webmin PGP key with the wget command and add the key to your system’s list of keys.
ubuntu@jain:~$ wget -q -O- http://www.webmin.com/jcameron-key.asc | sudo apt-key add
OK
Step 4: Re-update the Installed Packages
Update the list of packages on the server so that the Ubuntu 20.04 server adds the trusted Webmin repository.
ubuntu@jain:~$ sudo apt updateStep 5: Install Webmin on Ubuntu 20.04
Once the packages and repositories are verified, install and Enable Webmin on your Ubuntu 20.04 server.
ubuntu@jain:~$ sudo apt install webmin
Reading package lists... Done
Building dependency tree
Reading state information... Done
Once the installation completes, the following output displays.
Webmin install complete. You can now login to https://ip-172-31-15-182:10000/.Step 6: Enable Port on UFW Firewall
In most Ubuntu servers, UFW is installed and enabled by default. In that case, you will need to allow the Webmin port 10000 on the server firewall.
ubuntu@jain:~$ sudo ufw allow 10000
Rules updated
Rules updated (v6)
You can check the Webmin status using the command below. You also see the output immediately following the command.
ubuntu@jain:~$ sudo systemctl status webmin
● webmin.service - LSB: web-based administration interface for Unix systems
     Loaded: loaded (/etc/init.d/webmin; generated)
     Active: active (running) since Sun 2022-05-15 17:18:29 UTC; 3min 25s ago
       Docs: man:systemd-sysv-generator(8)
      Tasks: 1 (limit: 1145)
     Memory: 30.4M
     CGroup: /system.slice/webmin.service
             └─13268 /usr/bin/perl /usr/share/webmin/miniserv.pl /etc/webmin/miniserv.conf

May 15 17:18:27 ip-172-31-15-182 systemd[1]: Starting LSB: web-based administration interface for Unix systems...
May 15 17:18:27 ip-172-31-15-182 perl[13267]: pam_unix(webmin:auth): authentication failure; logname= uid=0 euid=0 tty= ruse>
May 15 17:18:28 ip-172-31-15-182 webmin[13267]: Webmin starting
May 15 17:18:29 ip-172-31-15-182 systemd[1]: Started LSB: web-based administration interface for Unix systems.
lines 1-13/13 (END)
Method 2
Step1: Add the Webmin PGP Key
Download the Webmin PGP key, and add it to our Ubuntu 20.04 system. To do that, you can use the following command.
ubuntu@jain:~$ wget -qO- http://www.webmin.com/jcameron-key.asc | sudo apt-key addStep 2: Enable the Webmin Repository
The following command helps download and add the Webmin repository.
ubuntu@jain:~$ sudo add-apt-repository "deb http://download.webmin.com/download/repository sarge contrib"Step 3: Update the Package List
Update the server packages to reflect the repository on the server correctly using the following command.
ubuntu@ip-172-31-15-182:~$ sudo apt updateStep 4: Install Webmin on Ubuntu 20.04
The following command helps install and configure Webmin.
ubuntu@jain:~$ sudo apt install webmin -yAfter the Webmin installation finishes, you receive the following output.
Webmin install complete. You can now login to https://hostname:10000/Finalize the Installation
Finalize the installation by resetting the Webmin root password with the commands below.
sudo cd /usr/share/webmin/
sudo changepass.pl /etc/webmin root [new password]
Combining the commands and entering the password looks like the example below.
ubuntu@jain:~$ sudo /usr/share/webmin/changepass.pl /etc/webmin root 7jwSVTy9pE4q7JXr
Password for Webmin user root updated successfully
Access the Webmin Panel
To access the control panel, type the Webmin panel URL in the web browser. Replace server-ip with your server’s IP address.
https://server-ip:10000/When you access the webmail control panel URL using an IP address, the URL will pop up with a warning message that the connection is not private. By default, Webmin has a self-signed SSL certificate that Certificate Authority (CA) does not validate. To skip this warning, click on the Advanced button and then click the link to proceed to the URL.
Once you have clicked on the advanced option, it will take you to the login page.

Input root as the username and the password set in the final step of the installation.
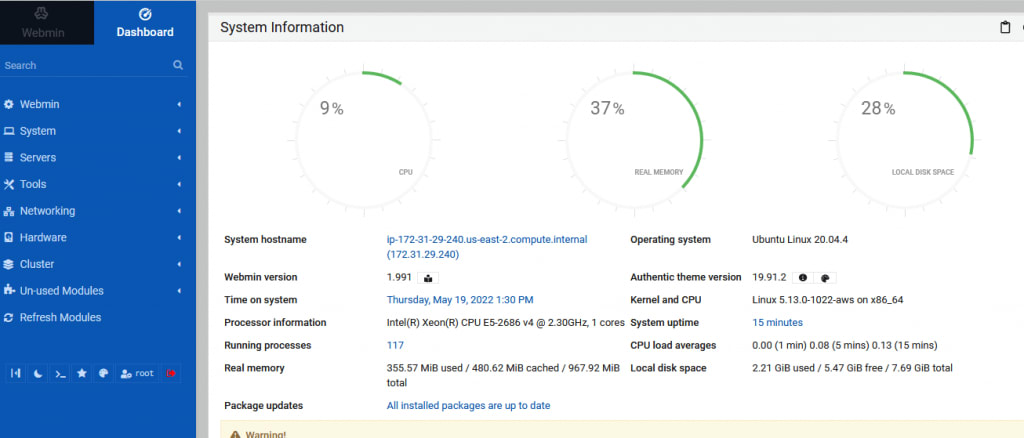
Once you enter the login details, you will see the Webmin dashboard’s first page. It displays all the system information and packages that have updates available. Webmin will notify you to reboot immediately if any package updates are available.
How to Add a Fully Qualified Name for the Hostname and Install the SSL.
To Enable SSL on your Webmin installation, ensure the following requirements are fulfilled:
- The FQDN is configured with an A record pointing to your server’s IP address.
- Apache web server is installed on your Ubuntu 20.04 server.
How Do I Configure and Use Webmin Using the Hostname?
First, set your server hostname. You can view and edit the hostname from the Webmin dashboard. Click on the link next to System hostname as shown below.

Following the tutorial, you must use your domain, hostname, and IP address. Here are the domains and hostnames used in this example:
- The domain is practiceandlearn.in.
- The server hostname is jain.practiceandlearn.in.
- The hostname should be pointed to the Server IP address.
To use this hostname, you will need to create a virtual host. Once completed, make a directory for your hostname using the following command.
ubuntu@jain:~$ sudo mkdir /var/www/sudo mkdir /var/www/jain.practiceandlearn.inNow, you need to set the ownership to your user, then add the correct permission using the following commands.
ubuntu@jain:~$ sudo chown -R ubuntu. /var/www/jain.practiceandlearn.inubuntu@jain:~$ sudo chmod -R 755 /var/www/jain.practiceandlearn.inYou can switch to your virtual host and open/create the configuration file using your favorite editor. This tutorial uses Vim.
ubuntu@jain:~$ sudo vi /etc/apache2/sites-available/jain.practiceandlearn.in.confIn the virtual host configuration file, you can establish some basic directives. Replace our hostname and domain with yours.
<VirtualHost *:80>
    ServerAdmin webmaster@localhost
    ServerName jain.practiceandlearn.in
    ServerAlias www.jain.practiceandlearn.in
    DocumentRoot /var/www/jain.practiceandlearn.in
    ErrorLog ${APACHE_LOG_DIR}/error.log
    CustomLog ${APACHE_LOG_DIR}/access.log combined
</VirtualHost>
Once all information is entered, save and close the file by pressing Esc to switch to normal mode, type :wq, and press Enter.
To enable your configuration file, use the following command.
ubuntu@jain:~$ sudo a2ensite jain.practiceandlearn.in.conf
Enabling site jain.practiceandlearn.in.
To activate the new configuration, you need to run:
  systemctl reload apache2
ubuntu@jain:~$
You also must disable the default site configured in 000-default.conf.
ubuntu@jain:~$ sudo a2dissite 000-default.conf
Site 000-default disabled.
To activate the new configuration, you need to run:
  systemctl reload apache2
ubuntu@jain:~$
Once the modification is completed, you can test your website configuration to make sure there are no Apache syntax errors.
ubuntu@jain:~$ sudo apache2ctl configtest
Syntax OK
ubuntu@jain:~$
Once the syntax is verified, you can safely proceed with a restart.
ubuntu@jain:~$ sudo systemctl restart apache2Secure the Webmin Installation By Requesting Your SSL Certificate.
Now that you have a proper virtual host and DNS configured for your hostname, you can request the Webmin SSL certificate.
From the Webmin portal, on the left-side menu of the dashboard, select Webmin Configuration.

Click on SSL Encryption.

Once opened, select Let’s Encrypt from the menu. This is where you will order an SSL certificate.
In the hostname field, enter your server hostname. Then, enter your website root directory in the Other directory field. The other fields can be left in the default setting. Click the Request Certificate button to install the certificate.

If successful, you’ll get the following message.

Wrapping Up
Now you have a fully secure Webmin control panel with a valid hostname and SSL to manage your Ubuntu server. Webmin helps you to complete various tasks that usually need to be done from the server console. It also allows you to setup PHP in Webmin.
The managed hosting experience is available with Liquid Web via our VPS hosting, cloud dedicated servers, and dedicated servers. Contact our sales team today for more information.