


Vue JS CLI 3 (Vue 3) Part 3
In the third part of our series, we will be using the Vue.js framework to create a simple project to demonstrate how easily this can be accomplished.
Create A Vue 3 Project
To create a new Vue 3 project, we will use the following command :
[lwvuejs@host ~]# vue create lwvuejs-default ( lwvuejs-default represents the name of the project )
The project is named as such since we will use the default presets option. You can name your project whatever you would like if following along. The command above should provide us the output as pictured below:
Vue CLI v3.0.5
? Please pick a preset: (Use arrow keys)
❯ default (babel, eslint)
 Manually select features
Since we do not have any custom presets configured, the output above only allows us to choose the default configuration. If there were additional custom presets deployed, they would be visible here.
Next, we press 'Enter' and then proceed with the project creation. After a few moments, the output of the 'create' command should appear similar to the activity below:
Vue CLI v3.0.5
✨ Creating project in /home/temp/public_html/lwvuejs-default.
⚙ Installing CLI plugins. This might take a while...


> yorkie@2.0.0 install /home/temp/public_html/lwvuejs-default/node_modules/yorkie
> node bin/install.js

setting up Git hooks
Done

> core-js@2.6.10 postinstall /home/temp/public_html/lwvuejs-default/node_modules/core-js
> node postinstall || echo "ignore"


> ejs@2.7.4 postinstall /home/temp/public_html/lwvuejs-default/node_modules/ejs
> node ./postinstall.js

added 1195 packages from 930 contributors and audited 24076 packages in 21.084s
found 0 vulnerabilities

🚀 Invoking generators...
📦 Installing additional dependencies...

added 36 packages from 29 contributors, updated 2 packages, moved 9 packages and audited 24363 packages in 8.684s
found 0 vulnerabilities

⚓ Running completion hooks...

📄 Generating README.md...

🎉 Successfully created project lwvuejs-default.
👉 Get started with the following commands:

 $ cd lwvuejs-default
 $ npm run serve

[lwvuejs@host public_html]#
If all went well and no errors appeared, we can change directories into our new project folder.
[lwvuejs@host public_html]# cd lwvuejs-default/
[root@host lwvuejs-default]#
If we list the contents of the folder it should look similar to this:
[lwvuejs@host lwvuejs-default]# ll
total 488
-rw-r--r-- 1 lwvuejs lwvuejs 53 Nov 19 18:17 babel.config.js
drwxr-xr-x 819 lwvuejs lwvuejs 28672 Nov 19 18:17 node_modules
-rw-r--r-- 1 lwvuejs lwvuejs 913 Nov 19 18:17 package.json
-rw-r--r-- 1 lwvuejs lwvuejs 443119 Nov 19 18:17 package-lock.json
drwxr-xr-x 2 lwvuejs lwvuejs 4096 Nov 19 18:17 public
-rw-r--r-- 1 lwvuejs lwvuejs 277 Nov 19 18:17 README.md
drwxr-xr-x 4 lwvuejs lwvuejs 4096 Nov 19 18:17 src
[lwvuejs@host lwvuejs-default]#
This will be similar to the file listings we had with the older CLI version. If we check the contents of the package.json file using the cat command, we should see the following contents:
@vue/cli-plugin-: This output shows that the plugins that were used by the default preset were babel and eslint, as mentioned earlier.
@vue/cli-service-: This output indicates that the binary files called vue CLI service were installs inside of our project. This binary is used to spin up the local development server, build our app for production, or to inspect the webpack config file.
Dev Server
Next, we will start a development server. We can use the following command to accomplish this:
[lwvuejs@host lwvuejs-default]# npm run serve

> lwvuejs-default@0.1.0 serve /home/temp/public_html/lwvuejs-default
> vue-cli-service serve

 INFO Starting development server...
98% after emitting CopyPlugin

 DONE Compiled successfully in 2378ms 6:37:57 PM


  App running at:
  - Local: http://localhost:8080/
  - Network: unavailable

  Note that the development build is not optimized.
  To create a production build, run npm run build.
This command should provide output similar to the above activity.
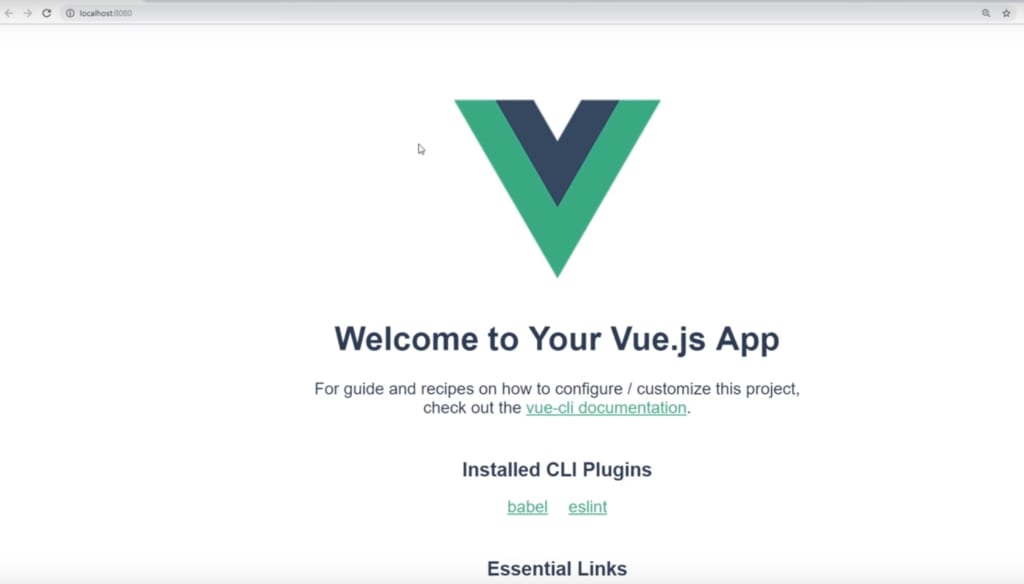
A development environment is only applicable if you are installing and using vue JS on a local computer. Once the above command is entered, you can browse to the link https://localhost:8080/, and you should see an interface like the one below in your browser:
If you get the error “This site can’t be reached”, double check your firewall to ensure port 8080 is open.
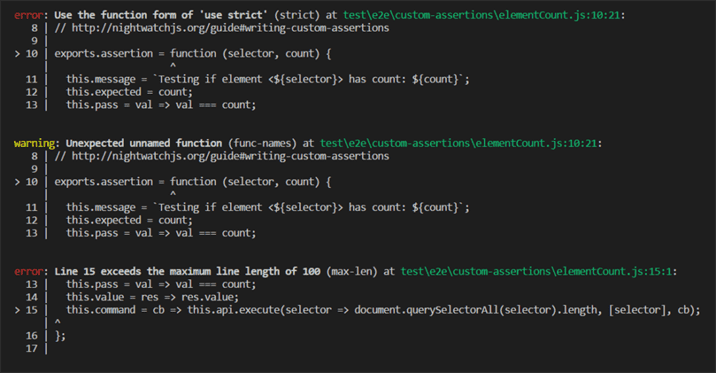
Debug The Application With ESLINT
Basic code debugging is accomplished by issuing the following command :
[lwvuejs@host lwvuejs-default]# npm run lint If there are no errors seen, the output should appear like so:
[root@host lwvuejs-default]# npm run lint

> lwvuejs-default@0.1.0 lint /home/temp/public_html/lwvuejs-default
> vue-cli-service lint

 DONE No lint errors found!
[root@host lwvuejs-default]#
If there are any errors, it will be similar to the ones seen in the image below.
Building The Application For The Live Production Server
To build the app for a live production server, we can use the following command:
[root@host lwvuejs-default]# npm run build

> lwvuejs-default@0.1.0 build /home/temp/public_html/lwvuejs-default
> vue-cli-service build


⠸ Building for production...

 DONE Compiled successfully in 4175ms 3:00:49 PM

 File Size Gzipped

 dist/js/chunk-vendors.deb8a740.js 82.98 KiB 29.99 KiB
 dist/js/app.442d56b7.js 4.64 KiB 1.66 KiB
 dist/css/app.e2713bb0.css 0.33 KiB 0.23 KiB

 Images and other types of assets omitted.

 DONE Build complete. The dist directory is ready to be deployed.
 INFO Check out deployment instructions at https://cli.vuejs.org/guide/deployment.html

[root@host lwvuejs-default]#
After a few moments, the build should compile the application for the production server and create the folder named dist inside our project directory.
[root@host lwvuejs-default]# ll
total 492
-rw-r--r-- 1 root root 53 Nov 19 18:17 babel.config.js
drwxr-xr-x 5 root root 4096 Nov 20 15:00 dist
drwxr-xr-x 820 root root 28672 Nov 19 18:37 node_modules
-rw-r--r-- 1 root root 913 Nov 19 18:17 package.json
-rw-r--r-- 1 root root 443119 Nov 19 18:17 package-lock.json
drwxr-xr-x 2 root root 4096 Nov 19 18:17 public
-rw-r--r-- 1 root root 277 Nov 19 18:17 README.md
drwxr-xr-x 4 root root 4096 Nov 19 18:17 src
[root@host lwvuejs-default]#
The dist folder contains the production files for the application, and its contents can then safely be moved to domains public_html so the app can be viewed by visiting the domains main public_html link.
Custom Presets For Webpack
In this section, we will create a custom preset for a new project called lwvuejs-custom. To create a second project, we need to go back to the domain’s Document Root.
[root@host lwvuejs-default]# cd /home/$USER/public_html
-or-
root@host lwvuejs-default]# cd ..
After that, create a new project with command :
[root@host]# vue create lwvuejs-custom On the next screen, select the “Manually select features” by clicking the arrow down key on your keyboard and pressing the Enter button.
Vue CLI v3.0.5
? Please pick a preset:
 default (babel, eslint)
❯ Manually select features
After we choose the Manually select features option and press enter, we can choose additional options by selecting them with the Space bar on the keyboard. Example:
Vue CLI v3.0.5
? Please pick a preset: Manually select features
? Check the features needed for your project:
 ◯ Babel
 ◯ TypeScript
 ◯ Progressive Web App (PWA) Support
 ◉ Router
 ◉ Vuex
 ◉ CSS Pre-processors
 ◉ Linter / Formatter
 ◯ Unit Testing
❯◯ E2E Testing
(Chosen options are Router, Vuex, CSS Pre-processors, and Linter)
After selecting those options, press Enter. Now, we will need to answer a few questions regarding those options chosen above.
Vue CLI v3.0.5
? Please pick a preset: Manually select features
? Check the features needed for your project: Router, Vuex, CSS Pre-processors, Linter
? Use history mode for router? (Requires proper server setup for index fallback in production) (Y/n) Y
We answer with 'Y' here.
? Pick a CSS pre-processor (PostCSS, Autoprefixer and CSS Modules are supported by default): (Use arrow keys)
❯ Sass/SCSS
 Less
 Stylus
We will select the first option here, so we will choose 'Sass/SCSS'.
? Pick a linter / formatter config: (Use arrow keys)
❯ ESLint with error prevention only
  ESLint + Airbnb config
  ESLint + Standard config
  ESLint + Prettier
We will also choose the first option on this one.
'ESLint with error prevention only'
? Pick additional lint features: (Press <space> to select, <a> to toggle all, <i> to invert selection)
◉ Lint on save
◯ Lint and fix on commit
Also, we choose the first option by pressing Enter.
'Lint on save'
? Where do you prefer placing config for Babel, PostCSS, ESLint, etc.? (Use arrow keys)

❯ In dedicated config files
  In package.json
Choosing the dedicated config files on this step will make a separate config file for each of those options. This can further assist with the reconfiguration to make it that much easier.
? Save this as a preset for future projects? (y/N)If we choose Yes on this question, we will be asked to provide a name for our preset, which we can later use in future projects. We will answer with 'Yes' to this option and name it "lwvuejs-custom."
After providing the name and pressing 'Enter,' it will take some time to create the project.
And that’s it! We have created our first custom preset for Vue JS.
Below, you can see the difference between the default options in babel and eslint, and the custom preset we have just created:
| Default Options | Custom Preset |
| babel.config.js | .browserslistrc |
| dist | .eslintrc.js |
| .git | .git |
| .gitignore | .gitignore |
| node_modules | node_modules |
| package.json | package.json |
| package-lock.json | package-lock.json |
| public | postcss.config.js |
| README.md | public |
| src | README.md |
| src |
The files marked in Blue on the right side of the table are the specific options configuration files which can be used to further configure those options.
Instant Prototyping
Instant prototyping is one of the best features that ease the testing of a single component without having to set up and configuring a whole new project just to test the component. Also, It’s only applicable if you are using a Local Development Environment.
But to be able to do this, we would need to install the 'cli-service-global' module anywhere on your computer. We will install this module as the root user.
We start by using the 'su' command to switch to the root user:
(assuming you originally logged into the server as a user)
[root@host]# su root The command to install the cli-service is:
[root@host]# npm install -g @vue/cli-service-global@3.0.5(Since we are using CLI 3 Version, we'll use the 3.0.5 version)
The output of the command should be similar to this:
[root@host ~]# npm install -g @vue/cli-service-global@3.0.5

> yorkie@2.0.0 install /usr/lib/node_modules/@vue/cli-service-global/node_modules/yorkie
> node bin/install.js

setting up Git hooks
trying to install from sub 'node_module' directory, skipping Git hooks installation

> core-js@2.6.10 postinstall /usr/lib/node_modules/@vue/cli-service-global/node_modules/core-js
> node postinstall || echo "ignore"

Thank you for using core-js ( https://github.com/zloirock/core-js ) for polyfilling JavaScript standard library!

The project needs your help! Please consider supporting of core-js on Open Collective or Patreon:
> https://opencollective.com/core-js
> https://www.patreon.com/zloirock

Also, the author of core-js ( https://github.com/zloirock ) is looking for a good job -)


> ejs@2.7.4 postinstall /usr/lib/node_modules/@vue/cli-service-global/node_modules/ejs
> node ./postinstall.js

Thank you for installing EJS: built with the Jake JavaScript build tool (https://jakejs.com/)

npm WARN optional SKIPPING OPTIONAL DEPENDENCY: fsevents@1.2.9 (node_modules/@vue/cli-service-global/node_modules/fsevents):
npm WARN notsup SKIPPING OPTIONAL DEPENDENCY: Unsupported platform for fsevents@1.2.9: wanted {"os":"darwin","arch":"any"} (current: {"os":"linux","arch":"x64"})

+ @vue/cli-service-global@3.0.5
added 1198 packages from 930 contributors in 41.868s
[root@host ~]#
Now we can create a test component called 'test.vue' inside our public_html directory with the following command:
[root@host public_html]# touch testcomponent.vueAnd then, we can test it with the following command:
[root@host public_html]# vue serve testcomponent.vue The command above will spin up a development server and present you with the output similar to the code below.
 DONE  Compiled successfully in 1176ms                                                                                 12:09:03 PM


  App running at:
  - Local:   http://localhost:8080/
  - Network: unavailable

  Note that the development build is not optimized.
  To create a production build, run npm run build.
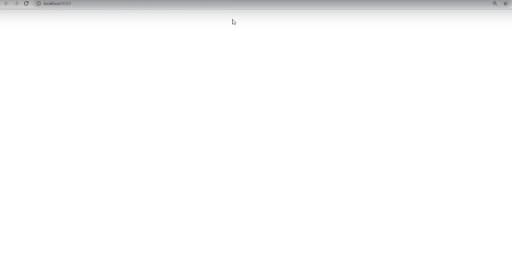
By clicking on the link, (http://localhost:8080/) it should show us only this specific component if there is any content. In this case, since we did not supply the component with any content, it will show up as a blank page.
This option is the new and improved way to test for relevant changes on specific components without interfering with the original ones.
This concludes the article on creating a simple project using Vue.JS.
Want To Join An Elite Group Of Experts? Find Out if You Have What It Takes!
Liquid Web has some of the most powerful servers in the industry! Our infrastructure has been built from the ground up for speed, stability, security, and redundancy. This is one of the main reasons that experts who know what we bring to the table, choose Liquid Web.

Related Articles:


About the Author: Nickolas Newell


Our Sales and Support teams are available 24 hours by phone or e-mail to assist.
Latest Articles
How to use kill commands in Linux
Read ArticleChange cPanel password from WebHost Manager (WHM)
Read ArticleChange cPanel password from WebHost Manager (WHM)
Read ArticleChange cPanel password from WebHost Manager (WHM)
Read ArticleChange the root password in WebHost Manager (WHM)
Read Article