Using Telepresence to Improve Microservice Development

What is Telepresence?
Initially developed by Datawire, Telepresence is a new open-source tool supported by the CNCF (Cloud Native Computing Foundation). It allows developers to run local software while connected to a remote Kubernetes cluster. The application uses a two-way network proxy to simulate TCP connections, environmental variables, and other volumes of services as local processes. This link allows for remote work to be accomplished while seemingly local to the cluster via the proxied connection.
This software allows developers to:
- Improve development speed even if the local service we are working on depends on our cluster's other remote services.
- Utilize a local tool to test, edit, or debug a service.
- Allow a local computer to operate as if it is part of a Kubernetes cluster.
Why Use Telepresence?
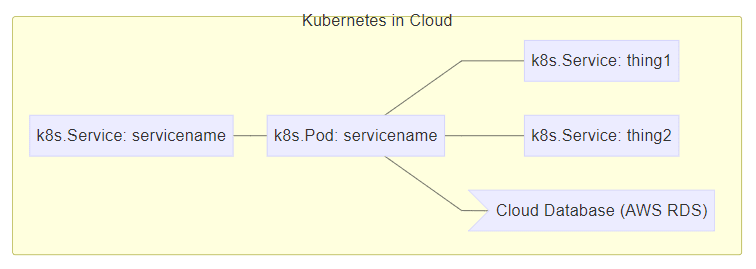
Let's assume that we have a remote service that listens on port 8080 with a Dockerfile. This Dockerfile builds into an image called examplecom/servicename. Additionally, our service depends on other Kubernetes service instances (called thing1 and thing2) and a cloud-based database.
Our Kubernetes staging environment will look something like this:

Credit to: telepresence.io
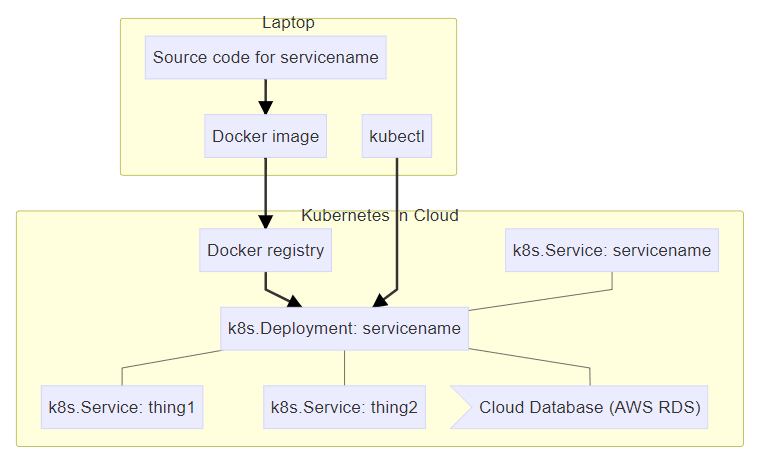
Since we need that cloud-based database and the two additional services to test our software, we will need to accomplish the following tasks to examine a code change:
- Change our code locally.
- Build a Docker image from that change.
- Push the Docker image to a Docker registry located in the cloud.
- Update the cluster staging environment to use the new image.
- Wait for the image to download.

Credit to: telepresence.io
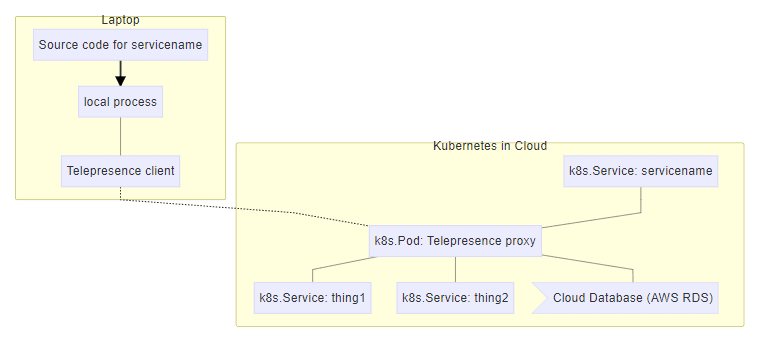
Telepresence alleviates the inherent sluggishness in this process by running our code locally, as a typical process, which then forwards those requests to/from the Kubernetes cluster.

Credit to: telepresence.io
This app increases the speed of development. We only have to change our code and restart our process. Additionally, since multiple web development frameworks automatically reload the code, we will not need to restart the process.
Install Telepresence
Telepresence has native packages on multiple operating systems, including macOS X and various Linux distributions.
macOS X
To install telepresence on macOS X, run the following commands.
 root@host:~# brew cask install osxfuse
 root@host:~# brew install datawire/blackbird/telepresence
Debian/Ubuntu
To install Telepresence on an Ubuntu server, run the following commands.
root@host:~# curl -s https://packagecloud.io/install/repositories/datawireio/telepresence/script.deb.sh | sudo bashIf using a Debian-based distro with Python 3.5 installed, and it is running as the python3 command, the docs state we may use the Ubuntu 16.04 (Xenial) packages. The following installation process works on Linux Mint 18.2 (Sonya) and Debian 9 (Stretch). These commands force the PackageCloud installer to access the Ubuntu 16.04 packages.
root@host:~# curl -sO https://packagecloud.io/install/repositories/datawireio/telepresence/script.deb.sh
root@host:~# env os=ubuntu dist=xenial bash script.deb.sh
root@host:~# apt install --no-install-recommends telepresence
root@host:~# rm script.deb.sh
A comparable method may work on Debian-based distributions running Python 3.6 using the Ubuntu 17.10 packages.
CentOS/Fedora
On a CentOS 8 server, we can install the software using these commands.
root@host:~# curl -s https://packagecloud.io/install/repositories/datawireio/telepresence/script.rpm.sh | sudo bash
root@host:~# dnf install telepresence
CentOS 7
For CentOS 7, an additional method may be used employing the following script.
Source Install
For a source installation, we can use Git to clone the software locally. On systems running Python 3.5+, we can install the software into our /usr/local/share/telepresence folder and then copy the binary into /usr/local/bin by running the following commands.
root@host:~# mkdir /usr/local/share/telepresence
root@host:~# cd /usr/local/share/telepresence
root@host:~# git clone https://github.com/telepresenceio/telepresence.git
root@host:~# env PREFIX=/usr/local ./install.sh
Dependencies
Next, we must install the dependencies to complete the process. If installing Telepresence using one of the pre-built packages, the dependencies (other than kubectl) are handled by the package manager, so those options are the preferred installation method. If we do a source install, we will also need to install the following software:
- kubectl (OpenShift users can use oc).
- Python 3.5 or newer.
- OpenSSH (the ssh command).
- sshfs to mount the pod's filesystem.
- conntrack and iptables on Linux for the vpn-tcp method.
- torsocks for the inject-tcp method.
- Docker for the container method.
- sudo to allow Telepresence to:
- Modify the local network (via sshuttle and pf/iptables) for the vpn-tcp method.
- Run the docker command in some configurations on Linux.
- Mount the remote filesystem for access in a Docker container.
If needed, the software can be installed in a different location by adjusting the environment variables before calling the installation script. Review the script below for more specific information.
After installation, we can delete the source code.
Connecting to a Cluster
Our next task involves connecting the software to our cluster. To accomplish this, we need to run a proxy inside the cluster. There are three methods for performing this.
Method 1: Create a New Deployment
This method involves using the --new-deployment option, which allows telepresence to create a new deployment for us. It should be noted that this connection will be deleted when the local telepresence process ends. This framework is the typical deployment method if no default is specified.
The following command creates a deployment called mylw.
root@local:~# telepresence --new-deployment mylw --run-shellThis command creates two Kubernetes objects, both named mylw:
- Deployment
- Service
If we choose not to name the Deployment, we use the following command.
root@host:~# telepresence --run-shellIf telepresence crashes badly enough (e.g., you used kill -9), you will need to delete the Deployment and Service objects that Telepresence created.
Method 2: Swapping out an existing deployment
If we already have our code running in the cluster, we can use the --swap-deployment flag to reconstruct the existing deployment with the Telepresence proxy. When the Telepresence process exits, it restores the earlier state of the Deployment.
root@host:~# telepresence --swap-deployment mylw --run-shellIf we have more than one container in the pods created by the deployment, we can also specify the container name:
root@host:~# telepresence --swap-deployment mylw:newname --run-shellIf telepresence crashes badly enough (e.g., you used kill -9), you will need to restore the Deployment manually.
Method 3: Running Telepresence manually
Lastly, we can manually run the Telepresence software by starting a Deployment that runs the proxy in a pod. The Deployment should only have one replica and use a different Telepresence image.
apiVersion: extensions/v1beta1
kind: Deployment
metadata:
  name: myservice
spec:
  replicas: 1 # only one replica
  template:
    metadata:
      labels:
        name: myservice
    spec:
      containers:
      - name: myservice
        image: datawire/telepresence-k8s:0.108 # new image
We should also add this file to our cluster via the kubectlcommand.
root@host:~# kubectl apply -f telepresence-deployment.yamlNow, we need to run the local Telepresence client on your machine, using the --deployment flag to indicate the name of the Deployment object whose pod is running telepresence/datawire-k8s:
root@host:~# telepresence --deployment mylw --run-shellThis way, Telepresence leaves the deployment intact when it exits.
Conclusion
Telepresence is a new and innovative method for developers to natively interact with a remote system. It uses a two-way network proxy to simulate TCP connections, environmental variables, and other volumes of services as local processes. We can natively react with the remote services, so the code is accessed as if it were being modified within a normal pod inside the cluster. Finally, it allows us to quickly implement changes, which increases the overall speed of the development cycle. Telepresence is licensed under the Apache 2.0 License.
Related Articles:
- Change cPanel password from WebHost Manager (WHM)
- Blocking IP or whitelisting IP addresses with UFW
- Fail2Ban install tutorial for Linux (AlmaLinux)
- How to set up NGINX virtual hosts (server blocks) on AlmaLinux
- Integrating Cloudflare Access with a Bitwarden instance
- How to install Yarn on Linux (AlmaLinux)

About the Author: David Singer
I am a g33k, Linux blogger, developer, student, and former Tech Writer for Liquidweb.com. My passion for all things tech drives my hunt for all the coolz. I often need a vacation after I get back from vacation....
Our Sales and Support teams are available 24 hours by phone or e-mail to assist.
Latest Articles
Change cPanel password from WebHost Manager (WHM)
Read ArticleChange cPanel password from WebHost Manager (WHM)
Read ArticleChange cPanel password from WebHost Manager (WHM)
Read ArticleChange cPanel password from WebHost Manager (WHM)
Read ArticleChange the root password in WebHost Manager (WHM)
Read Article


