


How to Use Disk Quotas in Dedicated Linux Servers With cPanel
- Use Disk Quotas in Dedicated Linux Servers
- How to Use Disk Quotas in Dedicated Linux Servers With cPanel
- How to Use Disk Quotas in Dedicated Linux Servers with Plesk
Disk space management in dedicated Linux servers with cPanel is an often underestimated necessity. This tutorial shows how to manage disk space in your cPanel dedicated server.
The maximum amount of disk space that an account can use on your cPanel server is specified by the disk quota. You can access WHM and create multiple cPanel accounts if you have a Reseller, VPS, or Dedicated hosting plan. For each of those accounts, you can have unique cPanels, and you may choose a storage quota when you build it.
What Does Disk Quota Do?
System administrators can limit the number of files and data blocks assigned to users or groups using the disk quota mechanism. In a multi-user scenario, setting up such a limit stops users from filling the file system, which helps prevent a server or share from becoming overloaded with data while allowing other users to save files. Disk quotas are used to allocate constrained disc space rationally.
What Are the Two Types of Disk Quotas?
The disk quotas are mainly of 2 types. The first restricts how much disc space can be used and is known as usage quota or block quota. The second restricts the number of files and directories that can be generated, known as inode quota or file quota.
Administrators typically set a warning level or soft quota. Users are alerted that they are nearing the limit, usually lower than the limit or hard quota. Soft quotas are flexible and allow users to exceed the limit for a period of time, but when they do so, the system provides warnings. Hard quotas are restrictive and define a precise limit.
Using Disk Quotas on a cPanel Dedicated Server
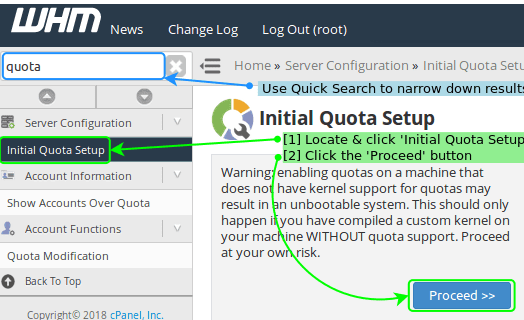
Step 1: cPanel Initialize Quota Setup
Before taking full advantage of disk quotas, you must first initialize them. cPanel makes enabling Disk Quotas on your servers as easy as pointing and clicking.
1. Click Initial Quota Setup.
2. Click the Proceed button.
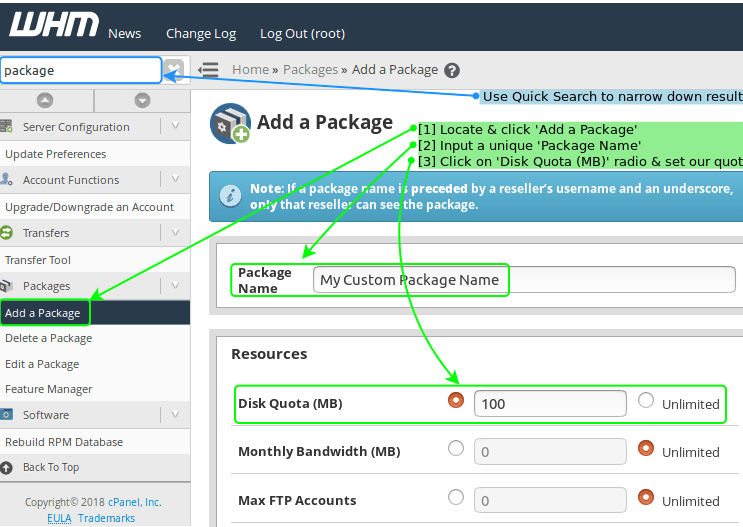
Step 2: Creating cPanel Packages
cPanel provides a built-in package feature. These packages are predefined limitations, which are assignable to any customer. Disk quota is one of several limits to set using this package's feature. Once the packages are created, they are usable in several ways. Package selection upon Account Creation, using the Quota Modification or the Modify an Account tool. All of these methods are outlined below.
Creating a package is a simple process that starts with logging into your WHM interface.
1. Locate and click Add a Package.
2. Input a unique package name.
3. Click the Disk Quota (MB) radio button.
4. Set the necessary quota limit.
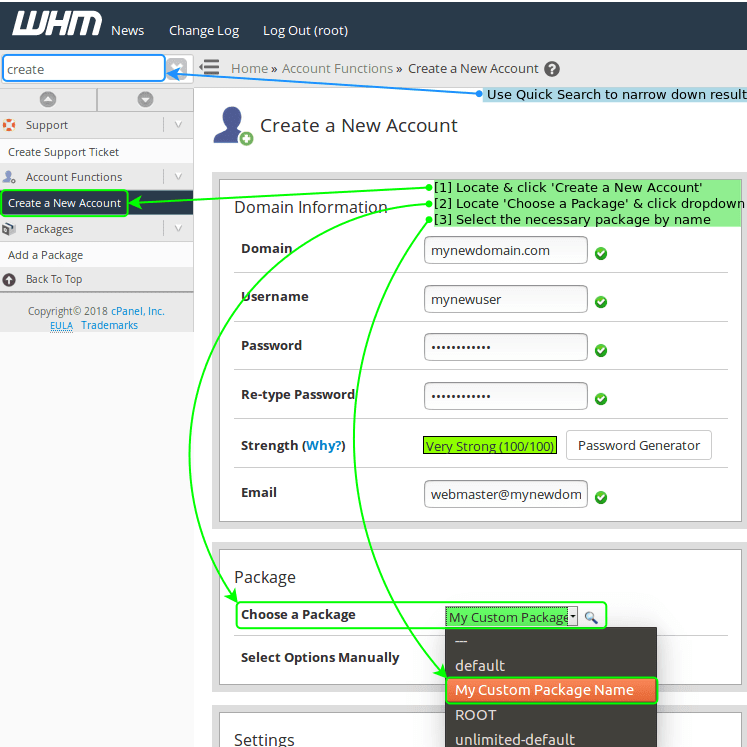
Step 3: Package Selection
Package Selection at Account Creation
1. Locate and click Create a New Account.
2. Click the Choose a Package dropdown.
3. Select the necessary package name.
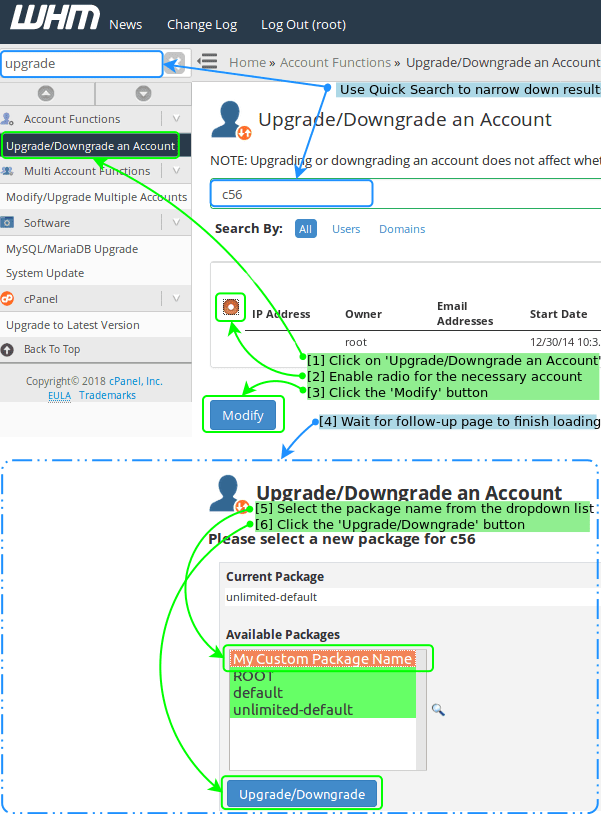
Package Selection Using Upgrade/Downgrade an Account
1. Click Upgrade/Downgrade an Account.
2. Click the radio button for the necessary account.
3. Click the Modify button and wait for the follow-up page to finish loading.
4. Select the package name from the dropdown list.
5. Click the Upgrade/Downgrade button.
Step 4: cPanel Packageless Quotas
cPanel is not restricted to using the packages feature. You can set quotas per cPanel account without creating any packages. This can be achieved at account creation using the Modify Quota tool or the Modify an Account tool. These methods are outlined below.
Packageless Quota at Account Creation
1. Locate and click Create a New Account.
2. Click the Select Options Manually radio button.
3. Click the Disk Space Quota (MB) radio button.
4. Input the necessary quota value.

Packageless Quota Using Quota Modification
1. Find and click Quota Modification.
2. Locate the needed account and click the radio button.
3. Click the Modify button and wait for the follow-up page to finish loading.
4. Click the custom quota radio button.
5. Input the needed quota value and click the Save button.
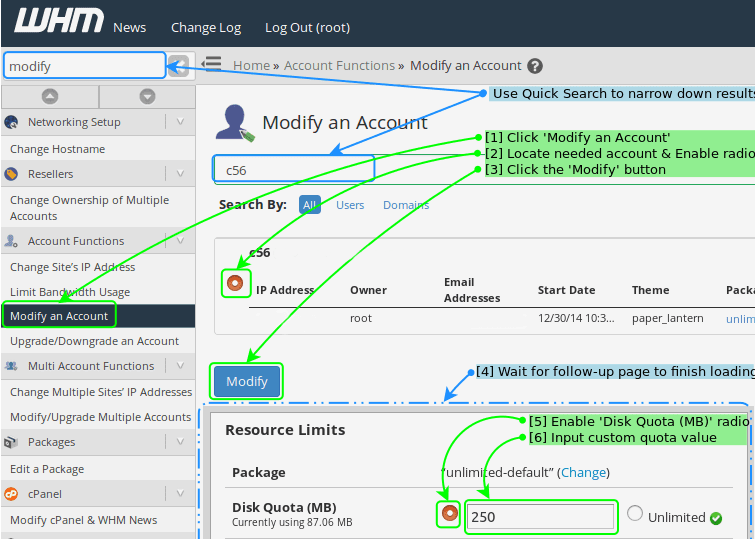
Packageless Quota Using Modify an Account
1. Click Modify an Account.
2. Locate the needed account and click the radio button.
3. Click the Modify button and wait for the follow-up page to finish loading.
4. Click the Disk Quota (MB) radio button.
5. Assign the custom quota as needed.
What Do You Do When You Have Reached Your Disk Quota?
When you attempt to upload a file, update the database, or send an email from within your control panel, you could occasionally receive the Disk quota exceeded error message in cPanel. This indicates that your account's disc space is full and that you must clear some space. Here are some steps to check disk space warnings and clear space from a cPanel account.
1. Check Your Disk Usage From cPanel
Utilize the cPanel disk usage tool to determine which directories use most of the space.
After logging in to your cPanel account, navigate to Files > Disk usage.
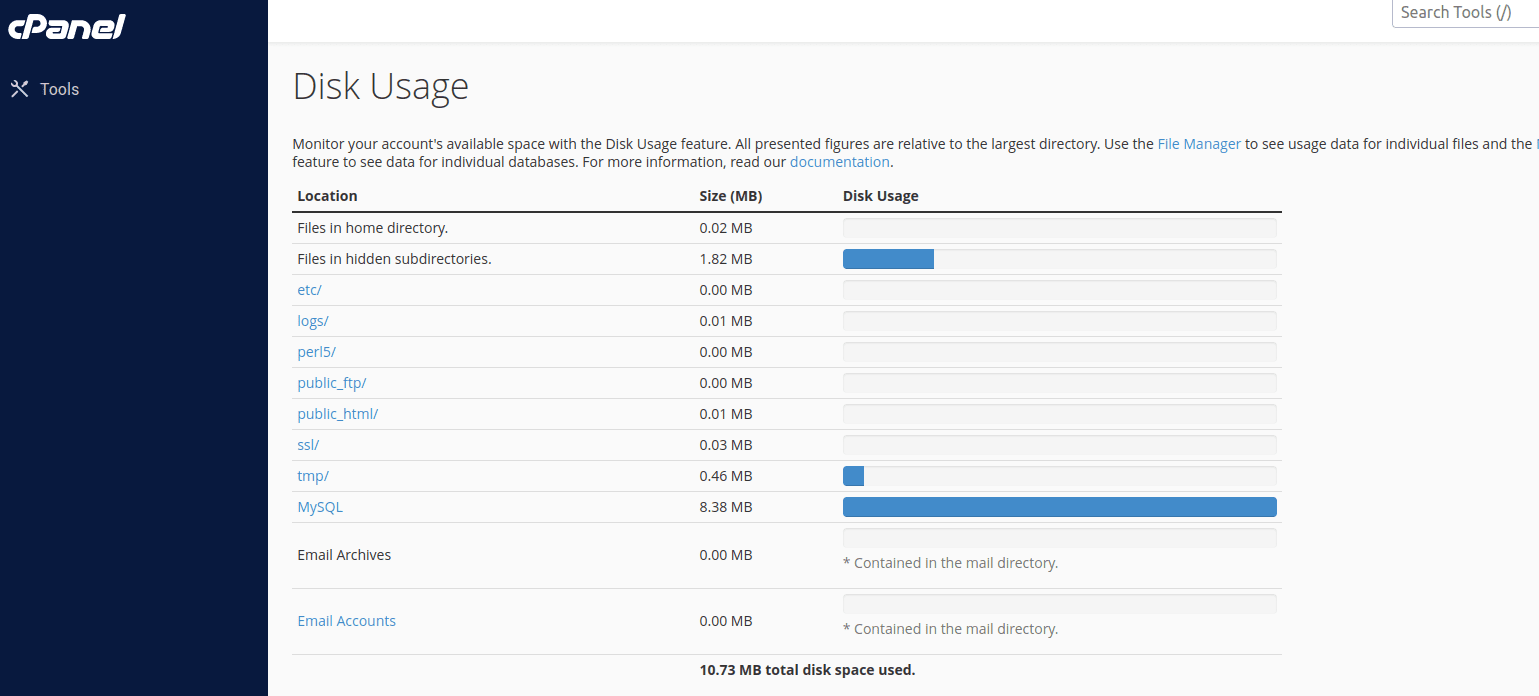
This gives a brief idea of which directories to concentrate on when you open your file manager. Per the screenshot, MySQL usage is high and needs attention.
In the following image, you can see a more detailed view of disk usage. For that, scroll downwards to the next section. It will display the explicit usage of each directory. You can keep browsing the directories to identify the folder or file you should delete from your file manager.

2. Check and Clear the Trash Folder
When you delete files and folders using the file manager directly, there's a probability they won't be entirely deleted, and you could still find them in the trash.
To completely remove the deleted files from the account, you can navigate to File Manager, select the .trash folder, and clear files inside the folder. You will also get an option to skip trash while deleting files from cPanel. In some cases .trash folder appears only when this option is enabled. You can enable hidden files from cPanel > File Manager > Settings > Show Hidden files.
3. Remove Unwanted Backups
In most cases, backup files occupy a significant portion of disk space allocated for an account. These backup files are compressed as a zip file and stored in the backup or snapshots directory. You can remove old and unwanted backups to free space. You'll get a confirmation window when you delete a folder or directory. Check the option to Skip the trash and permanently delete the files.
4. Clear Unwanted Emails
If you use the IMAP protocol in your mail client, a copy of emails will be stored on the server. In this case, you should delete the spam, junk, draft, and archives to free up more disc space. You may also remove old emails and unwanted attachments.
5. Clear cPanel Cache
You can clear the cPanel cache by deleting the contents of both the /tmp and /cache folders.
6. Remove Log Files
Check for large-sized log files and remove or compress them to free space. You may also enable proper log rotation to prevent logs from growing too big.
7. Delete Unused Website Applications/Files
Sometimes your app's installation files or early release versions may be left around. You may delete them to free space. Besides this, delete any unnecessary website files, media, themes, plugins, etc.
How Do I Reduce Disk Quota?
If you have a VPS server or dedicated cPanel server, you can follow the below steps:
1. WHM Quota Adjustment for Your Account
Ensure that email quotas are not set to unlimited for an account. Instead, configure a specific email account quota in the WHM > Packages > Modify package > Resources section so that disc space only gets filled partially by mail.
2. Add a New Location for the WHM Backups
For your WHM backups, you can add Google Drive as a remote storage location. Navigate to Backup Configuration > Extra Destinations > Destination Type > Google Drive and configure the backup location. To enter your API credentials, scroll down (client ID and client secret key). If you utilize this option, you can set your backup retention number to 1.
Final Thoughts
Managing disk utilization on dedicated Linux servers with cPanel requires dedicated server disk quotas. Disk quotas help prevent the server from running out of disk space by restricting how much disk space users or groups may use while guaranteeing that all users have equal access to resources. Therefore, monitoring disk utilization and modifying disk quotas is crucial for server administrators to ensure the server operates as it should.
Linux and Windows operating systems have cPanel as an option for VPS Hosting, Cloud Dedicated Servers, and Dedicated Servers. Disk quota management is only one of cPanel’s functions. Liquid Web also fully manages cPanel. Contact the sales staff to discuss your choices.
Related Articles:
- Using MySQL Command Line to Create a User
- How to Use Disk Quotas in Dedicated Linux Servers with Plesk
- Remove a MySQL User on Linux via Command Line
- Remove Permissions for a MySQL User on Linux via Command Line
- Grant Permissions to a MySQL User on Linux via Command Line
- Delete a MySQL or MariaDB Database via Command Line


About the Author: Sapta Upendran
Sapta is a passionate Linux system engineer, a voracious reader, a dexterous cook, and a wanderlust. She is also interested in technical and non-technical writing.


Our Sales and Support teams are available 24 hours by phone or e-mail to assist.
Latest Articles
How to use kill commands in Linux
Read ArticleChange cPanel password from WebHost Manager (WHM)
Read ArticleChange cPanel password from WebHost Manager (WHM)
Read ArticleChange cPanel password from WebHost Manager (WHM)
Read ArticleChange the root password in WebHost Manager (WHM)
Read Article