MySQL Performance: Converting MySQL to MariaDB
There are very few downsides to using MariaDB over standard MySQL. Our high-availability MariaDB’s have proven itself to be a worthy successor with easily mitigated drawbacks. As the last article in our series we will focus on upgrading to various MySQL and MariaDB version on the following servers:
CentOS 6/7
- MySQL to MariaDB on CentOS 6/7 with cPanel
- MySQL to MariaDB on CentOS 7 with Plesk Onyx 17
- MySQL 5.1-5.5 to MariaDB 5.5 on CentOS 6
- MariaDB 5.5 to MariaDB 10.0 on CentOS 6
Ubuntu 14.04/16.04
Choosing a MariaDB Upgrade Plan
Selecting the right upgrade plan requires determining which version of MySQL is running on the intended system. A universal method of determining what version of MySQL the server is currently running is to query the server itself to report the version. This works the same despite the Linux distribution running on the server:
mysql -h localhost -e 'SHOW VARIABLES LIKE "version"G'
Example Output:

~ $ mysql -h localhost -p -e 'SHOW VARIABLES LIKE "version"G'
 *************************** 1. row ***************************
 Variable_name: version
 Value: 5.5.61-MariaDB
Once you’ve identified your MySQL version, use the key below to locate the correct upgrade procedure for your particular server. Some versions of MySQL require upgrading to MariaDB 5.5 before upgrading to MariaDB 10.x versions.
Upgrading from MySQL to MariaDB
The upgrade process is similar between most server types. There are differences with the specific commands that are executed, but the overall procedure follows this General Upgrade Procedure:
- Schedule accurate downtime.
- Ensure adequate backups.
- Remove the existing MySQL binaries/packages.
- Install the correct MariaDB repository.
- Clear repository caches to expunge old package data.
- Install MariaDB packages via the system’s package manager.
- Start MariaDB by starting the MySQL service.
- Run MySQL upgrade script.
- Confirm MySQL databases are accessible and data is correct
We’ve included specific procedures below for various Liquid Web systems. Before choosing your applicable upgrade procedure, let us review the first two steps in the above General Upgrade Procedure. These steps are generally universal and are critical to the success of any maintenance plan.
Schedule Accurate Downtime
Scheduling proper maintenance windows to perform changes affecting production environments can be tricky. The maintenance event window must include enough time to perform all necessary tasks in the maintenance plan, plus any troubleshooting and extra time to complete the Reversion Plan if needed.
Ensure Adequate Backups
There is more to a maintenance backup plan than just backing up files and databases. It’s also necessary to form a Reversion Plan, which outlines the process to restore the environment to its original state before the start of the maintenance.
Maintenance events can sometimes lead to unforeseen issues with the alternative of reverting to backups. Having both a valid backup plan and a valid reversion plan to restore services is a critical component of successful maintenance. Below are outlines of both a Sample Backup Plan and a Sample Reversion Plan which can be used with this article’s upgrade procedure outlined.
Sample Backup Plan
Create a backup of all databases.
mysqldump --all-databases –add-drop-database > all-databases-backup.sql
This command has no visible output unless errors occur. The above command creates a single file backup of all databases used for easy restoration when using the –add-drop-database flag. This .sql file can re-import into MySQL for deletion and re-creations of all databases. The file created is named all-databases-backup.sql and will be needed later in the Sample Reversion Plan.


Create a backup of MySQL’s configuration file.
cp -p /etc/my.cnf{,.bak}
This command has no visible output unless errors occur. The above command will create an exact copy of /etc/my.cnf named /etc/my.cnf.bak which can be used to restore the configuration if needed.
Sample Reversion Plan
Step 1: Restore all databases into MySQL
mysql < all-databases-backup.sql
This command has no visible output unless errors occur. Step 2:Preserve existing config by renaming /etc/my.cnf to /etc/my.cnf.bak
mv -p /etc/my.cnf{,.bad}
This command has no visible output unless errors occur. Step 3: Copy the /etc/my.cnf.bak file to /etc/my.cnf
cp -p /etc/my.cnf{.bak,}
This command has no visible output unless errors occur. Step 4: Restart MySQL Service
service mysqld restart
Example Output:
~ $ service mysqld restart Stopping mysqld: [ OK ] Starting mysqld: [ OK ]

MySQL to MariaDB on CentOS 6/7 with cPanel
All Liquid Web cPanel server images include MariaDB 5.5 already installed. This includes both CentOS 6 and CentOS 7 server images. There is no need to upgrade unless the MariaDB 10.x series is required. For a manual upgrade, procedures as provided by MariaDB here: Upgrading from MariaDB 5.5 to MariaDB 10.0, otherwise, cPanel provides an easy point-&-click interface which does all the heavy lifting for you. Follow one of the procedures below in either ‘Text Only’ form or Graphical form.

cPanel MariaDB Upgrade Instructions:
Step A) Confirm backups are present before proceeding at the scheduled time.
Step B) Login to WHM and load the MySQL/MariaDB Upgrades page:
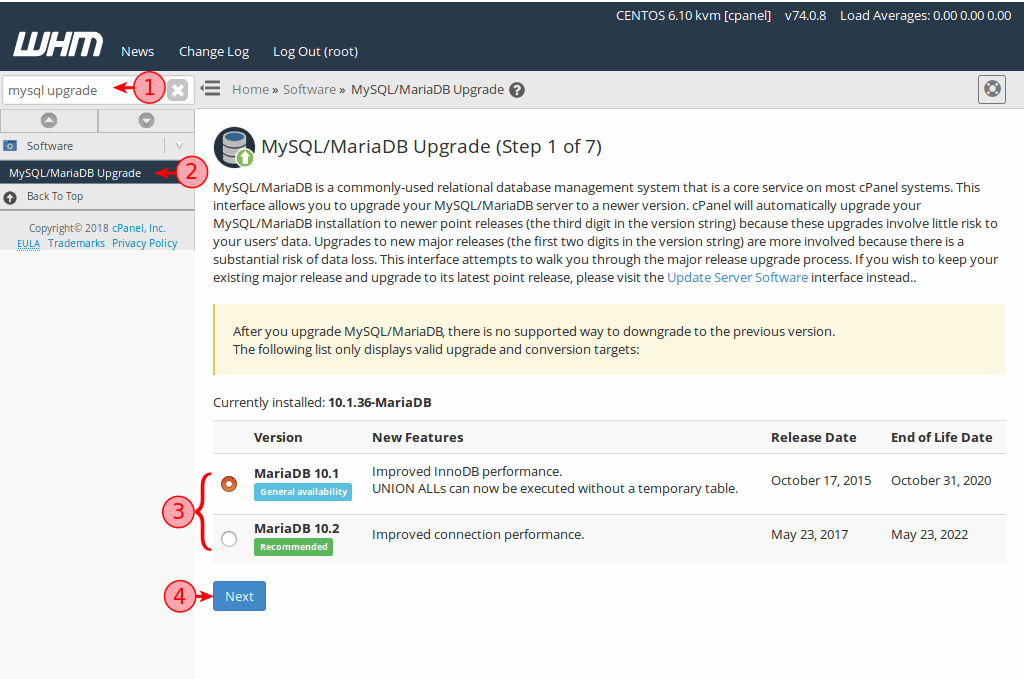
① Use the quick search box on the left and type in: mysql upgrade
② Locate and Click the MySQL/MariaDB Upgrades link.
③ Selected your desired version of MariaDB.
④ Click the Next button.
Step C) Wait for the “Upgrade Warnings” page to finish loading.

① Read & acknowledge each warning message by enabling each checkbox.
② Click the Continue button.
Step D) Wait for the “Upgrade Type” page to finish loading.
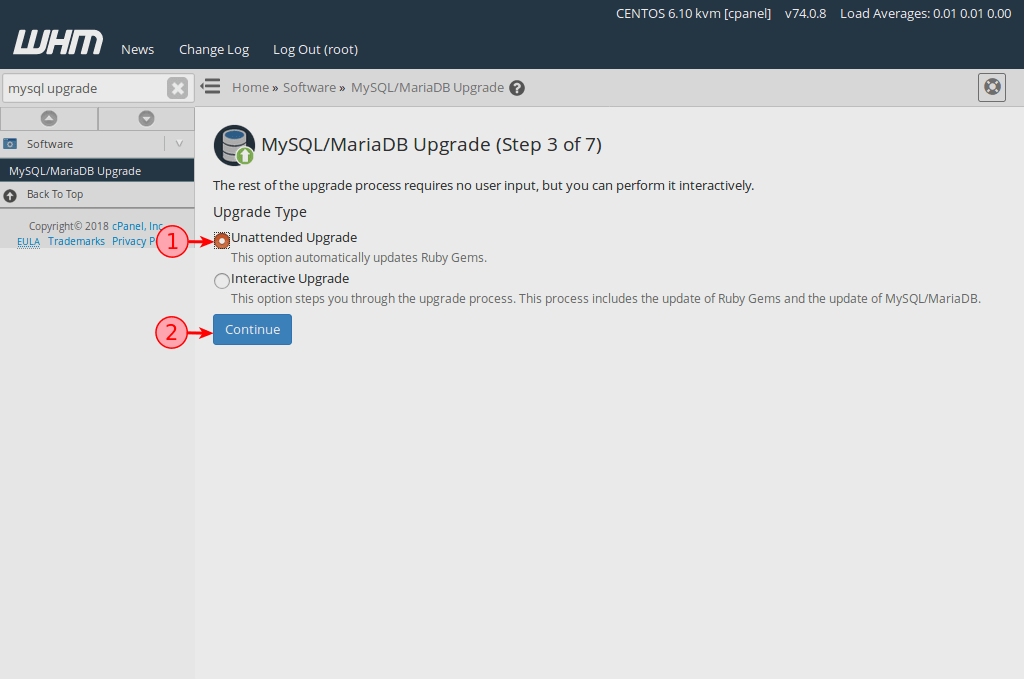
① Select Unattended Upgrade for a seamless upgrade experience.
② Click the Continue button.
Step E) Wait for the Upgrade Process to complete.
 MySQL to MariaDB on CentOS 7 with Plesk Onyx 17

All Liquid Web CentOS 7 server images include MariaDB 5.5 already installed, including our CentOS 7 Plesk Onyx 17 servers. There is no need to upgrade unless the MariaDB 10.x series is required. In these cases, follow the standard MariaDB Plesk Upgrade Procedures here: How to upgrade MySQL 5.5 to 5.6/5.7 or MariaDB 5.5 to 10.0/10.1/10.2 on Linux
MySQL 5.1-5.5 to MariaDB 5.5 on CentOS 6
Due to compatibility limitation, MySQL 5.1, 5.2, 5.3 and 5.5.x must be upgraded to MariaDB 5.5 and cannot be upgraded to MariaDB 10.0 directly. This upgrade plan will walk through getting any one of these deprecated MySQL versions upgraded to MariaDB 5.5. Once the upgrade to MariaDB 5.5 is complete, follow the How to upgrade MariaDB 5.5 to MariaDB 10.0 on CentOS 6 instructions to continue the upgrade process to MariaDB 10.
Step 1: Confirm backups are present before proceeding at the scheduled time.
Step 2: Stop the MySQL service.
service mysqld stop
Example Output:
~ $ service mysqld restart
Stopping mysqld: [ OK ]
Step 3: Install the MariaDB 5.5 repository for CentOS 6
The example URLs shown are subject to change.
cat < /etc/yum.repos.d/MariaDB.repoThis command has no visible output unless errors occur.
[mariadb]
name = MariaDB
baseurl = http://yum.mariadb.org/5.5/centos6-amd64
gpgkey=https://yum.mariadb.org/RPM-GPG-KEY-MariaDB
gpgcheck=1
EOF
Step 4: Clean the yum repository cache
yum clean all
Example Output:
~ $ yum clean all
 Loaded plugins: fastestmirror
 Cleaning repos: base extras mariadb updates
 Cleaning up Everything
 Cleaning up list of fastest mirrors
Step 5: Remove MySQL packages
yum remove mysql-server mysqlExample Output:
Running Transaction TestTruncated for brevity.
Transaction Test Succeeded
Running Transaction
Erasing : mysql-server-5.1.73-8.el6_8.x86_64 1/1
warning: /var/log/mysqld.log saved as /var/log/mysqld.log.rpmsave
Verifying : mysql-server-5.1.73-8.el6_8.x86_64 1/1
Removed:
mysql-server.x86_64 0:5.1.73-8.el6_8
Complete!
Step 6: Install the MariaDB-server and MariaDB-client packages via yum.
yum install MariaDB-server MariaDB-client -y
Example Output:Installed:Truncated for brevity.
MariaDB-client.x86_64 0:10.1.35-1.el6 MariaDB-compat.x86_64 0:10.1.35-1.el6 MariaDB-server.x86_64 0:10.1.35-1.el6
Dependency Installed:
MariaDB-common.x86_64 0:10.1.35-1.el6 boost-program-options.x86_64 0:1.41.0-28.el6
galera.x86_64 0:25.3.23-1.rhel6.el6 jemalloc.x86_64 0:3.6.0-1.el6
Replaced:
mysql-libs.x86_64 0:5.1.73-8.el6_8
Complete!
Step 7: Restart the MySQL service
service mysql startExample Output:
~ $ service mysql startStep 8: Run MySQL upgrade tool
Starting MariaDB.180808 18:21:13 mysqld_safe Logging to '/var/lib/mysql/cent6.hostname.err'.
180808 18:21:13 mysqld_safe Starting mysqld daemon with databases from /var/lib/mysql
SUCCESS!
mysql_upgradeExample Output:
~ $ mysql_upgradeTruncated for brevity.
MySQL upgrade detected
Phase 1/4: Fixing views from mysql
mysql
mysql.columns_priv OK
mysql.db OK
mysql.event OK
mysql.func OK
mysql.time_zone_leap_second OK
mysql.time_zone_name OK
mysql.time_zone_transition OK
mysql.time_zone_transition_type OK
mysql.user OK
Phase 4/4: Running 'mysql_fix_privilege_tables'
OK
Step 9: Confirm MariaDB server is running as expected
mysql -e 'SHOW VARIABLES LIKE "version"G'Example Output:
~ $ mysql -e 'SHOW VARIABLES LIKE "version"G'
 *************************** 1. row ***************************
 Variable_name: version
 Value: 5.5.61-MariaDB
Step 10: The upgrade is complete, check that your databases exist and are working.
[ Optional ] follow the How to upgrade MariaDB 5.5 to MariaDB 10.0 on CentOS 6 instructions.
MariaDB 5.5 to MariaDB 10.0 on CentOS 6
Step 1: Confirm backups are present before proceeding at the scheduled time.
Step 2: Remove all MariaDB packages.
yum remove MariaDB-*Example Output:Running Transaction TestTruncated for brevity.
Transaction Test Succeeded
Running Transaction
Erasing : MariaDB-server-5.5.61-1.el6.x86_64 1/2
Erasing : MariaDB-client-5.5.61-1.el6.x86_64 2/2
Verifying : MariaDB-server-5.5.61-1.el6.x86_64 1/2
Verifying : MariaDB-client-5.5.61-1.el6.x86_64 2/2
Removed:
MariaDB-client.x86_64 0:5.5.61-1.el6 MariaDB-server.x86_64 0:5.5.61-1.el6
Complete!
Step 3: Remove existing MariaDB repository.
rm -f /etc/yum.repos.d/MariaDB*.repoThis command has no visible output unless errors occur.
Step 4: Create MariaDB 10.O Yum repository file (example URLs are subject to change).
cat < /etc/yum.repos.d/MariaDB.repoThis command has no visible output unless errors occur.
[mariadb]
name = MariaDB
baseurl = http://yum.mariadb.org/10.0/centos6-amd64
gpgkey=https://yum.mariadb.org/RPM-GPG-KEY-MariaDB
gpgcheck=1
EOF
Step 5: Clean the Yum cache.
yum clean all
Example Output:
~ $ yum clean all
 Loaded plugins: fastestmirror
 Cleaning repos: base extras mariadb updates
 Cleaning up Everything
 Cleaning up list of fastest mirrors
Step 6: Install MariaDB-server and MariaDB-client package via Yum.
yum install MariaDB-server MariaDB-clientExample Output:
 Running Transaction Test
 Transaction Test Succeeded
 Running Transaction
 Installing : MariaDB-client-10.0.36-1.el6.x86_64                                                              1/2
 Installing : MariaDB-server-10.0.36-1.el6.x86_64                                                              2/2
 Verifying  : MariaDB-server-10.0.36-1.el6.x86_64                                                              1/2
 Verifying  : MariaDB-client-10.0.36-1.el6.x86_64                                                              2/2
 Installed:
 MariaDB-client.x86_64 0:10.0.36-1.el6                    MariaDB-server.x86_64 0:10.0.36-1.el6
 Complete!
Step 7: Start the MySQL Service.
service mysql start
Step 8: Run the MySQL Upgrade script.
mysql_upgrade
Step 9: The upgrade is complete, check that your databases exist and are working.
MySQL 5.1-5.5 to MariaDB 5.5 on Ubuntu 14.04
Step 1: Confirm backups are present before proceeding at the scheduled time.
Step 2: Install the MariaDB 5.5 repository with this one-liner it’ll install the necessary required tools (if missing), the Ubuntu 14.04 GPG key and the MariaDB 5.5 repository while updating the apt package caches.
sudo apt-get install software-properties-common -y
 sudo apt-key adv --recv-keys --keyserver hkp://keyserver.ubuntu.com:80 0xcbcb082a1bb943db
 sudo add-apt-repository 'deb [arch=amd64,i386,ppc64el] http://ftp.osuosl.org/pub/mariadb/repo/5.5/ubuntu trusty main'
 sudo apt-get update
Example Output:~ $ sudo apt-get install software-properties-common -y > /dev/nullTruncated for brevity.
~ $ sudo apt-key adv --recv-keys --keyserver hkp://keyserver.ubuntu.com:80 0xcbcb082a1bb943db
Executing: gpg --ignore-time-conflict --no-options --no-default-keyring --homedir /tmp/tmp.PtpHIXMNvY --no-auto-check-trustdb --trust-model always --keyring /etc/apt/trusted.gpg --primary-keyring /etc/apt/trusted.gpg --recv-keys --keyserver hkp://keyserver.ubuntu.com:80 0xcbcb082a1bb943db
gpg: requesting key 1BB943DB from hkp server keyserver.ubuntu.com
gpg: key 1BB943DB: public key "MariaDB Package Signing Key <package-signing-key@mariadb.org>" imported
gpg: Total number processed: 1
gpg: imported: 1
~ $ sudo add-apt-repository 'deb [arch=amd64,i386,ppc64el] http://ftp.osuosl.org/pub/mariadb/repo/5.5/ubuntu trusty main'
~ $ sudo apt-get update > /dev/null
Step 3: Stop mysql service.
sudo service mysql stop
Example Output:~ $ sudo service mysql stop
mysql stop/waiting
Step 4: Rename MySQL config file /etc/mysql/my.cnf to /etc/mysql/my.cnf.bak. This step is necessary to ensure all incompatible directives/variables have been removed from the configuration to prevent problems with the installation.
sudo mv /etc/mysql/my.cnf{,.bak}

Step 5: Install the mariadb-server package. This will simultaneously remove the existing MySQL binaries and then install the new MariaDB binaries. Please note that the URLs provided in the example output below are used just to illustrate this step. Those URLs are subject to change. sudo apt-get install mariadb-server -y
Example Output:
~ $ sudo apt-get install mariadb-server -y Reading package lists... Done Building dependency tree Reading state information... Done The following packages were automatically installed and are no longer required: linux-headers-3.13.0-153 linux-headers-3.13.0-153-generic linux-headers-3.13.0-24 linux-headers-3.13.0-24-generic linux-headers-3.13.0-91 linux-headers-3.13.0-91-generic linux-image-3.13.0-153-generic linux-image-3.13.0-24-generic linux-image-3.13.0-91-generic Use 'apt-get autoremove' to remove them. The following extra packages will be installed: libmariadbclient18 libmysqlclient18 mariadb-client-5.5 mariadb-client-core-5.5 mariadb-common mariadb-server-5.5 mariadb-server-core-5.5 Suggested packages: tinyca mailx mariadb-test The following packages will be REMOVED: mysql-client-5.5 mysql-client-core-5.5 mysql-server mysql-server-5.5 mysql-server-core-5.5 The following NEW packages will be installed: libmariadbclient18 mariadb-client-5.5 mariadb-client-core-5.5 mariadb-common mariadb-server mariadb-server-5.5 mariadb-server-core-5.5 The following packages will be upgraded: libmysqlclient18 1 upgraded, 7 newly installed, 5 to remove and 1 not upgraded. Need to get 10.4 MB of archives. After this operation, 22.1 MB of additional disk space will be used. Get:1 http://ftp.osuosl.org/pub/mariadb/repo/5.5/ubuntu/ trusty/main mariadb-common all 5.5.61+maria-1~trusty [3,180 B] Get:2 http://ftp.osuosl.org/pub/mariadb/repo/5.5/ubuntu/ trusty/main libmysqlclient18 amd64 5.5.61+maria-1~trusty [2,862 B] Get:3 http://ftp.osuosl.org/pub/mariadb/repo/5.5/ubuntu/ trusty/main libmariadbclient18 amd64 5.5.61+maria-1~trusty [521 kB] Get:4 http://ftp.osuosl.org/pub/mariadb/repo/5.5/ubuntu/ trusty/main mariadb-client-core-5.5 amd64 5.5.61+maria-1~trusty [622 kB] Get:5 http://ftp.osuosl.org/pub/mariadb/repo/5.5/ubuntu/ trusty/main mariadb-client-5.5 amd64 5.5.61+maria-1~trusty [961 kB] Get:6 http://ftp.osuosl.org/pub/mariadb/repo/5.5/ubuntu/ trusty/main mariadb-server-core-5.5 amd64 5.5.61+maria-1~trusty [3,831 kB] Get:7 http://ftp.osuosl.org/pub/mariadb/repo/5.5/ubuntu/ trusty/main mariadb-server-5.5 amd64 5.5.61+maria-1~trusty [4,413 kB] Get:8 http://ftp.osuosl.org/pub/mariadb/repo/5.5/ubuntu/ trusty/main mariadb-server all 5.5.61+maria-1~trusty [2,896 B] Fetched 10.4 MB in 1s (7,992 kB/s) Preconfiguring packages ... (Reading database ... 165598 files and directories currently installed.) Removing mysql-server (5.5.61-0ubuntu0.14.04.1) ... Removing mysql-server-5.5 (5.5.61-0ubuntu0.14.04.1) ... mysql stop/waiting Removing mysql-client-5.5 (5.5.61-0ubuntu0.14.04.1) ... Removing mysql-client-core-5.5 (5.5.61-0ubuntu0.14.04.1) ... Removing mysql-server-core-5.5 (5.5.61-0ubuntu0.14.04.1) ... Processing triggers for man-db (2.6.7.1-1ubuntu1) ... Selecting previously unselected package mariadb-common. (Reading database ... 165377 files and directories currently installed.) Preparing to unpack .../mariadb-common_5.5.61+maria-1~trusty_all.deb ... Unpacking mariadb-common (5.5.61+maria-1~trusty) ... Preparing to unpack .../libmysqlclient18_5.5.61+maria-1~trusty_amd64.deb ... Unpacking libmysqlclient18 (5.5.61+maria-1~trusty) over (5.5.61-0ubuntu0.14.04.1) ... Selecting previously unselected package libmariadbclient18. Preparing to unpack .../libmariadbclient18_5.5.61+maria-1~trusty_amd64.deb ... Unpacking libmariadbclient18 (5.5.61+maria-1~trusty) ... Selecting previously unselected package mariadb-client-core-5.5. Preparing to unpack .../mariadb-client-core-5.5_5.5.61+maria-1~trusty_amd64.deb ... Unpacking mariadb-client-core-5.5 (5.5.61+maria-1~trusty) ... Selecting previously unselected package mariadb-client-5.5. Preparing to unpack .../mariadb-client-5.5_5.5.61+maria-1~trusty_amd64.deb ... Unpacking mariadb-client-5.5 (5.5.61+maria-1~trusty) ... Selecting previously unselected package mariadb-server-core-5.5. Preparing to unpack .../mariadb-server-core-5.5_5.5.61+maria-1~trusty_amd64.deb ... Unpacking mariadb-server-core-5.5 (5.5.61+maria-1~trusty) ... Processing triggers for man-db (2.6.7.1-1ubuntu1) ... Setting up mariadb-common (5.5.61+maria-1~trusty) ... Selecting previously unselected package mariadb-server-5.5. (Reading database ... 165514 files and directories currently installed.) Preparing to unpack .../mariadb-server-5.5_5.5.61+maria-1~trusty_amd64.deb ... Unpacking mariadb-server-5.5 (5.5.61+maria-1~trusty) ... Selecting previously unselected package mariadb-server. Preparing to unpack .../mariadb-server_5.5.61+maria-1~trusty_all.deb ... Unpacking mariadb-server (5.5.61+maria-1~trusty) ... Processing triggers for man-db (2.6.7.1-1ubuntu1) ... Processing triggers for ureadahead (0.100.0-16) ... Setting up libmysqlclient18 (5.5.61+maria-1~trusty) ... Setting up libmariadbclient18 (5.5.61+maria-1~trusty) ... Setting up mariadb-client-core-5.5 (5.5.61+maria-1~trusty) ... Setting up mariadb-client-5.5 (5.5.61+maria-1~trusty) ... Setting up mariadb-server-core-5.5 (5.5.61+maria-1~trusty) ... Setting up mariadb-server-5.5 (5.5.61+maria-1~trusty) ... Installing new version of config file /etc/apparmor.d/usr.sbin.mysqld ... Installing new version of config file /etc/init.d/mysql ... Installing new version of config file /etc/logrotate.d/mysql-server ... Installing new version of config file /etc/mysql/debian-start ... mysql start/running, process 7255 Processing triggers for ureadahead (0.100.0-16) ... Setting up mariadb-server (5.5.61+maria-1~trusty) ... Processing triggers for libc-bin (2.19-0ubuntu6.14) ...
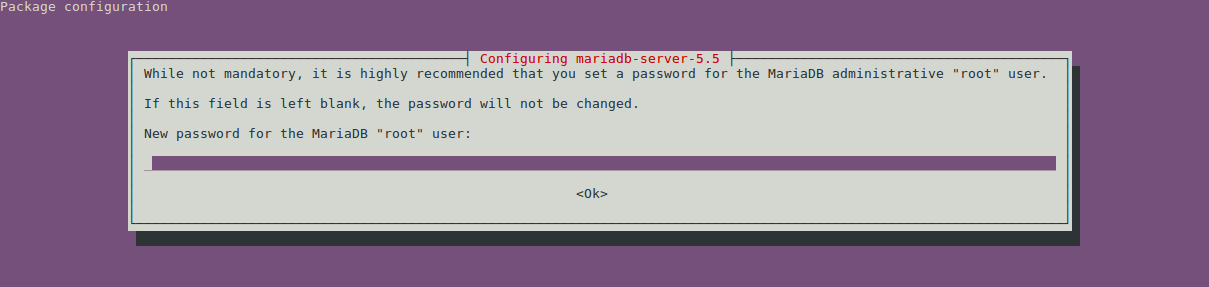
Step 6: During the installation an on-screen dialog will appear prompting to change the MySQL root password twice. Follow the instructions to either change the password or skip the change by providing a blank password.
Step 7: When completed successfully, the mysql service should automatically start and the mysql_upgrade script is completed automatically during the installation process.
A) Check that the mysql service is running.sudo service mysql status
Example Output:~ $ sudo service mysql status
mysql start/running, process 4745
B) Check that the mysql_upgrade was successful.sudo mysql_upgrade
Example Output:~ $ sudo mysql_upgrade
This installation of MySQL is already upgraded to 5.5.61-MariaDB, use --force if you still need to run mysql_upgrade
Step 8: The upgrade is complete, check that your databases exist and are working.
MySQL 5.7 to MariaDB 10.2 on Ubuntu 16.04
Step 1: Confirm backups are present before proceeding at the scheduled time.
Step 2: Check the local root account has a proper password. Before upgrading to MariaDB 10.2, check the ‘root’ @ ’localhost’ user to ensure a password is assigned otherwise, the auth_socket plugin uses an empty password. This is common practice in older setups and causes problems with the upgrade process due to the default mode of MariaDB 10.2 in Strict SQL.
The following script will print the local root user details.
mysql -e 'select User,Host,Plugin,authentication_string from user where authentication_string = "" and plugin = "auth_socket";' mysql
Example Output:~ $ mysql -e 'select User,Host,Plugin,authentication_string from user where authentication_string = "" and plugin = "auth_socket";' mysql
+------+-----------+-------------+-----------------------+
| User | Host | Plugin | authentication_string |
+------+-----------+-------------+-----------------------+
| root | localhost | auth_socket | |
+------+-----------+-------------+-----------------------+
Below are two examples of how to update these entries.
Automagic Method: The following one-liner reads the password from /root/.my.cnf and uses that password to update the MySQL user entry, if the file exists.

sudo test -e /root/.my.cnf && sudo mysql -e "ALTER USER 'root'@'localhost' IDENTIFIED WITH mysql_native_password BY '$(awk -F"[=']" 'tolower($1)~/password/{print $(NF-1)}' /root/.my.cnf)'; select User,Host,Plugin,authentication_string from user where user = 'root' and host = 'localhost';" mysql || echo "ERROR: /root/.my.cnf does not exist, are you root?"
Example Output:~ $ sudo test -e /root/.my.cnf && sudo mysql -e "ALTER USER 'root'@'localhost' IDENTIFIED WITH mysql_native_password BY '$(awk -F"[=']" 'tolower($1)~/password/{print $(NF-1)}' /root/.my.cnf)'; select User,Host,Plugin,authentication_string from user where user = 'root' and host = 'localhost';" mysql || echo "ERROR: /root/.my.cnf does not exist, are you root?"
+------+-----------+-----------------------+-------------------------------------------+
| User | Host | Plugin | authentication_string |
+------+-----------+-----------------------+-------------------------------------------+
| root | localhost | mysql_native_password | *40C5E49F0CC7BDC637FEEDFBF14FF100C37619D7 |
+------+-----------+-----------------------+-------------------------------------------+
Manual Method: The following syntax is necessary to add a proper password to the root user account. Don’t forget to update the /root/.my.cnf file with the correct password or your update may encounter errors. Be sure to substitute the correct password for SuperSecretPass.
ALTER USER 'root'@'localhost' IDENTIFIED WITH mysql_native_password BY 'SuperSecretPass';
Step 3: Install the MariaDB 10.2 repository. This is a multi-command stanza that will install the necessary required tools, GPG key, repository and update the package caches (the example URLs shown below will change based on the current version).
sudo apt-get install software-properties-common -y > /dev/null
 sudo apt-key adv --recv-keys --keyserver hkp://keyserver.ubuntu.com:80 0xF1656F24C74CD1D8
 sudo add-apt-repository 'deb [arch=amd64,arm64,i386,ppc64el] http://ftp.osuosl.org/pub/mariadb/repo/10.2/ubuntu xenial main'
 sudo apt-get update > /dev/null
Example Output:~ $ sudo apt-get install software-properties-common -yTruncated for brevity.
~ $ sudo apt-key adv --recv-keys --keyserver hkp://keyserver.ubuntu.com:80 0xF1656F24C74CD1D8
Executing: /tmp/tmp.J8PdET9w5B/gpg.1.sh --recv-keys
--keyserver
hkp://keyserver.ubuntu.com:80
0xF1656F24C74CD1D8
gpg: requesting key C74CD1D8 from hkp server keyserver.ubuntu.com
gpg: key C74CD1D8: public key "MariaDB Signing Key <signing-key@mariadb.org>" imported
gpg: Total number processed: 1
gpg: imported: 1 (RSA: 1)
~ $ sudo add-apt-repository 'deb [arch=amd64,arm64,i386,ppc64el] http://ftp.osuosl.org/pub/mariadb/repo/10.2/ubuntu xenial main'
~ $ sudo apt-get update > /dev/null
Step 4: Stop mysql service.
sudo service mysql stop
Example Output:~ $ sudo service mysql stop
mysql stop/waiting
Step 5: Rename MySQL config file /etc/mysql/my.cnf to /etc/mysql/my.cnf.bak. This step is necessary to ensure all incompatible directives/variables have been removed from the configuration to prevent problems with the installation.sudo mv /etc/mysql/my.cnf{,.bak}
Step 6: Install the mariadb-server package. This will simultaneously remove the existing MySQL binaries and then install the new MariaDB binaries.
sudo apt-get install mariadb-server -yExample Output:~ $ sudo apt install mariadb-server -y</code?
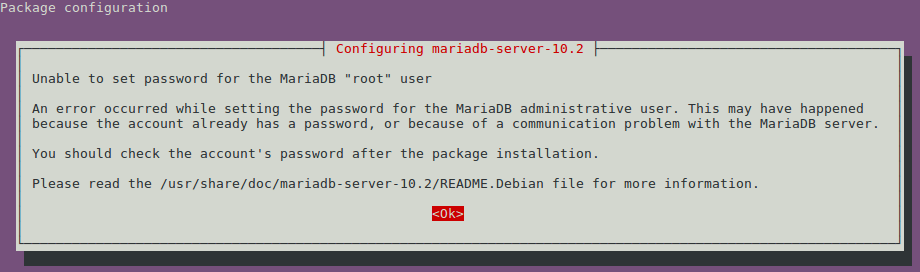
Step 7: During the installation an on-screen dialog will appear prompting that the root password could not be changed because one is already in place. Press enter to proceed.
Step 8: When completed successfully, the mysql service should automatically start.sudo service mysql statusExample Output:~ $ sudo service mysql status
mysql start/running, process 4745
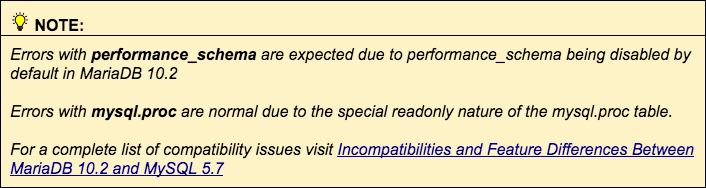
Step 9: Finally, run mysql_upgrade to complete the upgrade. The output illustrates normal errors when upgrading. Please note that the URLs provided in the example output below are used just to illustrate this step. Those URLs are subject to change. sudo mysql_upgrade
Example Output:
~ $ sudo mysql_upgrade MySQL upgrade detected Phase 1/7: Checking and upgrading mysql database Processing databases mysql mysql.column_stats OK mysql.columns_priv OK mysql.db OK mysql.engine_cost OK mysql.event OK mysql.func OK mysql.gtid_executed OK mysql.gtid_slave_pos OK mysql.help_category OK mysql.help_keyword OK mysql.help_relation OK mysql.help_topic OK mysql.host OK mysql.index_stats OK mysql.innodb_index_stats OK mysql.innodb_table_stats OK mysql.plugin OK mysql.proc OK mysql.procs_priv OK mysql.proxies_priv OK mysql.roles_mapping OK mysql.server_cost OK mysql.servers OK mysql.slave_master_info OK mysql.slave_relay_log_info OK mysql.slave_worker_info OK mysql.table_stats OK mysql.tables_priv OK mysql.time_zone OK mysql.time_zone_leap_second OK mysql.time_zone_name OK mysql.time_zone_transition OK mysql.time_zone_transition_type OK mysql.user OK Upgrading from a version before MariaDB-10.1 Phase 2/7: Installing used storage engines Checking for tables with unknown storage engine Phase 3/7: Fixing views from mysql sys.host_summary Error : Table 'performance_schema.memory_summary_by_host_by_event_name' doesn't exist Error : View 'sys.host_summary' references invalid table(s) or column(s) or function(s) or definer/invoker of view lack rights to use them error : Corrupt sys.host_summary_by_file_io Error : Cannot load from mysql.proc. The table is probably corrupted error : Corrupt sys.host_summary_by_file_io_type Error : Cannot load from mysql.proc. The table is probably corrupted error : Corrupt sys.host_summary_by_stages Error : Cannot load from mysql.proc. The table is probably corrupted error : Corrupt sys.host_summary_by_statement_latency Error : Cannot load from mysql.proc. The table is probably corrupted error : Corrupt sys.host_summary_by_statement_type Error : Cannot load from mysql.proc. The table is probably corrupted error : Corrupt sys.innodb_buffer_stats_by_schema Error : Cannot load from mysql.proc. The table is probably corrupted error : Corrupt sys.innodb_buffer_stats_by_table Error : Cannot load from mysql.proc. The table is probably corrupted error : Corrupt sys.innodb_lock_waits Error : Cannot load from mysql.proc. The table is probably corrupted error : Corrupt sys.io_by_thread_by_latency Error : Cannot load from mysql.proc. The table is probably corrupted error : Corrupt sys.io_global_by_file_by_bytes Error : Cannot load from mysql.proc. The table is probably corrupted error : Corrupt sys.io_global_by_file_by_latency Error : Cannot load from mysql.proc. The table is probably corrupted error : Corrupt sys.io_global_by_wait_by_bytes Error : Cannot load from mysql.proc. The table is probably corrupted error : Corrupt sys.io_global_by_wait_by_latency Error : Cannot load from mysql.proc. The table is probably corrupted error : Corrupt sys.latest_file_io Error : Cannot load from mysql.proc. The table is probably corrupted error : Corrupt sys.memory_by_host_by_current_bytes Error : Table 'performance_schema.memory_summary_by_host_by_event_name' doesn't exist Error : View 'sys.memory_by_host_by_current_bytes' references invalid table(s) or column(s) or function(s) or definer/invoker of view lack rights to use them error : Corrupt sys.memory_by_thread_by_current_bytes Error : Table 'performance_schema.memory_summary_by_thread_by_event_name' doesn't exist Error : View 'sys.memory_by_thread_by_current_bytes' references invalid table(s) or column(s) or function(s) or definer/invoker of view lack rights to use them error : Corrupt sys.memory_by_user_by_current_bytes Error : Table 'performance_schema.memory_summary_by_user_by_event_name' doesn't exist Error : View 'sys.memory_by_user_by_current_bytes' references invalid table(s) or column(s) or function(s) or definer/invoker of view lack rights to use them error : Corrupt sys.memory_global_by_current_bytes Error : Table 'performance_schema.memory_summary_global_by_event_name' doesn't exist Error : View 'sys.memory_global_by_current_bytes' references invalid table(s) or column(s) or function(s) or definer/invoker of view lack rights to use them error : Corrupt sys.memory_global_total Error : Table 'performance_schema.memory_summary_global_by_event_name' doesn't exist Error : View 'sys.memory_global_total' references invalid table(s) or column(s) or function(s) or definer/invoker of view lack rights to use them error : Corrupt sys.metrics Error : Table 'performance_schema.global_status' doesn't exist Error : View 'sys.metrics' references invalid table(s) or column(s) or function(s) or definer/invoker of view lack rights to use them error : Corrupt sys.processlist Error : Table 'performance_schema.events_transactions_current' doesn't exist Error : View 'sys.processlist' references invalid table(s) or column(s) or function(s) or definer/invoker of view lack rights to use them error : Corrupt sys.ps_check_lost_instrumentation Error : Table 'performance_schema.global_status' doesn't exist Error : View 'sys.ps_check_lost_instrumentation' references invalid table(s) or column(s) or function(s) or definer/invoker of view lack rights to use them error : Corrupt sys.schema_auto_increment_columns OK sys.schema_index_statistics Error : Cannot load from mysql.proc. The table is probably corrupted error : Corrupt sys.schema_object_overview OK sys.schema_redundant_indexes OK sys.schema_table_lock_waits Error : Table 'performance_schema.metadata_locks' doesn't exist Error : View 'sys.schema_table_lock_waits' references invalid table(s) or column(s) or function(s) or definer/invoker of view lack rights to use them error : Corrupt sys.schema_table_statistics Error : Cannot load from mysql.proc. The table is probably corrupted error : Corrupt sys.schema_table_statistics_with_buffer Error : Cannot load from mysql.proc. The table is probably corrupted error : Corrupt sys.schema_tables_with_full_table_scans Error : Cannot load from mysql.proc. The table is probably corrupted error : Corrupt sys.schema_unused_indexes OK sys.session Error : Table 'performance_schema.events_transactions_current' doesn't exist Error : View 'sys.session' references invalid table(s) or column(s) or function(s) or definer/invoker of view lack rights to use them error : Corrupt sys.session_ssl_status Error : Table 'performance_schema.status_by_thread' doesn't exist Error : View 'sys.session_ssl_status' references invalid table(s) or column(s) or function(s) or definer/invoker of view lack rights to use them error : Corrupt sys.statement_analysis Error : Cannot load from mysql.proc. The table is probably corrupted error : Corrupt sys.statements_with_errors_or_warnings Error : Cannot load from mysql.proc. The table is probably corrupted error : Corrupt sys.statements_with_full_table_scans Error : Cannot load from mysql.proc. The table is probably corrupted error : Corrupt sys.statements_with_runtimes_in_95th_percentile Error : Cannot load from mysql.proc. The table is probably corrupted error : Corrupt sys.statements_with_sorting Error : Cannot load from mysql.proc. The table is probably corrupted error : Corrupt sys.statements_with_temp_tables Error : Cannot load from mysql.proc. The table is probably corrupted error : Corrupt sys.user_summary Error : Table 'performance_schema.memory_summary_by_user_by_event_name' doesn't exist Error : View 'sys.user_summary' references invalid table(s) or column(s) or function(s) or definer/invoker of view lack rights to use them error : Corrupt sys.user_summary_by_file_io Error : Cannot load from mysql.proc. The table is probably corrupted error : Corrupt sys.user_summary_by_file_io_type Error : Cannot load from mysql.proc. The table is probably corrupted error : Corrupt sys.user_summary_by_stages Error : Cannot load from mysql.proc. The table is probably corrupted error : Corrupt sys.user_summary_by_statement_latency Error : Cannot load from mysql.proc. The table is probably corrupted error : Corrupt sys.user_summary_by_statement_type Error : Cannot load from mysql.proc. The table is probably corrupted error : Corrupt sys.version OK sys.wait_classes_global_by_avg_latency Error : Cannot load from mysql.proc. The table is probably corrupted error : Corrupt sys.wait_classes_global_by_latency Error : Cannot load from mysql.proc. The table is probably corrupted error : Corrupt sys.waits_by_host_by_latency Error : Cannot load from mysql.proc. The table is probably corrupted error : Corrupt sys.waits_by_user_by_latency Error : Cannot load from mysql.proc. The table is probably corrupted error : Corrupt sys.waits_global_by_latency Error : Cannot load from mysql.proc. The table is probably corrupted error : Corrupt sys.x$host_summary Error : Table 'performance_schema.memory_summary_by_host_by_event_name' doesn't exist Error : View 'sys.x$host_summary' references invalid table(s) or column(s) or function(s) or definer/invoker of view lack rights to use them error : Corrupt sys.x$host_summary_by_file_io OK sys.x$host_summary_by_file_io_type OK sys.x$host_summary_by_stages OK sys.x$host_summary_by_statement_latency OK sys.x$host_summary_by_statement_type OK sys.x$innodb_buffer_stats_by_schema OK sys.x$innodb_buffer_stats_by_table OK sys.x$innodb_lock_waits OK sys.x$io_by_thread_by_latency OK sys.x$io_global_by_file_by_bytes OK sys.x$io_global_by_file_by_latency OK sys.x$io_global_by_wait_by_bytes OK sys.x$io_global_by_wait_by_latency OK sys.x$latest_file_io OK sys.x$memory_by_host_by_current_bytes Error : Table 'performance_schema.memory_summary_by_host_by_event_name' doesn't exist Error : View 'sys.x$memory_by_host_by_current_bytes' references invalid table(s) or column(s) or function(s) or definer/invoker of view lack rights to use them error : Corrupt sys.x$memory_by_thread_by_current_bytes Error : Table 'performance_schema.memory_summary_by_thread_by_event_name' doesn't exist Error : View 'sys.x$memory_by_thread_by_current_bytes' references invalid table(s) or column(s) or function(s) or definer/invoker of view lack rights to use them error : Corrupt sys.x$memory_by_user_by_current_bytes Error : Table 'performance_schema.memory_summary_by_user_by_event_name' doesn't exist Error : View 'sys.x$memory_by_user_by_current_bytes' references invalid table(s) or column(s) or function(s) or definer/invoker of view lack rights to use them error : Corrupt sys.x$memory_global_by_current_bytes Error : Table 'performance_schema.memory_summary_global_by_event_name' doesn't exist Error : View 'sys.x$memory_global_by_current_bytes' references invalid table(s) or column(s) or function(s) or definer/invoker of view lack rights to use them error : Corrupt sys.x$memory_global_total Error : Table 'performance_schema.memory_summary_global_by_event_name' doesn't exist Error : View 'sys.x$memory_global_total' references invalid table(s) or column(s) or function(s) or definer/invoker of view lack rights to use them error : Corrupt sys.x$processlist Error : Table 'performance_schema.events_transactions_current' doesn't exist Error : View 'sys.x$processlist' references invalid table(s) or column(s) or function(s) or definer/invoker of view lack rights to use them error : Corrupt sys.x$ps_digest_95th_percentile_by_avg_us OK sys.x$ps_digest_avg_latency_distribution OK sys.x$ps_schema_table_statistics_io Error : Cannot load from mysql.proc. The table is probably corrupted error : Corrupt sys.x$schema_flattened_keys OK sys.x$schema_index_statistics OK sys.x$schema_table_lock_waits Error : Table 'performance_schema.metadata_locks' doesn't exist Error : View 'sys.x$schema_table_lock_waits' references invalid table(s) or column(s) or function(s) or definer/invoker of view lack rights to use them error : Corrupt sys.x$schema_table_statistics Error : Cannot load from mysql.proc. The table is probably corrupted error : Corrupt sys.x$schema_table_statistics_with_buffer Error : Cannot load from mysql.proc. The table is probably corrupted error : Corrupt sys.x$schema_tables_with_full_table_scans OK sys.x$session Error : Table 'performance_schema.events_transactions_current' doesn't exist Error : View 'sys.x$session' references invalid table(s) or column(s) or function(s) or definer/invoker of view lack rights to use them error : Corrupt sys.x$statement_analysis OK sys.x$statements_with_errors_or_warnings OK sys.x$statements_with_full_table_scans OK sys.x$statements_with_runtimes_in_95th_percentile OK sys.x$statements_with_sorting OK sys.x$statements_with_temp_tables OK sys.x$user_summary Error : Table 'performance_schema.memory_summary_by_user_by_event_name' doesn't exist Error : View 'sys.x$user_summary' references invalid table(s) or column(s) or function(s) or definer/invoker of view lack rights to use them error : Corrupt sys.x$user_summary_by_file_io OK sys.x$user_summary_by_file_io_type OK sys.x$user_summary_by_stages OK sys.x$user_summary_by_statement_latency OK sys.x$user_summary_by_statement_type OK sys.x$wait_classes_global_by_avg_latency OK sys.x$wait_classes_global_by_latency OK sys.x$waits_by_host_by_latency OK sys.x$waits_by_user_by_latency OK sys.x$waits_global_by_latency OK Phase 4/7: Running 'mysql_fix_privilege_tables' Phase 5/7: Fixing table and database names Phase 6/7: Checking and upgrading tables Processing databases information_schema performance_schema sys sys.sys_config OK Phase 7/7: Running 'FLUSH PRIVILEGES' OK

Step 10: The upgrade is complete, check that your databases exist and are working.