


Understanding localdomains and remotedomains
Due to the nature of the Internet, services for one domain do not need to be on one server. The website and email for a domain do not need to be on the same physical server. DNS is used to direct the traffic to the correct place, but DNS alone will not get all the bits to where they are supposed to be. Exim, cPanel’s SMTP service needs a little help beyond DNS to know how to handle mail that is generated locally. This is where /etc/localdomains and /etc/remotedomains come into play.
How it works
When an email is sent out from a cPanel server, exim checks /etc/localdomains and /etc/remotedomains to send the email to the correct place. If the domain is in /etc/localdomains, the mail is routed locally to the machine. If the domain is in /etc/remotedomains, the email is routed out to the Internet.
This is useful if the domain has some software installed that sends email notifications, such as a content management system like WordPress. This ensures that mail will get sent to the correct location. If a domain uses a remote server for email and the domain is not in remotedomains, notifications from the CMS will not be delivered.
Setting this option during account creation
At the bottom of the account creation page in the WebHost Manager, you will see a section like the following image:
 When set to Local Mail Exchanger, cPanel will place the domain in localdomains. If Remote Mail Exchanger is selected, it will place the domain in remotedomains. If Backup Mail Exchanger is selected, the domain will be added to localdomains but will only accept mail if there are no other mail servers available.
Automatically Detect Configuration will check the DNS Mail Exchanger records to see where the DNS is pointed, and make the configuration based off that. Most of the time, this is the best option to select. However, if DNS has not been set up for the domain yet, you may wish to set the Exchanger manually.
Changing the exchanger after account creation in WHM
Changing the mail exchanger on the server is relatively easy, and can be done from within WebHost Manager.
In WHM, navigate to “Edit MX Entry” under “DNS Functions” in the left menu list.
From there, simply select the domain name you wish to edit, and then select the desired mail exchanger (Local Mail Exchanger, Backup Mail Exchanger, or Remote Mail Exchanger) to change the mail routing settings for the domain:
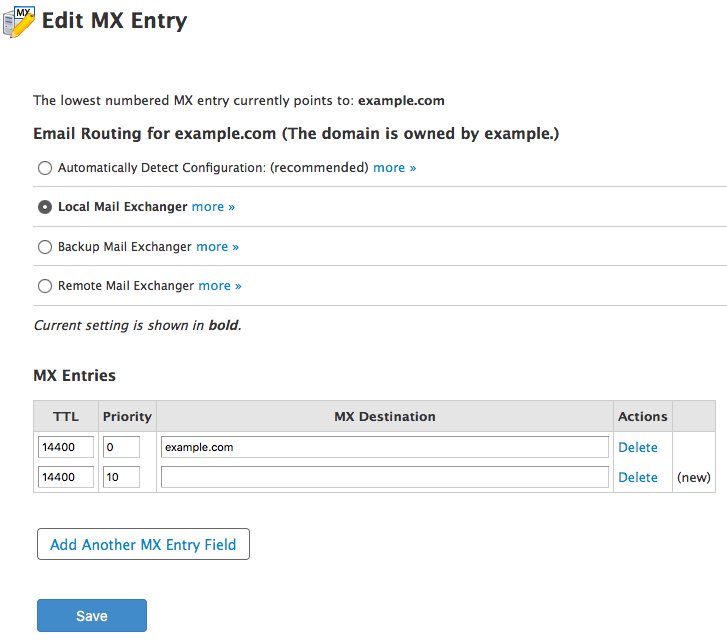 For best practices, you also may wish to take this opportunity to ensure that the mail record listed in the “MX Entries” section at the bottom of the “Edit MX Entry” page matches the actual mail record for the domain, even if the cPanel DNS zone is not authoritative (i.e., the domain is using nameservers external to the server itself).
Once you hit “Save”, the domain will be listed in /etc/localdomains or /etc/remotedomains automatically, and the new setting will take effect immediately.
Changing the exchanger after account creation via SSH
To prevent cPanel from possibly overwriting any changes, the preferred method of changing a domain’s mail exchanger settings is via WHM’s “Edit MX Entry” feature. However, the settings also can be configured manually by directly editing the two files controlling mail routing: /etc/localdomains and /etc/remotedomains.
Modifying a domain to use a different exchanger is as simple as SSH’ing into the server and editing the files; simply remove the domain from one file and add it to the other. It is that simple. No need to restart services afterward.
The files will look something like the following:
root@host [~]# cat /etc/localdomains

domain.com

example.com

test.com

root@host [~]#
Making sure that domains are listed in the correct file will help keep mail moving on its intended path. Localdomains and remotedomains are an often-overlooked part of email administration, but are easy enough to fix. If you have any questions, or are unsure of which file a domain should be in, please give Heroic Support® a call.
Related Articles:


About the Author: Matt Aurand


Our Sales and Support teams are available 24 hours by phone or e-mail to assist.
Latest Articles
How to use kill commands in Linux
Read ArticleChange cPanel password from WebHost Manager (WHM)
Read ArticleChange cPanel password from WebHost Manager (WHM)
Read ArticleChange cPanel password from WebHost Manager (WHM)
Read ArticleChange the root password in WebHost Manager (WHM)
Read Article