
 Joseph Molloy
 Using your computer to multi-task is no longer optional. When you’re at work, you must manage multiple apps and browser tabs and can’t fit all of them on one or two monitors. It’s no different at home since most use separate apps for entertainment, communication, and keeping up with expenses.
Thankfully, Ubuntu workspaces solve this problem. If you need help managing Ubuntu workspaces or want to learn more about them, this guide shows you how to manage desktops and windows in Ubuntu and take your multitasking to the next level.
You will learn about the benefits of Ubuntu workspaces and how you can apply them to various scenarios. Furthermore, you will know how to switch between workspaces effectively with many helpful existing keyboard shortcuts and set up new shortcuts in case you ever need them.
What Are Ubuntu Workspaces?
Ubuntu workspaces are virtual desktops within the operating system (OS). The first implementation was with Unix in 1990, taking many forms before reaching its current style. Windows and macOS took longer to offer a virtual desktop solution.
There’s certainly no lack of ways in which you can apply Ubuntu workspaces to improve your everyday Ubuntu experience. Here are some common use cases for Ubuntu workspaces if you want ideas.
- Web developers want to boost productivity. In that case, they can use the first workspace for writing code and the second, third, and fourth for testing the outcome in browsers that simulate different device screens.
- Visual artists or designers rely on multiple apps to get the job done. Fortunately, they can open each app in separate workspaces and switch between them to improve their workflow.
- Project managers have many uses as well. Since they manage multiple projects simultaneously, they can dedicate a single workspace to each project and switch through them as necessary.
- IT support technicians must answer dozens of queries from clients and employees daily. To boost productivity and be at ease, they can create one workspace for communication via chats and emails, a second one for research, and a third one for monitoring tools.
- Personal Ubuntu users may use the computer for everyday purposes. In that case, they can use workspaces to separate and view activities such as gaming, budgeting, emails, or social media posts.
- Small business owners or office managers will appreciate how Ubuntu workspaces can help cut down on hardware costs and unnecessary office space. That’s because workspaces can replace multiple monitor setups in some cases.
What Is the Benefit of Using Ubuntu Workspaces?
Sometimes having multiple windows on your desktop can be a pain. But that’s where workspaces shine, allowing you to manage your windows better, optimize your workflow, and improve productivity.
For example, you could use one workspace for work, another for social media, and the third for entertainment. In some cases, workspaces can even replace multiple monitors, provided you don’t need to use them simultaneously.
There are plenty of benefits to using Ubuntu workspaces. Here is a short list of those benefits:
- Improve your multitasking skills and performance regardless of your current productivity flow and monitor setup.
- Extend your screen real estate, enabling you to manage tasks more effectively.
- Help cut down hardware costs by relying on a free software solution instead of buying multiple monitors for your computer.
- Save space on your desk and avoid investing in a larger desk for multiple monitors, also saving space in your room or office.
- Help keep different activities, such as work and personal projects, in separate categories, improving focus and reducing distractions.
Working With Ubuntu Workspaces
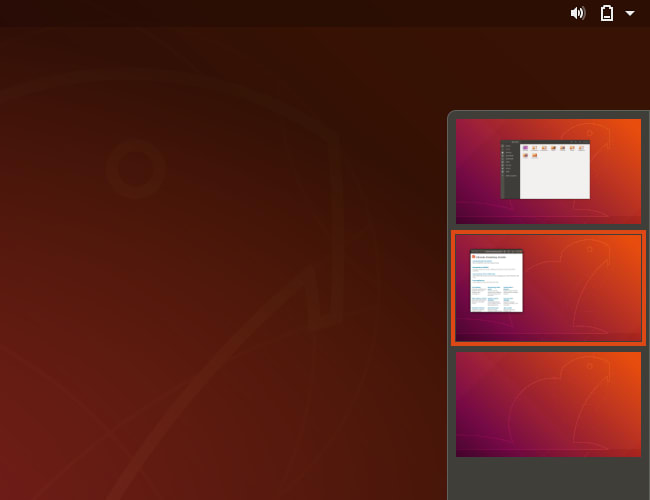
To operate numerous workspaces, you must use the Ubuntu workspace switcher. To make it appear, press the Super key. Alternatively, you can click the Activities button in the upper left corner. A portion of it appears on the right-hand side of the screen.

Move the mouse pointer over it to display it in its entirety.

You can now select the second workspace by left-clicking it. The second workspace is now the active one.
Enabling Ubuntu Workspaces
Typically, workspaces are enabled by default. If, for some reason, they are not, navigate to Settings, then go to the Behavior tab and click the checkbox next to Enable
Workspaces.
Creating Ubuntu Workspaces
You aren’t limited to just two workspaces. You can add as many as you’d like using the same workspace switcher on the right. Drag and drop a window from an existing Ubuntu workspace onto the empty one below it. As soon as the lowest Ubuntu workspace is occupied, a new empty one will appear under it.
Switching Ubuntu Workspaces
There are two ways to cycle between workspaces. The first displays the workspace switcher by pressing the Super key and then left-clicking the relevant preview screen.
The second is pressing either of the following keyboard shortcuts:
- Ctrl+Alt+Up/Down.
- Ctrl+Alt+Super+Page Up/Page Down.
As soon as you press the shortcut combination, an alternative workspace selector will appear in the middle of the screen. You can now click on the workspace you need to make it active, as seen below.

Removing a Workspace
To close a workspace, close all its windows or move them to another workspace. The empty workspace will then disappear automatically. All workspaces disappear except the last one, per the OS design. As mentioned earlier, a minimum of two workspaces are present by default.
Configuring and Using Workspace Shortcuts
Want to improve your workspace skills even further? That’s easy. Just learn to use the workspace shortcut keys.
The following table serves as a quick guide for the most important shortcuts.
| SHORTCUT | ACTION |
| Super+Page Up | Switch to a workspace above. |
| Super+Page Down | Switch to a workspace below. |
| Super+Home | Switch to the first workspace. |
| Super+End | Switch to the last workspace. |
| Shift+Super+Page Up | Move a window one workspace up. |
| Shift+Super+Page Down | Move a window one workspace down. |
| Shift+Super+Home | Move a window to the first workspace. |
| Shift+Super+End | Move a window to the last workspace. |
Remember that you aren’t limited to the default shortcut key bindings. If you want to change them, navigate to and click Settings, Devices, then Keyboard.
Wrapping Up
This guide covers enabling, creating, and switching Ubuntu workspaces so you can test them yourself. Switching the workspaces, moving windows between them, and configuring shortcuts is a breeze with this powerful tool.
If you’re a developer using Ubuntu as your go-to OS, you’ll feel at home with a production server running Ubuntu. Liquid Web offers Ubuntu server options with our VPS hosting, cloud servers, and dedicated servers. Contact us today to get started.