


Tag: cdn
What is the Difference Between a CDN and an eCDN?
Ever wonder how content is served to your device, and how quickly you can access and view the content? The answer is the content is served from either a CDN or an eCDN. A CDN serves public-facing content while an eCDN serves video and live-streaming events to employees within a corporation’s LAN. This article looks at the differences between these two types of networks, how they work, the benefits of each, and when to use one over the other.
How Do I Setup W3 Total Cache In WordPress 2019?
Do You Need W3TC?
The short answer is an overwhelming Yes!
W3 Total Cache is currently the best WordPress plugin for cache-based, performance optimization. W3 Total Cache improves the overall speed of your site by caching multiple elements on your pages which improves the overall responsiveness of your webserver.
Exploring the CloudFlare Dashboard
II. How to Configure Your DNS for CloudFlare
III. How To Configure Your Server to Log Real Visitor IPs
IV. Exploring the CloudFlare Dashboard
How to Configure Your DNS for CloudFlare
II. How to Configure Your DNS for CloudFlare
III. How To Configure Your Server to Log Real Visitor IPs
IV. Exploring the CloudFlare Dashboard
Pre-Flight Check
- This article assumes that you have already set up CloudFlare and added your domain.
- We’ll be adding DNS records in Liquid Web’s Manage dashboard. If your site isn’t using Liquid Web’s nameservers, you’ll need to make changes at your registrar or DNS provider.
- We’ll be using cPanel to set up an .htaccess redirect. If you don’t have access to cPanel, you will need to edit your .htaccess file directly; if you’re using a web server other than Apache (such as Nginx or IIS), you’ll need to set up the redirect manually. You can find tips for doing so in the bonus content section of this article.
Step #1: Get Your CloudFlare DNS Settings
- Once your site has been added to CloudFlare via Manage, select Domains from the left menu, click on the CloudFlare tab and click the [+] button next to your domain name to expand the CloudFlare dashboard.
- Now click on the DNS Settings link near the bottom-right corner to view your settings.

- The popup window will show you the specific changes you’ll need to make for your site:
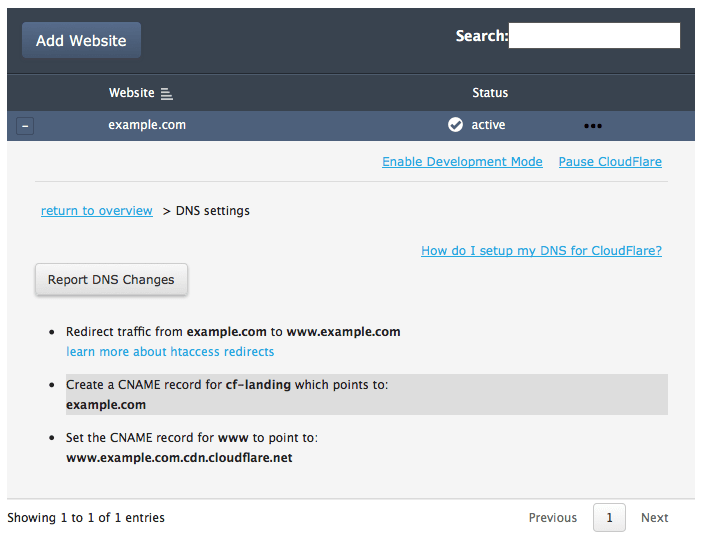 Specifically, you’ll need to:
- Add an .htaccess redirect to ensure all traffic to your site uses the “www” subdomain.
- Add a CNAME record for the subdomain “cf-landing.yourdomainname.com”.
- Change your CNAME record for the “www” subdomain to point to “www.yourdomain.com.cdn.cloudflare.net”.
Step #2: Redirect Traffic to Your ‘www’ Subdomain
If you have access to cPanel, setting up the redirect is a simple process using the method detailed below. If you don’t have access to cPanel, though, you’ll need to set up the redirect manually. You can find tips for doing so in the bonus content section of this article.
How To Configure Your Server to Log Real Visitor IPs
Because CloudFlare acts as a proxy, all visits to your website and web applications will, by default, be logged as originating from a CloudFlare IP address — not the visitor’s actual IP address. However, the Apache module mod_cloudflare can be used to ensure that visitors’ actual IP addresses are logged and displayed. We recommend that you activate mod_cloudflare as outlined in this article to accurately log website visitor IP addresses and prevent unwanted behavior. Without this step, your server’s firewall could block CloudFlare’s IP addresses, making your site inaccessible. If you need to check whether the module is already enabled or need assistance installing it, please open a ticket and Heroic Support® will be happy to help.
How To Add Cloudflare to Your Website
II. How to Configure Your DNS for Cloudflare
III. How To Configure Your Server to Log Real Visitor IPs
IV. Exploring the Cloudflare Dashboard
Pre-Flight Check
- This article covers adding Cloudflare through your Liquid Web account and enabling it for a site you host here.
- In this example, we'll be setting up a new Cloudflare account for an existing domain that will continue to use its current nameservers.
- Please note that to accurately log website visitor IP addresses and prevent unwanted behavior, we recommend that you activate the mod_cloudflare module on your server as detailed in Part III: How To Configure Your Server to Log Real Visitor IPs. Without this, your server's firewall may block Cloudflare's IP addresses, making your site inaccessible. If you need to check whether the module is already enabled or need assistance installing it, please open a ticket and Heroic Support® will be happy to help.
Step #1: Add Cloudflare to Your Account
In your Manage interface, click on Domains in the left menu and select the Cloudflare tab.
What is Caching?
Caching Defined
Caching, as it pertains to hosting a website, is the temporary storage of content. This content could be images, files, bits of PHP scripts that are precompiled, HTML pages, results of database queries, and other web objects.
Liquid Web CDN Nodes
The Liquid Web Content Delivery Network (CDN) is comprised of thousands of CDN nodes via the Akamai Intelligent Platform. This platform effectively gives our customers the ability to increase global reach over 2,000 percent further than any previously available option. Below is a complete list of the Liquid Web CDN Nodes:
If you have a CDN plan with Liquid Web, it is probably a good idea to keep tabs on your bandwidth usage. Bandwidth overages can lead to additional charges. There are preventative and defensive measures you can take to prevent overages.
On CNAMEs and CDNs
Liquid Web’s Content Delivery Network is a fantastic way to get elements of your site to your global customers in a timely manner. As part of the set up process, you may need to add a Canonical Name (CNAME) record to your domain’s DNS.
Our Sales and Support teams are available 24 hours by phone or e-mail to assist.