
 Justin Palmer
 The most common way to remotely manage a Windows server is through Remote Desktop Protocol. By default, Liquid Web’s Windows servers only allow the members of the administrators’ group remote desktop access. However, the Remote Desktop Users group grants its members access to securely connect to the server through RDP (Remote Desktop Protocol) as well.
This article will go over the basics of the Remote Desktop Users group. By the end, you will be able to add users to the group, understand permissions, and basic user management.

Preflight
The information below covers methods to configure the Remote Desktop Users group for Windows Server 2012 through Windows Server 2016 on any Liquid Web Windows server.
Managing Local Users and Groups
Users and groups on Windows servers are managed in a number of different ways, but the most user-friendly way is through the Local Users and Groups interface. There are several ways to open the interface. However, the easiest is to run “lusrmgr.msc”. Lusrmgr.msc can be launched by searching the start menu, command line, or through a run dialog. These methods allow you to find users and groups easily.

To manage local users and groups, you will need to be logged in with a user that has the proper permissions to do so. This is most commonly a user that is already a member of the Administrators group.
User Management
Once you open the Local Users and Groups interface, you will see two folders on the left, one for Users, and one for Groups. By selecting Users, you will see a full list of local users on the server. You can also see a variety of related tasks by right-clicking Users, Groups, a user’s name, or a blank area of the middle pane.
There are several ways to add a new user through the Local Users and Groups interface. These methods all result in the same “New User” dialog box opening where you can then configure a Username, Password, and other options. Choose one of the options below to create a new user:
- With the Users folder selected in the left pane, click the Action menu, then select “New User…”.
- With the Users folder selected in the left pane, click “More Actions” from the right- hand pane, then select “New User…”.
- Right-click the Users folder, then select “New User…”.
- With the Users folder selected in the left pane, right-click in a blank area of the middle page, then select “New User…”.
Once you have created a new user, or have identified the username of the existing user, you are ready to assign that user to a Group. Users assigned to a group are known as group members.
Group Management
As with user management, group management can also be performed in several ways. The options below cover several of the most common ways to assign a new member to the Remote Desktop Users group:
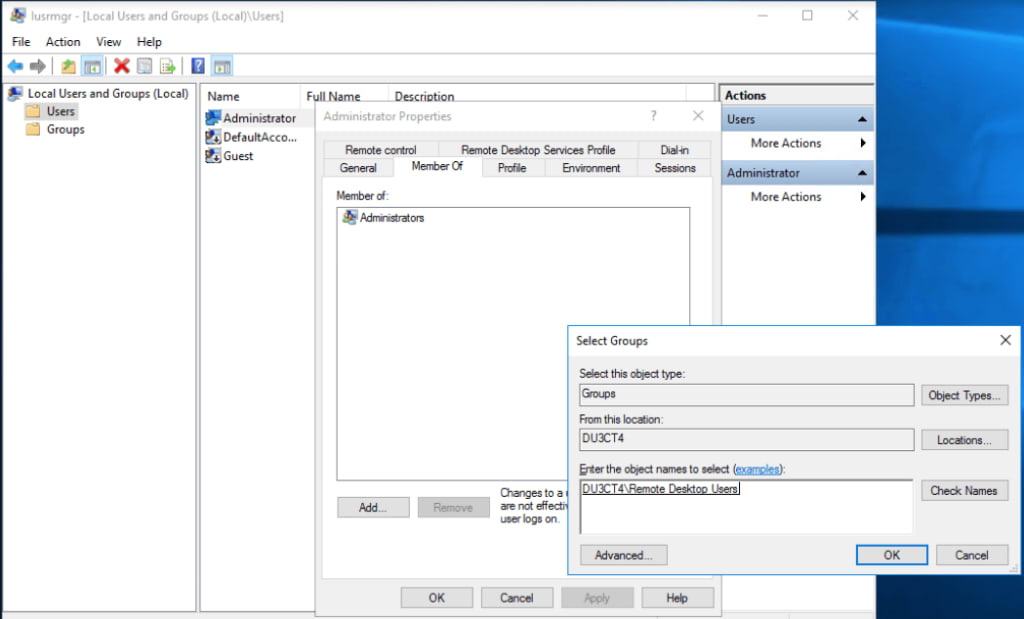
- Select the Users folder from the left pane of the Local Users and Groups interface, open the Users Properties window by double-clicking the user, select the “Member Of” tab, then click “Add…”. Now type “Remote Desktop Users” in the text box and click OK.
- Select the Groups folder from the left pane of the Local Users and Groups interface, double-click the “Remote Desktop Users” group, click “Add…”, enter the user’s name in the text box and click OK.
- Open the system settings by right-clicking the start menu and selecting “System”, choose “Advanced system settings”, select the “Remote” tab, click the “Select Users…” button then click the “Add” button. Now enter the user’s name in the text box and click OK.
- Open the “Server Manager”, select “Local Server” from the left pane, click the blue text next to “Computer Name”, select the “Remote” tab, click the “Select Users…” button then click the “Add” button. Now enter the user’s name in the text box and click OK.
When selecting users or groups, it is recommended to click the “Check Names” button after typing in the user or group name. If the name is underlined after clicking the “Check Names” button, then the name was identified correctly.
You can also use the “Advanced…” button when selecting users or groups instead of typing its name. Clicking the “Advanced…” button followed by the “Find Now” button will result in a list of users to select.
Notes on Permissions & Security
By default, there are no members of the Remote Desktop Users group and only members of the Administrators group are allowed to connect through RDP. Members added to the Remote Desktop Users group are considered non-Administrative users. These users will be unable to perform most management tasks such as installing software, managing IIS, or rebooting the server.
If a user requires management abilities, the user will need explicit access to that task or will need to be a member of the Administrators. Please use the best practice of “least privilege” when configuring your users, groups, and permissions.
Test/Verify Group Membership
When configuring new user and group memberships, you should always review group membership once complete. Reviewing group membership is most commonly performed through the Local Users and Groups interface. In addition to verifying membership, we also recommend attempting a remote desktop connection with your newest Remote Desktop Users group member. If you are unable to connect with your user, please see our Remote Desktop Troubleshooting article.
Once you have logged in with your newest member of the Remote Desktop Users group, you can further verify that groups are set up correctly by running the command “whoami /groups” from a command line. The output of this command lists the username and its associated Group names.
Learn More!
We pride ourselves on being The Most Helpful Humans In Hosting™!
Our Support Team is full of talented and experienced Windows and Linux technicians and System administrators who have intimate knowledge of multiple web hosting technologies, including those discussed in this article.
Should you have any questions about any of our products, we are always available, 24 hours a day, 7 days a week 365 days a year. If you are experiencing problems, open a chat or ticket with us to speak with one of our knowledgeable technicians!
If you are a VPS hosting, dedicated cloud server, private cloud, VPS reseller server, managed cloud servers, or a dedicated server owner and you are uncomfortable with performing any of the steps outlined, we can be reached via chat or support ticket to assisting you with this process.