 Dean Conally
 osTicket is a free, open-sourced, and web-based customer support platform. In this article, we will show you how to install and configure the support ticket system osTicket on CentOS 7. While this guide will cover installation for unmanaged servers, Liquid Web’s fully managed servers with cPanel, Plesk, or InterWorx control panels allow for a one-click installation of osTicket.
osTicket Setup System Requirements
To follow this tutorial, make sure your system includes the items below:
- CentOS 7 operating system.
- Apache web server.
- MySQL version 5.0 and above (or the MariaDB equivalent).
- PHP version 5.6 and above.
- Enabled Firewalld.
Install PHP Extensions
First, verify the necessary PHP extensions are installed. We can quickly install them with one single command that includes some of the most command PHP extensions. If an extension is already installed, yum will move to the next extension found in the command.
[root@host ~]# yum install php-mysql php-xml php-common php-gd php-imap php-mbstring -yOnce complete, you will get the below output.
Installed:
php-common.x86_64 0:5.4.16-48.el7 php-gd.x86_64 0:5.4.16-48.el7
php-mbstring.x86_64 0:5.4.16-48.el7 php-mysql.x86_64 0:5.4.16-48.el7
php-xml.x86_64 0:5.4.16-48.el7
Dependency Installed:
libX11.x86_64 0:1.6.7-3.el7_9 libX11-common.noarch 0:1.6.7-3.el7_9
libXau.x86_64 0:1.0.8-2.1.el7 libXpm.x86_64 0:3.5.12-1.el7
libjpeg-turbo.x86_64 0:1.2.90-8.el7 libxcb.x86_64 0:1.13-1.el7
libxslt.x86_64 0:1.1.28-6.el7 libzip.x86_64 0:0.10.1-8.el7
php-pdo.x86_64 0:5.4.16-48.el7 t1lib.x86_64 0:5.1.2-14.el7
Complete!
osTicket Installation
Now we will show you how to install osTicket, which is easy to set up. Before installing osTicket, navigate to your temporary directory.
[root@host ~]# cd /tmp/Move to the Correct Directory
Download the latest release of osTicket by using the wget command.
[root@host tmp]# wget https://github.com/osTicket/osTicket-1.8/releases/download/v1.9.9/osTicket-v1.9.9-1-gbe2f138.zipUnzip the downloaded file.
[root@host tmp]# unzip osTicket-v1.9.9-1-gbe2f138.zipTwo separate directories will be in /tmp after you unzip the file called scripts and upload. Since osTicket is a web-based platform, the upload directory needs to be moved to a different location. To do so, type in the command below to navigate to the Apache directory.
[root@host tmp]# cd /var/www/Next, let’s create a directory from which we will run osTicket.
[root@host www]# mkdir osticketThen we can move the upload directory to our newly-created directory.
[root@host www]# mv /tmp/upload /var/www/osticketOwnership and Permissions
The next part of the process is to change the ownership and permissions and copy the configuration file. Change ownership of the directory with the below command.
[root@host html]# chown apache. -R /var/www/osticketNow we will move to the upload directory by running the command below.
[root@host www]# cd support/upload/Next, copy the configuration file.
[root@host www]#cp include/ost-sampleconfig.php include/ost-config.phpAfter copying the configuration file, move to the include directory.
[root@host upload]# cd include/Run the command below to change the permissions on the configuration file.
[root@host upload]# chmod 666 ost-config.phpNow we will create and configure a database, which is an essential step in the osTicket installation process.
Creating an osTicket Database
We will create a MySQL user and database through the command line. To do that, you first need to create a database and give it a name.
MariaDB [(none)]> CREATE DATABASE example_osticket_db;After making the database, create a database user along with its respective password. All passwords should follow best practices for security.
MariaDB [(none)]> CREATE USER 'example_osticket_admin'@'localhost' IDENTIFIED BY 'example_osticket_password';Next, use the command below to grant all privileges on the database to the new user.
MariaDB [(none)]> GRANT ALL PRIVILEGES on example_osticket_db.* TO 'example_osticket_admin'@'localhost' ;And lastly, run the flush privileges command to reload the database grant tables and enable the recent changes.
[su_box title=”Note:” style=”glass” box_color=”#3ac6eb” radius=”20″]Observe all necessary security measures by creating a secure password for your database and using database names and usernames different from this tutorial.[/su_box]
Firewall Setup
Firewalls are an added security measure that can both allow and block traffic. For this reason, we will open port 80 to allow web traffic to access our osTicket installation through a browser with the below command.
[root@host ~]# firewall-cmd --zone=public --add-port=80/tcp --permanentUse the following command to reload the firewall and ensure the implementation of your port change.
[root@host ~]# firewall-cmd --reloadWeb-Based Installation
Now you can open osTicket in your browser by typing https://your_server_ip/support. Make sure to replace your_server_ip with your server’s IP address. You will see the below screen once the page loads. Click Continue to proceed.

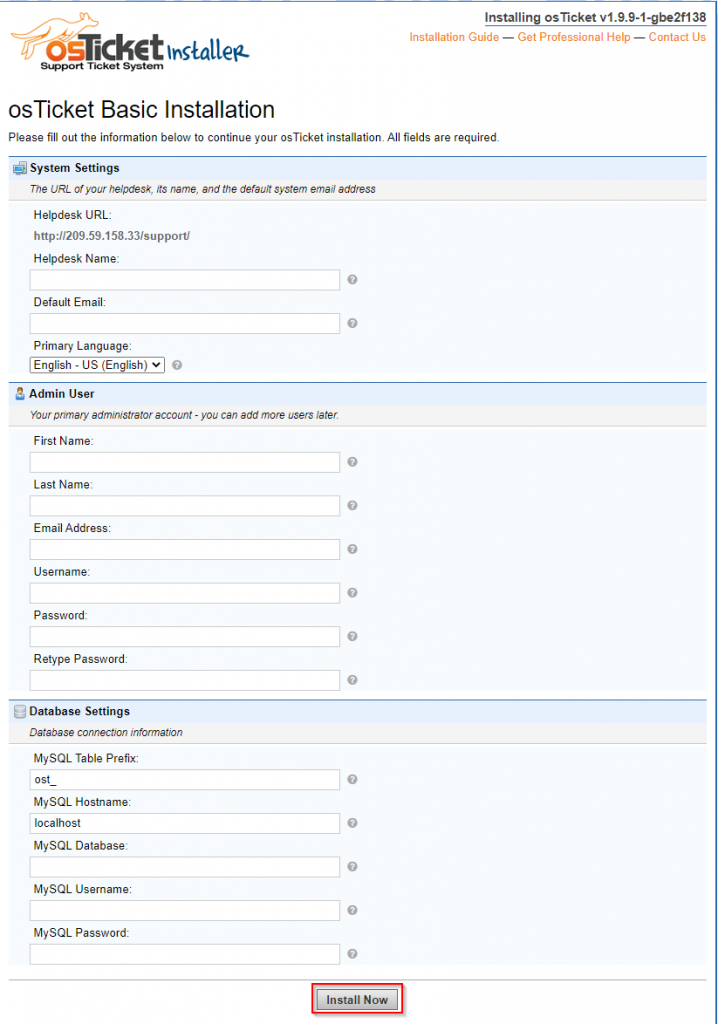
Complete the form below to establish your admin user and database settings. Once finished, click Install Now.
After installing osTicket, you can configure your support ticket system.

Some helpful links you will find on this page are:
- Your osTicket URL: Where your customers can submit support requests created via email.
- Your Staff Control Panel: Where users can access the admin panel to control various settings.
- osTicket Forums: Where users can ask and answer osTicket questions.
- osTicket Community Wiki: Where users can find additional osTicket documentation.
Conclusion
osTicket is a very useful tool for your support system and is completely free. Not everyone needs an enterprise product like SalesForce or Zendesk, which is where osTicket comes in. After familiarizing yourself with osTicket, handling customer inquiries created via email will become a breeze.
Are you looking for an unmanaged VPS to run your support ticketing system? Liquid Web has both managed and unmanaged plans available, so contact us now!