How to Backup a MySQL Database: Complete Guide
MySQL via Command Line 102: Basic User Interaction
Generating frequent backups of databases is important to recover data and rerun it if any problems occur. Such problems include:
- System crashes.
- Hardware failures
- Database corruption.
- Data deletion by user error.
MySQL offers various methods to generate a backup and restore the database. You can choose any method that best suits your backup and disaster recovery requirements. Backups are also crucial as a precaution before we upgrade a MySQL installation. The backups are also used to transfer a MySQL installation to another system or to set up clone servers.
Requirements
- Any Linux distributions.
- MySQL Server or MariaDB.
- The mysqldump utility.
- Root privileged access to your Linux system or via the sudo command.
How to Backup and Restore a MySQL Database
You can backup and restore a MySQL Database using mysqldump via command line or PHPMyAdmin.
Backup a MySQL Database Using mysqldump via Command Line
The mysqldump utility is an effective tool to backup MySQL databases and transfer your MySQL database to another MySQL server. It is a set of SQL statements used to recreate the original database.
The mysqldump utility can generate a backup of the database as a single .sql file including SQL statements like DROP TABLE, CREATE TABLE, and INSERT to rebuild the database. The utility also helps dump multiple databases or their objects into MySQL tables in a single file.
It is impossible to backup MySQL databases or data to separate .sql files with the mysqldump utility. It also does not dump the performance_schema, information_schema, or NDB Cluster information database (ndbinfo).
Let’s look at the syntax of the mysqldump command.
mysqldump -u [database_username] –p [database_password] [database_name] [tablename] > [database_backup_file.sql]Here is a breakdown of what the components of this command mean:
- -u [database_username]: The username to connect to the MySQL server.
- -p [database_password]: The password of the database username.
- [database_name]: Name of the database that you want to take backup.
- [tablename]: Name of that table name that you want to take backup. This is an optional parameter.
- > : To generate the backup.
- [database_backup_file.sql]: Path and name of the backup file that you want to save the dump file.
1. Backup a Single MySQL Database
To take a backup of a single database, you can use the following command syntax. It will prompt you for a password when entering this command.
mysqldump -u database_username -p database_name > database_backup_file.sqlHere is the output for the command.
$ mysqldump  -u a056c59a_f56757  -p a056c59a_f56757 > a056c59a_f56757.sql
Enter password:
$ ll
-rw-rw-r--   1 a056c59a a056c59a 53886 Mar 25 17:16 a056c59a_f56757.sql
Using the --password option, you can avoid the password prompt. The syntax for this command is as follows. Replace the database_password portion with your database’s password.
mysqldump -u database_username --password="database_password" database_name > database_backup_file.sqlHere is the output.
$ mysqldump -u a056c59a_f56757 --password="DB_password" a056c59a_f56757 > a056c59a_f56757.sql
$ ll
-rw-rw-r--  1 a056c59a a056c59a 53886 Mar 25 17:33 a056c59a_f56757.sql
2. Backup Multiple MySQL Databases
To take a backup of multiple databases, you can use the following command syntax.
mysqldump -u database_username -p --databases database_name1 database_name2 > database_backup_file.sqlHere is the output for running this command.
$ mysqldump -u a056c59a_f56757 -p --databases a056c59a_f56757 a056c59a_g67868 > a056c59a_newdb.sql
Enter password:
$ ll
-rw-rw-r--   1 a056c59a a056c59a 54159 Mar 27 03:11 a056c59a_newdb.sql
Again, you can use the --password option to avoid the password prompt. Replace the database_password portion with your database’s password.
mysqldump -u database_username --password="database_password" --databases database_name1 database_name2 > database_backup_file.sqlHere is the output for the command.
$ mysqldump -u a056c59a_f56757 --password="DB_password" --databases a056c59a_f56757 a056c59a_g67868 > a056c59a_newdb2.sql
$ ll
-rw-rw-r--  1 a056c59a a056c59a 54159 Mar 27 03:19 a056c59a_newdb2.sql
3. Backup Every MySQL Databases
To take a backup of every MySQL or MariaDB database at once, use the following command syntax.
mysqldump -u database_username -p --all-databases > all_databases_backup_file.sqlHere is the output.
$ mysqldump -u a056c59a_f56757 -p --all-databases > a056c59a_newdb3.sql
Enter password:
$ ll
-rw-rw-r--  1 a056c59a a056c59a 54144 Mar 27 03:38 a056c59a_newdb3.sql
Here the --password option is used to avoid the password prompt. As always, replace the database_password portion with your database’s password.
mysqldump --all-databases -u database_username --password="database_password" > all_databases_backup_file.sqlHere is the output for this command.
$ mysqldump --all-databases -u a056c59a_f56757 --password="DB_password" > a056c59a_newdb4.sql
$ ll
-rw-rw-r--  1 a056c59a a056c59a 54144 Mar 27 03:41 a056c59a_newdb4.sql
4. Backup All MySQL Databases to Separate Files
The mysqldump utility doesn’t provide an option to backup all databases to separate files. However, you can easily take a separate backup file for each database using the database name as the filename using a simple bash command line for loop.
for database in $(mysql -e 'show databases' -s --skip-column-names); do
	mysqldump $database > "$database.sql";
done
5. Create a Backup With a Timestamp
To keep more than one Database backup in the same location, you can add the current date to the database backup filename. This is the syntax for the command.
mysqldump database_name -u database_username -p > database_name-$(date +%Y%m%d).sqlHere is the output.
$ mysqldump a056c59a_f56757 -u a056c59a_f56757 -p > a056c59a_f56757-$(date +%Y%m%d).sql
$ll
-rw-rw-r--   1 a056c59a a056c59a 53834 Mar 28 15:09 a056c59a_f56757-20220328.sql
6. Create a Compressed MySQL Database Backup
If your database size is considerable, you can compress the output to save disk space. You will need to simply pipe the output to the gzip utility and redirect it to a file. Here is the syntax.
mysqldump database_name -u database_username -p | gzip > database_name.sql.gzThe output will be as follows.
$ mysqldump a056c59a_f56757 -u a056c59a_f56757 -p | gzip > a056c59a_f56757.sql.gz
Enter password:
$ ll
-rw-rw-r--  1 a056c59a a056c59a 11843 Mar 29 04:08 a056c59a_f56757.sql.gz
Restore a MySQL Database Using mysqldump
1. Restore a MySQL Database
To restore a MySQL database using MySQL backup, you can use the mysql tool. The command syntax is as follows.
mysql -u database_username database_name -p < database_backup_file.sqlThe output will be as follows.
$ mysql -u a056c59a_f56757 a056c59a_f56757 -p < a056c59a_f56757-20220329.sql
Enter password:
$
2. Restore a Single MySQL Database From a Full MySQL Dump File.
If you want to restore a single MySQL database from a Database backup file that contains multiple MySQL databases, you can use the --one-database option in the command.
mysql -u database_username --one-database database_name1 -p < all_databases_backup_file.sqlHere is the output.
$ mysql -u a056c59a_f56757 --one-database a056c59a_f56757 -p < a056c59a_full_db.sql
Enter password:
$
3. Export and Import a MySQL Database in One Command
You can create a dump file from one MySQL database and import it into another MySQL database using the following one-line command. This example pipes the output to a MySQL client on a remote host that imports it into the database. Replace remote_database_name with the remote host database name of your choosing.
mysqldump -u database_username database_name -p | mysql -h remote_host -u remote_database_username remote_database_name -pBackup a MySQL Database Using phpMyAdmin
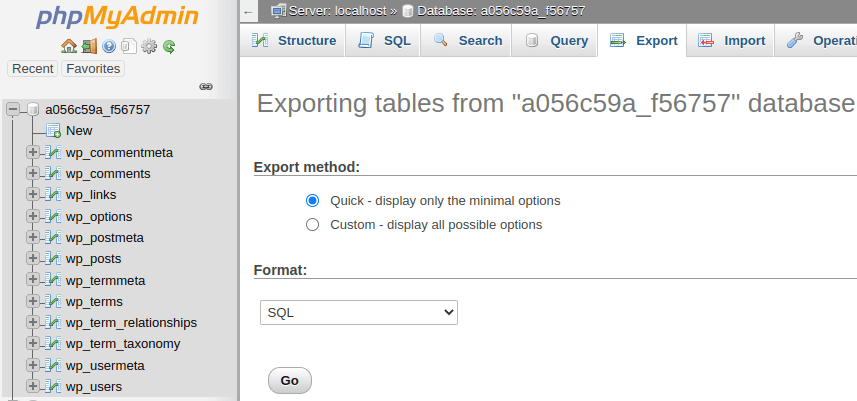
To take a backup of the MySQL database using phpMyAdmin, follow these steps.
Step 1:
Log in to phpMyAdmin.

Step 2:
Select the database you wish to backup from the left navigation tree.

Step 3:
Click on the Export tab.

Step 4:
Select the Export method. For this tutorial, select the Quick radio button unless your requirements differ.

Step 5:
Once all selections are made, click the Go button.

Restore a MySQL Database Using phpMyAdmin
To restore the MySQL database from a Backup using phpMyAdmin, these are the steps to follow.
Step 1:
Log in to phpMyAdmin.

Step 2:
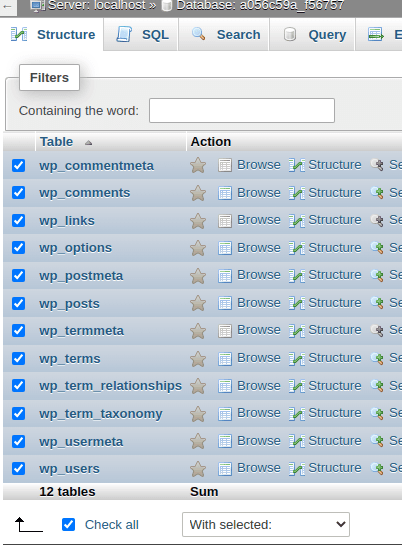
Select the database you wish to restore from the left navigation tree.

Step 3:
Click the Check All check box at the bottom to select all tables.

Step 4:
Click on the With selected drop-down menu and choose Drop.

Step 5:
Click Yes to confirm.

Step 6:
Click the Import tab.

Step 7:
Click the Choose file button to browse for the MySQL backup.

Step 8:
Click the Go button.

Once completed, you will receive a confirmation message.

Wrapping Up
If you are looking for assistance backing up or restoring your database, this guide can help. Following this tutorial and other best practices for your backup and recovery needs will help ensure the security of your data.
We offer Dedicated Server and VPS Hosting options for hosting standard or high availability databases. In addition, our skilled team provides 24/7/365 support and monitoring services so that you can focus on your websites. Contact our team today to learn more.
Related Articles:

About the Author: Mohammed Noufal
Mohammed Noufal is a B.Tech graduate with a decade of experience in server administration and web hosting. He is a father to two daughters and finds fulfillment in their growth. In his free time, he enjoys blogging, sharing experiences, and listening to music. With a strong technical background, family commitment, and creative outlets, he represents a well-rounded life journey.
Our Sales and Support teams are available 24 hours by phone or e-mail to assist.
Latest Articles
How to use kill commands in Linux
Read ArticleChange cPanel password from WebHost Manager (WHM)
Read ArticleChange cPanel password from WebHost Manager (WHM)
Read ArticleChange cPanel password from WebHost Manager (WHM)
Read ArticleChange the root password in WebHost Manager (WHM)
Read Article


