Your guide to hosting a Minecraft server on Linux
Let's dive into our introduction that answers the question, "Can you host a Minecraft server on Linux?"
Minecraft is a popular sandbox and adventure game that offers creative and survival challenges as you explore an infinite world with endless modification possibilities. Mojang Studios officially released the game on November 18, 2011, and it quickly experienced explosive popularity.
Worldwide monthly active usersfor Minecraft reached 40 million in June 2016. That number climbed to 140 million as of March 2021. However, with so many users accessing Minecraft’s server resources, inconvenient glitches and slow gameplay can occasionally frustrate users.
Fortunately, savvy Minecraft enthusiasts are able to bypass these problems by building their own Linux Minecraft server. All it takes is a little coding knowledge and a few easy-to-follow steps. Previously, you learned how to create a Minecraft server on Linux in five steps using your virtual private server (VPS). You will now learn how to set up a dedicated Minecraft server on a Linux machine.
Why should you set up Minecraft on a dedicated Linux server?
With a dedicated Minecraft server running on on the Linux operating system (OS), you have sole use and control over server resources. Processing power, memory, and storage are available specifically for your gameplay without noisy neighbors (shared hosting) or running virtualization (cloud dedicated or bare metal servers).
Your mods (additions to the game), plugins, and security settings are under your control. You can set up your Minecraft server on Linux how you want without other users changing your settings. Controlling server resources and security settings maximizes your performance while eliminating in-game errors due to server overload.
Spinning up your own Linux Minecraft server also affords you a new level of security as you play. Since server resources are all your own, you’re less likely to experience cyber threats. Many users are grateful for the increased security since Minecraft does have some in-game purchases that require sensitive financial information.
Server requirements
Per the Fandom Wiki, several configurations are available, including the minimum and optimal server configurations. Here are the minimum Minecraft server requirements for Linux:
- One to five players.
- Intel Pentium 4 2.0 GHz or AMD Athlon-based CPUs and better.
- 512 MB of RAM.
- 2 GB of available HDD space (5 GB for frequent backups).
- Internet connection of 3 Mbps upload speed and 2 Mbps download speed.
Here are the optimal server requirements to run a Minecraft server on Linux:
- Twenty or more players.
- Intel i5 or i7 CPUs, AMD Ryzen 5 or 7-based CPUs, and better.
- 6 GB of RAM.
- 35 GB of available HDD space.
- Internet connection of 30 Mbps upload speed and 15 Mbps download speed.
Note: It is recommended to use a solid-state drive (SSD) for additional performance due to faster read/write data speeds.
For this article, Minecraft is installed on a Liquid Web Dedicated Server with the following configuration:
- Intel Xeon CPU E3-1230 v5.
- 4 Core @ 3.40GHz.
- 16 GB RAM.
- 500 GB SSD.
- AlmaLinux 8 64-bit OS.
Steps to set up a dedicated Minecraft server on Linux
Host a dedicated Minecraft server on Linux using these seven easy steps. Improve your gaming experience with better performance and security.
Step #1. Connecting your server
Access your server’s console or connect remotely via secure shell (SSH). If connecting remotely via SSH, use the following command to log in as the root user:
ssh root@serveripaddressNote: Replace serveripaddress with your server’s IP address.
If this is your first time connecting to this server, you will be prompted to confirm that you want to connect to a new unknown host. Select the yes option, and you will be asked for the root password for the host. Once entered, you will be logged in as root.
We highly recommend creating a separate user account with restricted privileges, so that if your Minecraft server is compromised, the hacker does not get access to the root user account. Use the command below to create a user named mcuser:
adduser mcuserHere is the command is to set the password for our new user:
passwd mcuserOn the screen, you are then prompted to enter and confirm the password:

Step #2. Updating the package repository and installing Java
You will need to install Java. First, ensure that your package repository is updated using the following command:

Next, install Java using the following commands.
Note: Starting with Minecraft 1.17, the new standard for Java has shifted to Java 16.
You can check that it was installed successfully by confirming the Java version:
java -versionYou will see the following output:

To install Java 16, you need to ensure the server knows the package is available by updating the Extra Packages for Enterprise Linux (EPEL) repository. You will update it with the command below:
yum install -y epel-releaseIf it is not already installed, you will see the following output:
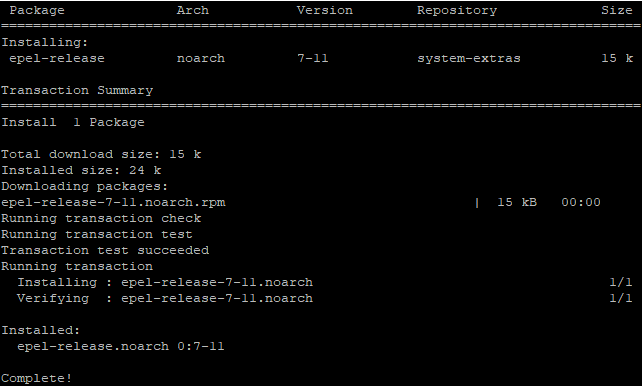
Next, you will install the latest version of Java, currently Java 16. Use the following command to install the newest version of Java:
yum install -y java-latest-openjdk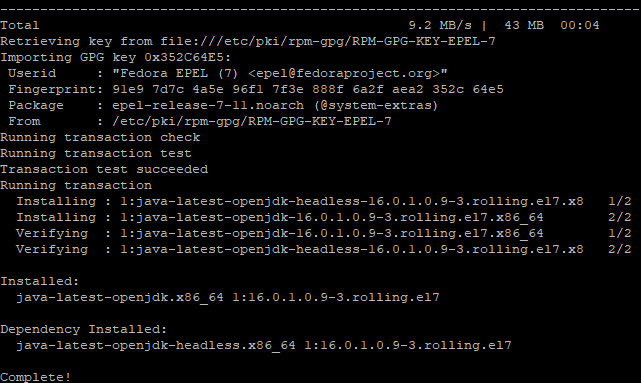
While Java 16 is installed, you still need to set it as the default for the server to run applications using the latest version. You can accomplish this by using the following command:
alternatives --config javaYou will be presented with the versions of Java installed on your server, each with a corresponding number. Choose the appropriate number and press the Enter key:
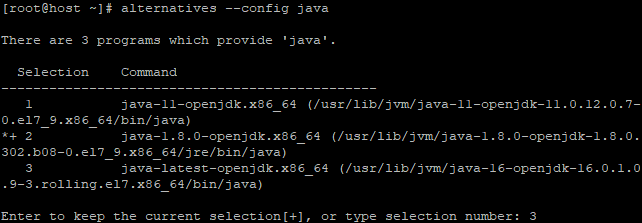
If you run the java -version command again, it will show your selected version number:

Step #3. Installing the Screen application
Install Screen, an application for the console that keeps your server running when you are not connected. To install it, use the following command:
sudo yum install screenYou will confirm installation as with installing Java. You will be informed and returned to the prompt if it is already installed:

Step #4. Setting up your Minecraft server on Linux
Start by switching users (to the username created in step #1) and making a directory for your Minecraft files. You can call your directory mineserver:
su - mcuser
mkdir mineserver
You will move to that directory with the following command:
cd mineserver
Next, you will download the needed configuration files for Minecraft. Visit the Minecraft Java Edition server page, right-click the Minecraft server .jar link, and copy the link address.
To download the files, you need to use the wget command along with the link to the files. It should look like this:
wget https://launcher.mojang.com/v1/objects/a16d67e5807f57fc4e550299cf20226194497dc2/server.jarNote: This URL will change with subsequent releases. Always obtain it directly from the Minecraft download page. As a general rule, only download installation files from trusted sources.
After running the command, the output will let you know the files were saved:
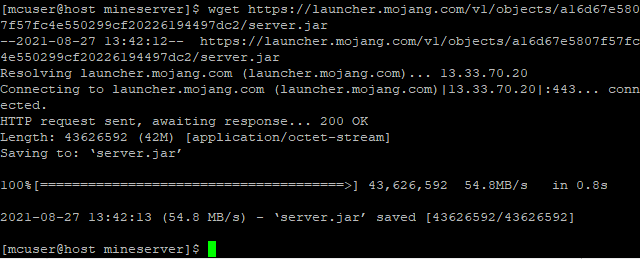
Note: Instead of saving the files to minecraft_server.1.17.1.jar, as it appears on the Minecraft download page, the files are saved to server.jar as in the image above. Make sure the file permissions are correct.
Step #5. Starting your Minecraft server for gameplay
Start your Minecraft server for the first time by running the following command:
java -Xmx1024M -Xms1024M -jar server.jar noguiBefore the server can start, you must accept Mojang’s license terms. You will need to open the document in your chosen text editor to do this. The example below will use Vim. The following command will open the document:
vim eula.txt5.1 Using the Vim editor
- Press i to enter Insert mode.
- Change eula=false to eula=true.
- Press the Escape key to exit Insert mode.
- Type :wq to save your changes and exit the editor.
Once you accept the terms, you can start a Screen session and the Minecraft server again. Type the screen command to start a new terminal session within your current session. Then, type the command you used before (as shown below) to start the Minecraft server:
screen
java -Xmx1024M -Xms1024M -jar server.jar nogui x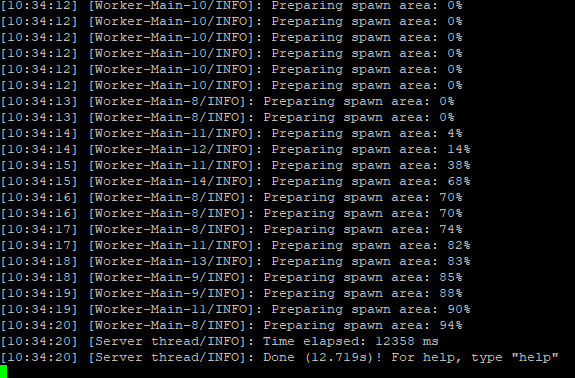
A new random world will be created once booting is completed. You can press the Ctrl+A+D keys to detach from this Screen session, which will place you back into the original terminal session you had while leaving Minecraft running inside the detached screen. You can log out without stopping the process or use the screen -r command to reattach it and bring it back to the foreground. To stop your Minecraft server, type the stop command from the Minecraft Screen session and press the Enter key .
Note: If you have issues connecting to the server, ensure that the default port for Minecraft (port 25565) is open in your server’s firewall.
Step #6. Adjusting your firewall settings
In addition to ensuring the Minecraft port (port 25565) is open, you’ll need to make some additional adjustments for your firewall to accept Minecraft’s incoming connections. First, you’ll need to enable port forwarding for ufw with the following command:
sudo ufw allow 25565Next, you’ll need to use the iptables feature. If you’re using an older OS, the iptables function should already be included. Use these commands to enable port forwarding for your iptables:
iptables -I INPUT -p tcp --dport 25565 -j ACCEPT
iptables-save >/etc/sysconfig/iptables
If you’re running a newer version of the OS, you’ll need these commands:
firewall-cmd --permanent --add-port=25565/tcp
firewall-cmd --reload
Step #7. Porting your Linux Minecraft server to a domain
Now that your Linux Minecraft server is up and running, you can point a domain to it and make it easily accessible. Doing this is a simple process and only requires a quick change to the domain’s DNS records.
Add an A record for your new domain. It should contain these variables:
- Host: @
- Value: Your Minecraft server’s IP address
- TTL: Set to Automatic or 30 minutes
Don’t be alarmed if you go to access your new domain right away and things aren’t working. DNS changes can take 24 hours to update, so be patient.
Final thoughts
We walked you through the process for hosting a Minecraft server on Linux. You are now Minecraft gameplay-ready on your newly created Linux server. And, your fellow players can quickly join the server with ease by using your direct IP address.
Managed dedicated server hosting is available through Liquid Web to set up your very own Minecraft server on Linux. You can contact us today to get your server and follow this tutorial once it is built.
Minecraft server hosting frequently asked questions
Which Linux distribution is best for a dedicated Minecraft server?
If you’re looking to build a Linux Minecraft server, you’ll want to use Ubuntu 20.04 as your foundation. It provides the stability of Linux and the user-friendliness of Ubuntu to make for seamless Minecraft gameplay.
How much RAM do I need to run a dedicated Minecraft server?
You’ll need at least 16 GB of RAM to support Minecraft on your server. The graphics, speed, and other features of the game won’t function well on anything lower.
What is the best category of operating systems for a dedicated Minecraft server?
Professionals recommend Windows or Linux servers for hosting your Minecraft server. If you don’t want to use traditional Linux OS, other OS options like Debian or openSUSE could also work.
Related Articles:
Our Sales and Support teams are available 24 hours by phone or e-mail to assist.
Latest Articles
How to use kill commands in Linux
Read ArticleChange cPanel password from WebHost Manager (WHM)
Read ArticleChange cPanel password from WebHost Manager (WHM)
Read ArticleChange cPanel password from WebHost Manager (WHM)
Read ArticleChange the root password in WebHost Manager (WHM)
Read Article


