What Is a DNS Zone? Guide to Decoding DNS Zone Types
What is a DNS Zone?
A Domain Name System (DNS) zone is the area of the DNS namespace under the control of one particular administrator or organization. A DNS zone is a space for the administration that enables more precise control over DNS elements like authoritative nameservers. The DNS root domain is at the top of a hierarchical tree representing the domain name space.
There are numerous different zones in the DNS. These zones distinguish between the DNS namespace’s separately managed areas. A DNS zone starts at a domain within the tree and can extend down into subdomains to allow the management of multiple subdomains by a single entity.
An actual representation of the zone and all the records for each domain within the zone are contained in a plain text file called a DNS zone file kept on the DNS server. A Start of Authority (SOA) record, which must always be present at the beginning of a zone file and contains crucial details like the zone administrator’s contact information, must always be present.
Types of DNS Zones
The DNS zones are classified as follows.
Primary Zone
Primary (Master) zones have a read/write copy of the zone data. One Master zone at a time could only exist on one DNS server. This DNS server’s Primary zone contains all the manually and automatically added DNS records. This zone receives zone updates, which are replicated in the secondary zones. The information is kept in a common.txt text file. The benefit is that backing it up and recovering it in case of issues is simple.
There is a requirement that the Primary zone is accessible to modify the DNS zone. You won’t be able to make any changes if your Primary DNS server is unavailable. The zone data must be accessible on multiple servers if you want redundancy.
Secondary Zone
The Primary Zone is a read-only copy of the Secondary (commonly called slave) Zone. Master zones are frequently exact replicas of secondary zones. Additionally, they could be duplicates of Active Directory Zones or other Secondary zones. A single point of failure is avoided by using the Secondary Zones and reducing the workload on the Primary Zone.
It may direct you to another zone with read/write access if you attempt to modify a DNS record in a secondary zone. It cannot modify it by itself. Serving as a backup is one of the main functions of a slave zone. It can still respond to requests for the zone from its copy, even if the primary zone is down.
Active Directory-Integrated Zone
DNS zones integrated with Active Directory are kept in directory partitions within Active Directory. Along with the rest of the Active Directory, these directory partitions replicate. So, no additional configuration, such as zone transfer setup, is needed for DNS replication. The use of secure dynamic updates is also possible with Active Directory-integrated zones. As a result, machines unable to log in to the domain cannot update DNS records.
Data is stored in the Active Directory database as a container object by the Active Directory Integrated zone. Every DNS zone has its container created with the DNS zone class. A DNS node object in the DNS zone object represents a unique name in the zone. These items fall under the DNS node class. Multiple attributes are connected to the DNS node objects.
Stub Zone
A stub zone is a duplicate of a zone that only includes the resource records required to identify the zone’s authoritative Domain Name System (DNS) servers. To resolve names between different DNS namespaces, use a stub zone. When an organizational merger requires the name resolution of clients in both DNS namespaces, this type of resolution may be necessary.
A stub zone is made up of the glue A resource records for the delegated zone, name server (NS) resource records, and the start of authority (SOA) resource records. An update to the stub zone can be made using one or more master servers, whose IP addresses can be found here. The DNS server hosting the primary zone for the delegated domain name is typically one of the one or more DNS servers authoritative for the child zone that makes up the master servers for a stub zone.
Reverse Lookup Zone
A reverse lookup zone is a type of authoritative DNS zone that is mainly employed to translate IP addresses into the names of various types of network resources. This zone type can be integrated with Active Directory, primary, or secondary.
Email servers frequently use reverse lookups to find information. Before adding an email message to their network, email servers verify that it originated from a legitimate server. Many email servers will reject messages from any server that doesn’t support reverse lookups or is unlikely to be a reliable source. There won’t be a PTR record because spammers frequently use IP addresses from compromised systems. Alternatively, they might use dynamically assigned IP addresses that point to server domains with extremely generic names.
Setting Up a DNS Zone
Add a DNS Zone
You can use the steps listed below to add a DNS zone.
- Open your Liquid Web account.
- From the left menu, click on Domains.
- Click on the DNS Tab
- Click on Create New DNS Zone.
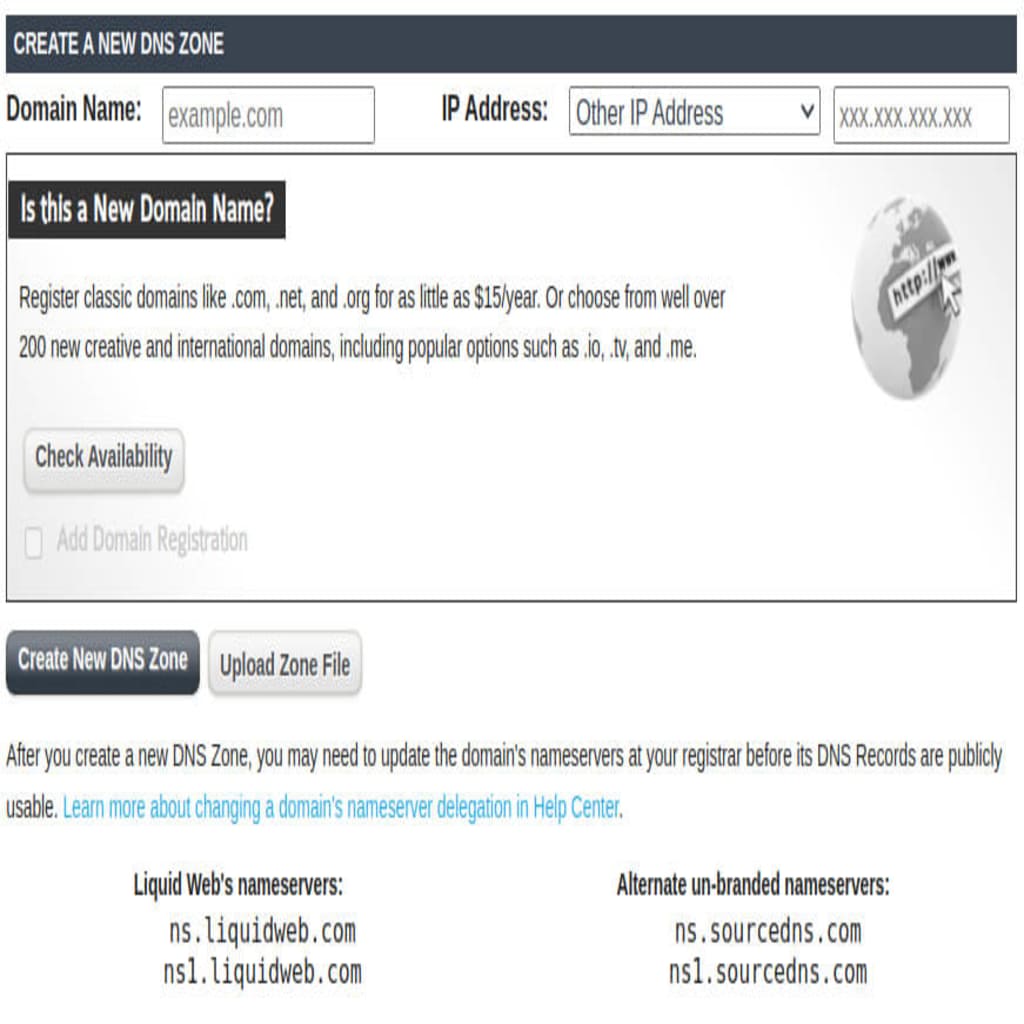
Create a New DNS Zone
Use the steps listed below to create a New DNS Zone.
- Choose a domain name and enter it.
- Choose IP Address from the drop-down menu.
- Other IP Address: Use of a user-defined IP address for the target domain
- Import From a Live Domain: Depending on the domain, our system will copy the current A record IP address.
- Click on Create New DNS Zone from the menu.
Upload a Zone File
If you want to import an existing DNS zone file from an external source or a backup, you should use this option. You can use the steps listed below to upload a Zone File.
- Enter the domain name you want to use.
- Click on the Upload Zone File button.
- From your local file system, choose the DNS zone file.
Note that this functionality won’t replace an existing domain’s system record.
Export a DNS Zone
You can use the steps below to export a DNS Zone.
- Click the [+] Plus Sign to the left of the domain name in the Current DNS Zones section to expand the DNS zone records details.
- In the bottom-right corner of the section, click on Download Zone Records.
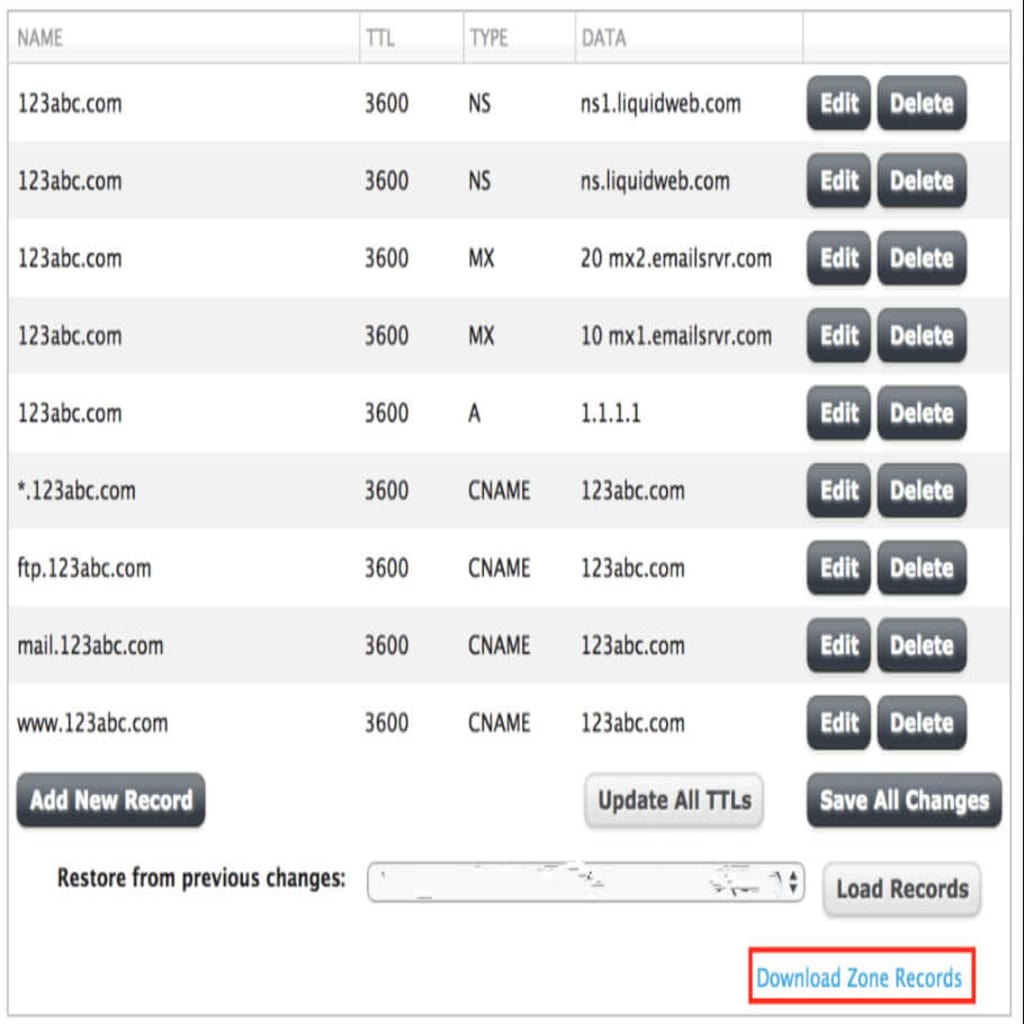
- A download prompt will appear for you to finish the export.
The exported file will be in BIND format. Here is an example of the exported file.
Domain: domain.com
Exported (y-m-d hh:mm:ss): 2022-11-21 12:00:00

This file is intended to be informational and for user reference only.

Before migrating or using this file on a production environment please validate record accuracy. Please ensure you update the SOA record with the correct authoritative name server, contact e-mail address information, and the correct NS records for the name servers which will be authoritative for the new Domain.

Use of this zone data with any other third-party DNS software and services is not supported.

More information can be found in this Help Center document:

; SOA Record
domain.com.	3600	IN	SOA	ns.liquidweb.com.
liquidweb.com. (
				2022112000
				86400
				7200
				3600000
				14400
				)
; A Records
@	3600	IN	A	1.1.1.1

; CNAME Records
ftp           3600	IN	CNAME	@
mail	3600	IN	CNAME	@
www	3600	IN	CNAME	@
*	        3600	IN	CNAME	@

; MX Records
@	        3600	IN	MX	10	domain.com

; NS Records
@	       3600	IN	NS	ns1.liquidweb.com
@	       3600	IN	NS	ns.liquidweb.com
What is a DNS Zone File?
The DNS zone file is a text-based file kept on a DNS name server. This file includes details about resource records that map IP addresses, domain names, and other resources (RR). Any DNS zone file must contain the Start of Authority (SOA) record and the Global Time to Live (TTL) record as their first two records.
Types of DNS Zone Records
Start of Authority (SOA)
Information about a domain name system (DNS) zone and other DNS records is stored in a start of authority (SOA) record. A DNS zone is the portion of a domain that is under the control of one specific DNS server. Each zone has a single SOA record.
Here is the sample SOA record.
The SOA record is:
Primary nameserver: ns1.example.com
Hostmaster E-mail address: dns-admin.example.com
Serial #: 328771906
Refresh: 900
Retry: 900
Expire: 1800   30 minutes
Default TTL: 60
Name Server (NS)
An NS record, also known as a nameserver record, is a DNS entry that specifies the authoritative name server for a domain or DNS zone. A client can use a DNS lookup to determine the IP address of their intended destination when it requests an IP address by using an NS record.
The following is a sample NS record.
example.com.	86400	IN	NS	ns1.example.com.
example.com.	86400   IN	NS	ns2.example.com.
Mail Exchange (MX)
An MX record in DNS tells email clients where to send messages (mail exchange). According to the Simple Mail Transfer Protocol, the MX record specifies how email messages should be forwarded (SMTP, the standard protocol for all emails). An MX record must always point to a different domain, similar to CNAME records.
Here is a sample MX record.
example.com 14400 IN MX 0 Example.com.Address (A)
A type of Advanced DNS record known as an Address (A) Record points a domain or subdomain to the IP address (IPv4) of the server hosting the website. The Host Name, Address, and TTL are the components of an A record.
Below is a sample A record.
example.com. 14400 IN A 104.XX.XX.XXAAAA (quad A)
When IPv6 addresses are used, an essential DNS record type is the type AAAA. A destination’s IPv6 address is assigned via AAAA records, enabling communication between the source and destination.
Here is the sample AAAA record.
example.com. 14400 IN AAAA 2001:db8:1::ab9:C0A8:102Canonical Name (CNAME)
An alias name is mapped to the actual or canonical domain name using a DNS record type known as a Canonical Name (CNAME) record. A subdomain like www or mail is typically mapped to the domain hosting that subdomain’s content using CNAME records. For instance, a CNAME record can direct visitors to the website for the domain example.com from the web address www.example.com.
The following is a sample CNAME record.
www.example.com. 14400 IN CNAME example.com.Alias Record (ALIAS)
The DNS record known as an ALIAS points your domain name to a hostname rather than an IP address. The root domain can also use the ALIAS record to add multiple hostnames to the same subdomain. You cannot use a CNAME record, but you can use an ALIAS record if your domain is example.com and you want it to point to a hostname such as host.example.com. The ALIAS record causes your domain to automatically resolve to one or more A records at resolution time, giving resolvers the impression that your domain has A records.
Below is the sample ALIAS record.
example.com. 14400 IN ALIAS host.example.com.Text (TXT)
TXT records are a particular class of DNS records that store text data for external sources. Records in TXT can serve a variety of purposes. This record type can also contain human-readable instructions, unlike most DNS records, which only contain information for machines. TXT records are frequently used to keep track of contact information and other domain-related details. However, they are also utilized for higher purposes like framework (SPF) policies, domain ownership verification, and email spam prevention.
Here is a sample TXT record.
example.com. 14400 IN TXT "v=spf1 +a +mx +ip4:1.2.3.4 ~all"Service Locator (SRV)
The host and port for messaging services are automatically configured by clients when an account is created using SRV records, also known as service location records. These records are generated within the domain’s declared DNS zone records. SRV records include a port at that IP address in addition to the server or IP address, which is different from most other DNS records. SRV records are necessary for some Internet protocols to work.
The following is a sample SRV record.
example.com. 14400 IN SRV 0 5 5060 sipserver.example.com.Pointer (PTR)
A PTR record, also referred to as a Pointer Record, is a file (a record) that is included with an email message. The PTR record aims to confirm that the sender uses the IP address it claims to be using. Reverse DNS lookup is another name for this email ID verification process. Browsers employ the opposite of the forward DNS lookup procedure to translate a domain name to a numeric address or IP address.
Below is the sample PTR record.
4.3.2.1.in-addr.arpa. IN PTR example.com.DNS Zone vs Domain
Individual DNS servers are in charge of each zone that makes up a domain. DNS Zones are divisions of domains for which specific DNS servers are accountable. A domain is a collective group of names that fall under a given organizational domain name. For instance, all domain names that end in .com belong to the com domain. A DNS zone is a domain empty of any subdomains assigned to other DNS servers. It has one SOA record describing the zone’s general properties and other DNS records.
Conclusion
One of the most crucial components of the internet is DNS. Your company’s online presence depends on it, whether or not you are aware of it. If it fails, people will have difficulty finding your assets online.