
 Nathaniel Swanson
 VNC (Virtual Network Computing) is a method for sharing a remote desktop environment. Allowing you to remote control another computer or server over the Internet or local network as if you were sitting in front of it. Keyboard and mouse strokes from your computer are relayed to the remote computer/server.
There are many different kinds of VNC software available today. Several are cross-platform and add additional features, such as chat or file transfers. VNC is often used for remote technical support and remotely accessing files.
What is TeamViewer?
Have you ever wanted to open a file manager and browse your server’s files? Have you ever wanted to open a browser on your server and use it as a VPN? TeamViewer will allow you to do that without much effort. Once TeamViewer is set up on your server, accessing your server takes only a couple of clicks.
Many additional features such as chat, file transfers, and wake-on-LAN are available through TeamViewer. They also offer monitoring, asset tracking, anti-malware, and backups for an additional fee.
TeamViewer supports text-based consoles as well as a GUI (Graphic User Interface). If you want to use TeamViewer without using a GUI you can skip installing a desktop environment and window session manager and go straight to the Installing TeamViewer section. However, for this guide, we will assume that remote control of a desktop environment is needed or otherwise wanted.
Prerequisites
You will need to have a server running Ubuntu VPS with a desktop environment and a window session manager. There are many types of desktop environments and window session managers you could install.
There is plenty of debate in the Linux community, but for this guide, we recommend going with something lightweight. For that we suggest Xfce. Another good option is LXDE which is again known for being lightweight and used in many different operating systems as the default desktop environment. Gnome, Mate, and KDE are also noteworthy.
Like desktop environments, there are many window session managers and some even come with the desktop environment! We recommend using LightDM with Xfce. LightDM is easy to install and configure and is also very lightweight.
You’ll need a TeamViewer account with your login credentials handy, along with the TeamViewer client installed on your local computer, or you can use the web client which requires Flash.
Installing Xfce and LightDM
Once you have your Ubuntu 16.04 LTS server up and running, install the desktop environment and window session manager. For our build, we’ve installed Xfce with our Knowledge Base article. Next, install LightDM by running:sudo apt install lightdmOnce installed you will need to configure it to use Xfce. You can do that by creating a file called /etc/lightdm/lightdm.conf using your favorite text editor and adding the following configuration settings:sudo vim /etc/lightdm/lightdm.conf[SeatDefaults]
allow-guest=false
user-session=xfce
Opening Firewall Ports
TeamViewer prefers connections using UDP and TCP on port 5938, but if that port is not available, it falls back to ports 80 (HTTP) or 443 (SSL). Port 80 is used only as a last resort and is not recommended due to the additional overhead. Making connections over this port results in a laggy experience. If you are running firewalld use these commands to open port 5938:sudo firewall-cmd --zone=public --add-port=5938/tcpsudo firewall-cmd --zone=public --add-port=5938/udp
If you are using ConfigServer Security & Firewall (CSF) you will need to edit the configuration file. Open the file with your favorite text editor and add the port number to the lines that start with TCP_IN and UDP_IN. Remember to separate your port numbers with commas and then restart the firewall.sudo vim /etc/csf/csf.confsudo csf -r

The firewall ports are open now that you’ve installed the desktop environment and window session manager. You can now reboot the server. Upon boot, the server will startup Xfce and LightDM.shutdown -r now
Installing TeamViewer Host
To install TeamViewer, you first need to download the package:wget https://download.teamviewer.com/download/linux/teamviewer-host_amd64.debThen use apt to install the package:sudo apt install ./teamviewer-host_amd64.deb
During installation, TeamViewer adds the file /etc/apt/sources.list.d/teamviewer.list (DEB), which contains information about the repository. Apt update & upgrade allows you to keep the software up-to-date by simply running:sudo apt updatesudo apt upgrade
Once TeamViewer is installed you will need to configure it for first time use.sudo teamviewer setup
TeamViewer will prompt you to accept the license agreement and then ask you for your username and password for your TeamViewer account. The first time that you log in, TeamViewer will most likely email you to verify that you are trying to log in to your account from a new location (i.e., your server). Until verified through email it will not allow you to log in until you confirm the new location. Check your inbox and spam folder for their email and click the link to approve the new login location. Afterward, go back to your server and re-enter the username and password to log in.
TeamViewer asks if you would like to add the server to “My computers” on your account. If you get a connection error make sure your server is connected to the Internet and that the proper ports are open in the firewall. Run:
sudo teamviewer setup

If everything goes as planned you should see something like this:
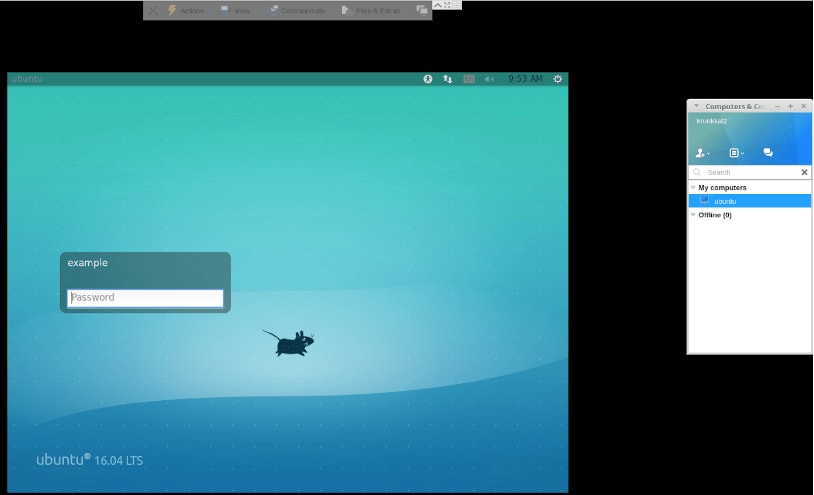
Now that TeamViewer is installed, you can connect to your server remotely with your TeamViewer client or by logging in with your teamviewer account here. You will now see your server listed under “My computers” in TeamViewer. Just double-click on your server under “My computers” and it will connect to your Ubuntu server. Here is an example TeamViewer connected to my Ubuntu VPS running Xfce and LightDM:
You now know how to set up TeamViewer on Ubuntu server 16.04 LTS! If you are already a Liquid Web customer, feel free to contact The Most Helpful Humans™ with questions you may have in setting up a TeamViewer on Ubuntu 16.04 LTS. We also have some more useful articles about Ubuntu.
Cloud Spectator is an independent, third-party cloud analytics confirms Liquid Web’s VPS servers outperform Rackspace, Amazon, and Digital Ocean across the board.