
 Nelson Alba
 Different business and development workloads call for more versatility in your environment. Virtualization provides an option for creating virtual environments to host, test, and develop your mission-critical projects.
If you need help installing a Kernel-based virtual machine (KVM) on CentOS 8, then you have come to the right place. We will go over steps to set up virtual machines (VMs) in desktop environments equipped with a graphical user interface (GUI) and servers using the command line interface (CLI).
What is KVM?
Kernel-based virtual machine (KVM) is an open source virtualization solution that turns your Linux machine into a hypervisor on x86 hardware. It gives each VM its own virtualized set of resources such as processors, storage, and RAM.
What is Virtualization?
For those wondering “What is Virtualization,” it is the process of running virtual computer instances on physical hardware. It lets you reallocate your system hardware for use as smaller virtual computers.
Virtualization achieves this by allowing a guest operating system (OS) to run on the host OS. The host OS is the operating system running on the hardware which shares its resources with any guest server instances (VMs). The guest OS is the virtualized operating system running on the VMs that you create.
Virtualization is useful when the host OS cannot run the desired software (compatibility for legacy software) or turns one big computer into smaller ones. The latter is what hosting providers do to provide many clients their own environments with complete control.
[su_box title=”Note:” style=”glass” box_color=”#3ac6eb” radius=”20″]There are additional resources available on “What is a hypervisor?” and the differences between a bare metal server vs virtual server.[/su_box]
Requirements
Now that we know the basics of KVM and how it works, here is what you need to install a virtual machine on CentOS 8:
- A computer or server running CentOS 8.
- ISO image (optical disc image) of the guest OS to be installed.
- Root or sudo privileges on the machine.
- CLI or terminal access.
[su_box title=”Note:” style=”glass” box_color=”#3ac6eb” radius=”20″]These steps can be performed on CentOS 7 and AlmaLinux 8.4 desktop and server variants. AlmaLinux OS is 1:1 binary compatible with RHEL and CentOS versions before CentOS Stream (CentOS 7 and 8). Or, find out more about Ubuntu server virtualization.[/su_box]
Software Virtualization VS Hardware Virtualization
Software virtualization is when the host OS emulates all the software executed on the guest machine. While performance takes a hit, the additional abstraction layer is easier to maintain since the host and guest OSs will be completely independent.
Hardware virtualization has the advantage that the host hardware will execute all or part of the instructions run on the guest machine, which boosts performance; however, since the host hardware must be capable of performing this, it limits what systems or platforms will be compatible.
Hardware Virtualization Compatibility
Let’s check If your hardware is compatible with hardware virtualization since your guest OS will perform better.
Run the command below. If there is output, it means it is compatible with hardware virtualization. The vmx is the flag for Intel hardware, and the svm is the flag for AMD hardware.
$ cat /proc/cpuinfo | egrep "vmx|svm"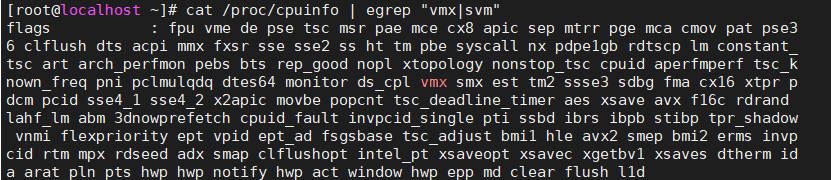
There are two reasons for no output:
- Your hardware is not compatible with virtualization.
- Your hardware is turned off in the basic input/output system (BIOS).
Review the specifications for your CPU to confirm whether or not it is compatible. If it is, take steps to enable virtualization in the BIOS before your computer boots.
Install a VM with a GUI
Let’s install a VM in our CentOS virtualization server (the host server) with a desktop environment and GUI.
Step 1: Install the Necessary Software
1. Let’s update our packages and gather the software needed. The virt-manager will allow us to manage VMs from a GUI while virt-top and libguestfs-tools offer management tools. Implementing these packages is the easiest way to get started with virtual machines.
$ sudo yum update$ sudo yum install @virt virt-manager$ sudo yum install virt-top libguestfs-tools virt-install virt-viewer2. Let’s check if KVM is installed correctly.
$ lsmod | grep kvmOur output should look like this.

3. Next, make sure that libvirtd is active and running.
$ sudo systemctl start libvirtd.service
$ sudo systemctl enable libvirtd.service
Step 2: Installation Using a Graphical User Interface
Use the virtual machine manager installed earlier to add a VM.
On your desktop, click Activities on the top left. It gives you a menu to see commonly used applications similar to the start menu in Windows. Then, type virtual in the search bar at the center of the screen to reveal the Virtual Machine Manager application. Finally, click the icon to open the application.

Step 3: Setting up the Virtual Machine
Follow the steps below to set up your VM.
1. Click File then New Virtual Machine.

2. Select Local install media (ISO image or CDROM) then click Forward.

3. Click Browse to find and select your preferred installation media path (if it asks for permissions, click Yes). Verify the checkbox for “Automatically detect from the installation media/source” is checked and that it detected the appropriate OS. Click Forward to continue.

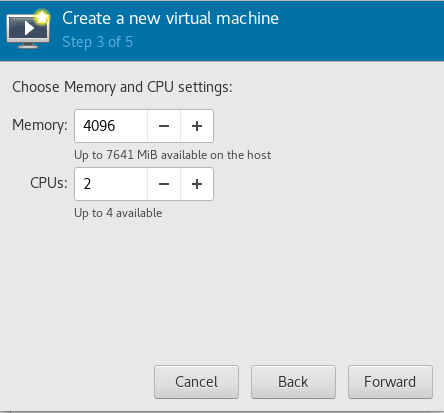
4. Add the desired amount of memory and number of CPU cores for the VM then click Forward.
5. Choose the disk size and click Forward.

6. The final menu will show the configurations previously selected. Click Back to make any changes. But If no changes are necessary, click Finish.

Once you click Finish, follow the guest OS installation instructions once the VM automatically starts.
In this example, you see an Ubuntu 20.04 ISO installation. The KVM part is fully set up in our CentOS virtualization server.
Usability Tips
Lost Cursor
If your cursor is lost or the mouse is not responding, it is likely captured by the VM. To get it back to the host desktop, hold the Ctrl + Alt keys.
Resize VM
If the display of the VM looks off or out of range, adjust it by clicking View, then Resize to VM.

Revert Changes
Snapshot is very helpful when performing software changes or upgrades that alter your VM behavior. Click the Snapshot icon to take a snapshot of the VM, which will allow you to roll back to the exact VM state as the snapshot.

You now have a successful Ubuntu VM installed and ready to use.
Adding a Virtual Machine via CLI
In this example, you will work with a CentOS virtualization server without a GUI. The ISO is an Ubuntu server install also without a GUI. Run commands as the root user.
Cockpit is the means used to install the VM. While there are other methods, it comes installed on CentOS 8. You need to install cockpit-machines for Cockpit to function properly.
Cockpit allows us to install Ubuntu server thanks to a Virtual Network Computing (VNC) server. The VNC is a graphical desktop sharing system that uses remote frame buffer protocol (RBF) to control another computer remotely.
Step 1: Install the Required Software
1. Similar to the GUI example, install virt-top and libguestfs-tools.
# yum install @virt virt-top libguestfs-tools virt-install virt-viewer -y2. Remember to start and enable libvirtd.
# systemctl start libvirtd.service
# systemctl enable libvirtd.service
3. The below command installs both Cockpit and cockpit-machines, but skips the packages that are already installed.
# yum install cockpit cockpit-machines4. Start and enable Cockpit using the following commands.
# systemctl start cockpit.socket
# systemctl enable cockpit.socket
5. Verify Cockpit is allowed in the firewall.
# firewall-cmd --add-service=cockpit --permanent
# firewall-cmd --reload
Step 2: Create the Virtual Machine via CLI
1. Add the virtual machine through the command line with the command below. It needs customization for your VM specifications.
# virt-install --name Ubuntu-server --ram=2048 --vcpus=2 --cpu host --hvm --disk path=/var/lib/libvirt/images/ubuntuservervm1,size=20 --cdrom /var/lib/libvirt/boot/ubuntu-20.04.3-live-server-amd64.iso --graphics vnc[su_box title=”Note:” style=”glass” box_color=”#3ac6eb” radius=”20″]The ISO directory from the above command is –cdrom /var/lib/libvirt/boot/ubuntu-20.04.3-live-server-amd64.iso. It is recommended that you put your ISO in the /var/lib/libvirt/boot directory so that you do not need to give more permissions.[/su_box]
Here is a closer look at what the flags mean. Modify them according to your needs:
- –name: The name of the VM.
- –ram: The amount of ram in megabytes the VM can use (2048M equals 2 Gigabytes).
- –vcpus: The virtual CPU cores that are allotted to the VM.
- –cpu host: The CPU or processor type. The host portion of the command causes the VM to emulate the host processor entirely.
- –hvm: The guest (VM) is fully virtualized.
- –disk path: The location on your CentOS 8 virtualization server where the virtual disk of the VM is stored, immediately followed by the size.
- size=20: The amount of disk space in gigabytes for the VM.
- –graphics: Select what tool (VNC, Spice, etc.) to use to install the guest OS
To get all the options and sub-options available for each flag, type the virt-install –help command.
Your terminal will show that it is waiting on the installation to complete. Move to the next step once completed.

2. Log into Cockpit to complete the installation with your IP address. Find your CentOS virtualization server’s private IP address with the following command.
# hostname -I | awk '{print $1}'3. Open your web browser and type https://yourIP:9090.
[su_box title=”Note:” style=”glass” box_color=”#3ac6eb” radius=”20″]Replace yourIP with your actual private IP address.[/su_box]
It will give a warning about the SSL Certificate. Since this is your own server, click Advance and proceed.
Login to the Cockpit administration panel with the root username and password of your CentOS virtualization server. Click the Virtual Machines section on the left, wait a moment, and it should show that the VM is running.
4. Click on the name of the VM (Ubuntu-server in this case).

You are brought to an overview screen with a terminal on the right to finish installing your guest OS on the VM.

5. Follow the steps to install your guest OS. If you are installing an Ubuntu server, write down the username and password you entered while setting it up. You will use it to SSH (secure shell) into the virtual machine.

Step 3: SSH into the VM
SSH into your VM once installed. The host server and the VM’s private IP addresses are required for SSH access.
In Cockpit, you can find the VM IP address by scrolling down to the Network section or using the terminal with the command in the previous step.
[su_box title=”Note:” style=”glass” box_color=”#3ac6eb” radius=”20″]Cockpit shows the IP as yourIP/24. Discard the /24 subnet mask as it is not needed.
[/su_box]
With your preferred method, SSH into your CentOS virtualization server and the VM.
The VM username and password will be the ones that you entered during the installation process.
The new VM is installed and ready for use.
Basic Commands
Here are a few useful commands for managing virtual machines from the command line. It is worth noting that you can perform these actions from the Cockpit control panel as well. If you choose to run the following commands from the CentOS virtualization server, replace Ubuntu-server with the name of your VM.
Use the following command to get help with the available commands and what they can do.
# virsh --helpThe below command lists all VMs regardless of their state.
# virsh list --allUse the following command to shut down the VM.
# virsh shutdown Ubuntu-serverStart the VM with the below command.
# virsh start Ubuntu-serverUse this command to clone your VM.
# virt-clone --original Ubuntu-server --auto-cloneThe VM name you wish to clone follows the –original portion of the command. The –auto-clone command will automatically assign a new name and disk location to the clone.
To create a clone, you need first to shut down or pause the VM you are cloning. Then, after the clone is created, use the virsh list –all command to view the new VM. For this example, the newly cloned VM is named Ubuntu-server-clone.

Those are the most basic commands for virtualization from the command line.
Wrapping Up
This tutorial is a starting point for KVM virtualization. It shows how to install KVM on CentOS 8 with and without a GUI.
Liquid Web doesn’t want you going at server virtualization alone. That’s why we offer Private Cloud Powered by VMware environments to fit your mission-critical workloads. Contact our sales team today to discuss getting the right environment for your needs.
