
 Mohammed Noufal
 A wide range of antivirus (AV) software is available for purchase, but not all are free or open source. This article helps you understand what ClamAV is, how to install it on Mac, Ubuntu, and Windows, and how to scan your system for viruses.
What is ClamAV?
Clam AntiVirus (ClamAV) is one of these open-source software that stands out for its capabilities and efficiency. ClamAV was initially created for the UNIX operating system but is currently available for Windows, AIX, BSD, HP-UX, Linux, macOS, OpenVMS, OSF (Tru64), and Solaris. It can detect, quarantine, and remove all types of malware, including trojans, worms, rootkits, and others.
What Does ClamAV Do?
The key responsibility of ClamAV is to integrate with mail servers for attachment scanning and is a framework that provides a protection engine that can be attached to a Message Transfer Agent (MTA) such as Sendmail, PostFix, and others. It is an outstanding email gateway antivirus that Internet service providers (ISP), telecom service providers, and web hosting organizations use. Many AV gateway suppliers, such as Barracuda, and OS vendors like Apple also employ it.
ClamAV has a command-line scanner, an automatic database updater, and a scalable multi-threaded daemon powered by a shared library-based antivirus engine. If the ClamAV scanner detects a potential security threat, it flags the file so you may take the necessary action.
How to Install ClamAV for macOS
ClamAV can be installed on a Mac using the steps shown in this section.
Step 1: Install the Homebrew Package Manager for macOS
Unlike Ubuntu, macOS doesn’t have a package manager like Apt. To install the Homebrew package manager, execute the following command from the Terminal (actual URLs to be used in the examples provided are subject to change).
/bin/bash -c "$(curl -fsSL https://raw.githubusercontent.com/Homebrew/install/HEAD/install.sh)"Step 2: Install ClamAV Using the brew Command
Use Homebrew to install ClamAV quickly.
brew install clamavStep 3: Configure ClamAV
To configure ClamAV, you must first change directories and copy the existing ClamAV files.
cd /usr/local/etc/clamav/
cp freshclam.conf.sample freshclam.conf
cp clamd.conf.sample clamd.conf.
Open the freshclam.conf file and comment (using the # symbol) out the line that includes Example so that the file looks like the following.
##
## Example config file for freshclam
## Please read the freshclam.conf(5) manual before editing this file.
##


# Comment or remove the line below.
# Example
#
# ...
You will also need to open the clamd.conf file and comment out the line that includes Example. Once you’ve made the necessary adjustments, save both files.
Step 4: Update the ClamAV Database
Execute the following command to update the ClamAV database, including virus signatures.
freshclamTo scan the current working directory, you can execute the following command.
clamscanTo scan a particular file, you can execute the following command, substituting /path/to/file with the actual file path.
clamscan /path/to/file.You can execute the following command to scan all files in a directory recursively.
clamscan -r /path/to/directoryHow to Install ClamAV on Ubuntu
You can install ClamAV on Linux Ubuntu by following the steps below.
Step 1: Update the Package Repository Index
To update the package repository index, you can execute the following command.
sudo apt-get updateStep 2: Install ClamAV
To install the ClamAV, you can execute the following command.
sudo apt-get install clamav clamav-daemon -yHere is the output.
root@noufal:~# sudo apt-get install clamav clamav-daemon -y
Reading package lists... Done
Building dependency tree... Done
Reading state information... Done
The following additional packages will be installed:
  clamav-base clamav-freshclam clamdscan libclamav9 libltdl7 libtfm1
Suggested packages:
  libclamunrar clamav-docs daemon libclamunrar9
The following NEW packages will be installed:
  clamav clamav-base clamav-daemon clamav-freshclam clamdscan libclamav9 libltdl7 libtfm1
Step 3: Confirm the ClamAV Version
After installing ClamAV, execute the following command to confirm the ClamAV version.
root@noufal:~# clamscan --version
ClamAV 0.103.8/26825/Mon Feb 27 08:24:38 2023
Step 4: Update the ClamAV Signature Database
ClamAV detects malware using virus signature databases. The most recent signatures are regularly updated in these databases. To keep protected, you must also download and install these updates on your ClamAV installation.
To update the ClamAV Signature Database, follow these steps.
Stop the ClamAV Service
You will need to execute the following command to stop the ClamAV service.
sudo systemctl stop clamav-freshclamManually Update the ClamAV Signature Database
You must execute the following command to update the ClamAV signature database manually.
sudo freshclamHere is the output.
root@noufal:~# sudo freshclam
Thu Mar 2 06:10:22 2023 -> ClamAV update process started at Tue Mar 2 06:10:22 2023
Thu Mar 2 06:10:22 2023 -> daily.cvd database is up-to-date (version: 26825, sigs: 2021909, f-level: 90, builder: raynman)
Thu Mar 2 06:10:22 2023 -> main.cvd database is up-to-date (version: 62, sigs: 6647427, f-level: 90, builder: sigmgr)
Thu Mar 2 06:10:22 2023 -> bytecode.cvd database is up-to-date (version: 334, sigs: 91, f-level: 90, builder: anvilleg)
Start the ClamAV Service
You will need to execute the following command to start the ClamAV service.
sudo systemctl start clamav-freshclamYou can list the options available with ClamAV by executing the following command.
man clamscanTo scan a directory recursively, execute the command below.
clamscan --infected --remove --recursive foldernameTo scan a file, execute the command below.
clamscan --remove filenameHere are explanations of some portions of the commands.
-i, –infected: Only show infected files on the screen. Clean files are not displayed. To suppress, use this option.
-r, –recursive: Scan the folder and its subfolders recursively. Avoid using this setting to restrict the scan to the top folder.
–remove: Remove infected files automatically. If a false-positive detection occurs when using this option, ClamAV will also delete those files.
How to Install ClamAV for Windows
To install ClamAV for Windows, you can follow the steps below.
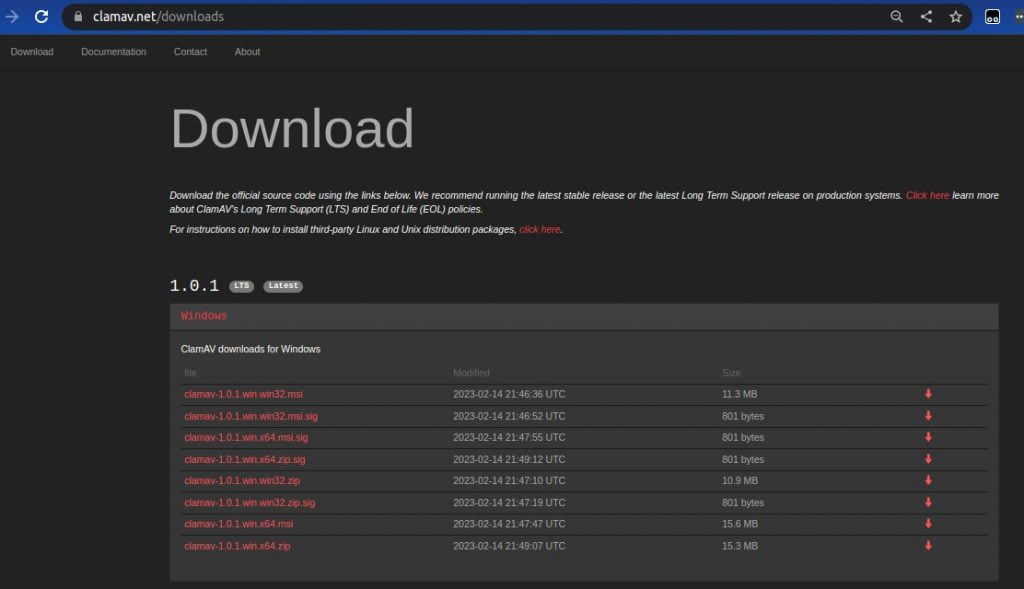
Step 1: Download and Extract ClamAV Daemon for Windows.
You can find the most recent ClamAV Windows package in the Download section.
Step 2: Installation and Configuration Files
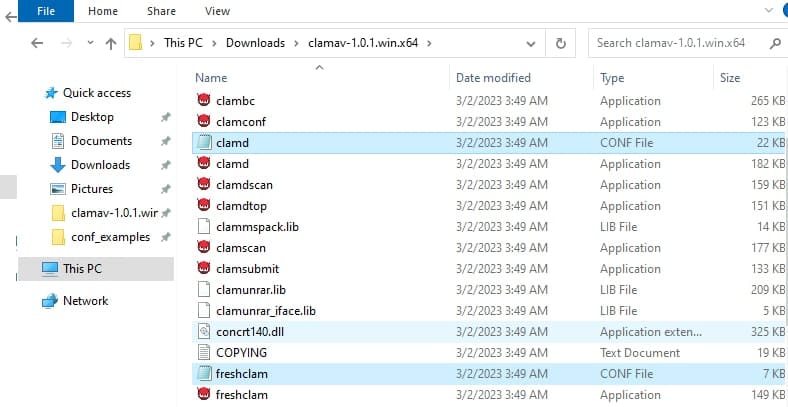
Go to the install directory and look for the conf_examples folder after downloading and extracting ClamAV.

This directory has two files: clamd.conf.sample and freshclam.conf.sample. You will need to copy these files to the installation directory. In this example, the files would be copied to c:\Users\Administrator\Downloads\clamav-1.0.1.win.x64.

Step 3: Modifying Configuration Files
Before modifying these configuration files, rename clamd.conf.sample to clamd.conf and freshclam.conf.sample to freshclam.conf.
Then, open clamd.conf and freshclam.conf in any text editor and look for the word Example on Line 8. The line has to be either commented (# Example) or removed.
clamd.conf File

freshclam.conf File
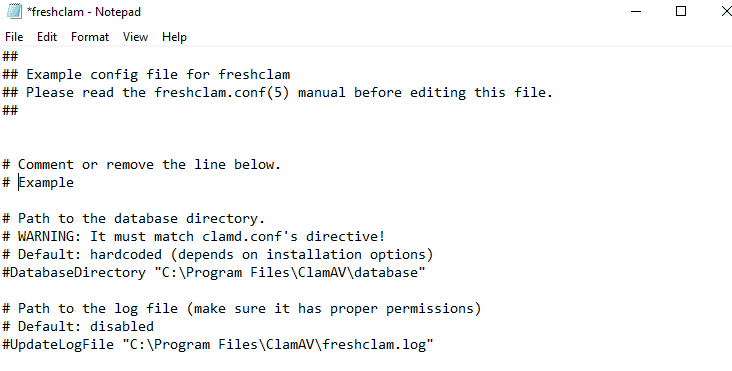
Once you’ve made the necessary adjustments, save both files.
Step 4: Install Service and Update Antivirus Library
Copy the ClamAV path from File Explorer’s address bar (For example, c:\Users\Administrator\Downloads\clamav-1.0.1.win.x64).Open Command Prompt as an administrator and change directories using the cd command to the ClamAV folder path. From the ClamAV folder, type the freshclam command, and press enter to proceed.
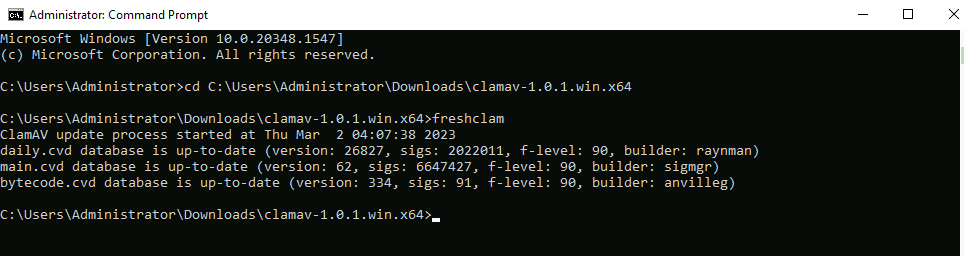
It will set up ClamAV for Windows and get it ready to use and secure your environment.
To scan a file or directory, execute the following command. Remember, the clamscan command must be run from the ClamAV folder in the Command Prompt window.
clamscan [options] [file/directory]Execute the following command to save a ClamAV scan report to a file.
clamscan --log=FILE [file/directory]To move or copy infected files into a particular directory, you can execute the following commands.
clamscan  --move=directory [file/directory]

clamscan --copy=directory [file/directory]
As ClamAV lacks a GUI and must be run from the command line, several third-party developers have created GUIs for the program that are optimized for different systems and purposes.
Conclusion
Scanning your computer for viruses is an important preventative maintenance activity to maintain your system malware-free. ClamAV is one of the excellent open-source anti-malware solutions available today, and it is a vital tool that can assist in keeping virus-free systems.
ClamAV is usable on your Windows or Linux server in addition to your personal computer. Liquid Web offers Windows and Linux options for VPS hosting, cloud servers, and dedicated servers. Contact a sales representative today to get your server up and running.