What is ownCloud?
Have you ever used an online collaboration tool or shared files with a co-worker, family member, or friend? You might have used email to send those files, or an online editor to work on a spreadsheet or text document at the same time.
But have you considered the security behind these dedicated server platforms? Who is safeguarding your data, and who else might have access to it? How can you be certain that content is properly encrypted so that only the intended recipients see it, away from the prying eyes of disgruntled employees, rogue agents, third party data miners, or government agencies? Many people want a certain level of control over exactly who is able to see their sensitive data, and this is where ownCloud comes into play.
OwnCloud is an open-source self-hosted cloud storage, file sharing, and collaboration tool. It is installed on a server and can store encrypted or unencrypted data on the server itself, or a number of other pre-existing storage locations such as Amazon S3, an FTP repository, or network file system.
OwnCloud is accessed through a web portal, or through any of a number of available clients for desktop and mobile devices. It has controllable sharing and access levels, and is even extensible with new features via plugins and apps!
Is ownCloud secure?
OwnCloud has great security offerings. It supports HTTPS and offers server-side encryption. Additionally, by default, each user has a unique public/private key pair generated when their account is created. These private keys are encrypted, so without the password, data can be made entirely inaccessible if files are encrypted on disk.
All of the built-in security can be further augmented with the use of apps from the ownCloud marketplace. By default, encryption and decryption happen on the server’s side, but with end-to-end encryption (E2EE) plugin, encryption and decryption can be shifted to the web browser for advanced transport security. There are even apps to add two-factor authentication to accounts as part of the ownCloud login process!
All of this is coupled with the fact that your ownCloud installation is being set up on your own private server, to which you control all access. Any server-level security that you implement, such as SSH security, filesystem encryption, AppArmor/SELinux, or userspace restriction, only strengthens the security of your data!
Prerequisites for Installation
As of writing, the latest version of ownCloud was 10.0.x. On Ubuntu 16.04, the system requirements are:
- MySQL 5.5+
- Apache 2.4
- PHP 5.6-7.2
To install this LAMP stack on a fresh Ubuntu 16.04 installation, you would run the following commands. These will install Apache 2.4, PHP 7.0 with PHP-FPM as its default handler, and MySQL 5.7:
apt-get install apache2apt-get install php php-curl php-gd php-intl php-json php-xml php7.0-fpm php7.0-opcache php-mbstring php-mysql php-zip php-mcrypt php-bz2 libapache2-mod-phpapt-get install mysql-server mysql-clientThis last command will ask you to set the root password for the MySQL server. Make sure you make this very secure and write it down somewhere safe! We’ll need this later during our installation of ownCloud.
Everything LAMP related is now installed; let’s continue with the basic configuration and enabling services:
a2enmod sslsystemctl restart apache2systemctl enable apache2mysql_secure_installationsystemctl restart mysqlsystemctl enable mysqlSecuring your server in general and tuning the parameters for each of these services is outside of the scope of this article, but these steps will at least get us up and running so that ownCloud can get installed. Please be sure to secure your installation and add any other programs you might use at this time.
OwnCloud also recommends using a caching tool, such as Redis or Memcache. We’ll address Redis during post-install down below.
There is one final item needed on a basic Ubuntu install to get the repository for ownCloud working:
apt-get install apt-transport-httpsInstalling ownCloud
We bet you didn’t think you could get a LAMP stack installed that easily! Now that our server is set up with all the prerequisites for ownCloud, let’s add the repository and install the program.
wget -qnv https://download.owncloud.org/download/repositories/production/Ubuntu_16.04/Release.key -O- | apt-key add -echo 'deb http://download.owncloud.org/download/repositories/production/Ubuntu_16.04/ /' > /etc/apt/sources.list.d/owncloud.listapt-get updateapt-get install owncloud-fileschown -R www-data:www-data /var/www/owncloudThe application is now installed, but it still needs to be made accessible through Apache. Let’s make our virtual host file. Insert the following into a file called /etc/apache2/sites-available/owncloud.conf.
<VirtualHost *:80>
        ServerName owncloud.mydomain.com
        DocumentRoot /var/www/owncloud/
        <Directory “/var/www/owncloud/”>
                   Options +FollowSymLinks
                   AllowOverride All
                   SetEnv HOME /var/www/owncloud
                   SetEnv HTTP_HOME /var/www/owncloud
        </Directory>
        <Directory “/var/www/owncloud/data/”>
                   Require all denied
        </Directory>
</VirtualHost>
Make sure that your ServerName variable is changed to the domain name that you would like to use for ownCloud. It’s also a very good idea at this time to set up DNS for this domain or subdomain, as you will likely want to visit the server by name and not by IP!
Once this is finished, we enable the site, test the configuration, and reload Apache.
a2ensite ownclouda2dissite 000-defaultapache2ctl -tsystemctl restart apache2Setting up ownCloud
We are very nearly there! Just a bit more configuration to do for ownCloud. Now that the site is loaded into Apache, and assuming we set up DNS for our domain as above, we should be able to navigate to our server to complete the graphical portion of the installation.

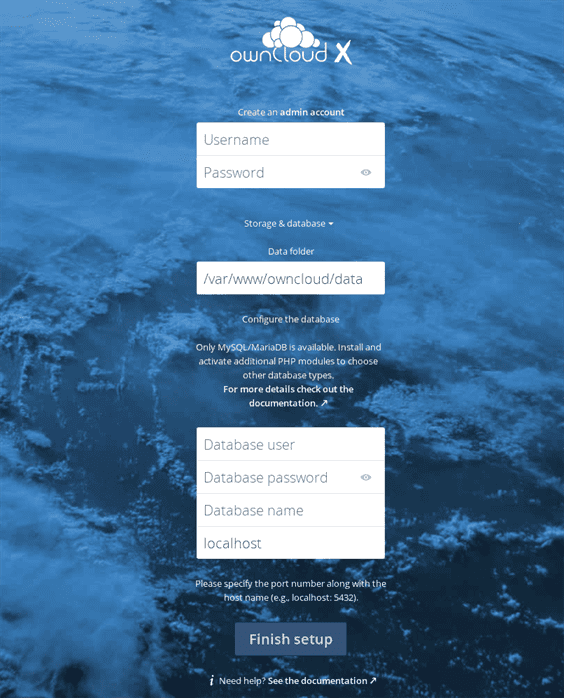
This will require a little more information from us in regard to a database to use and a location to store data on the server. Let’s get the database created first. Both of these commands will prompt you for the MySQL root password you selected back when you installed that service.
mysqladmin -u root -p create owncloud_dbmysql -u root -p -e ‘grant all privileges on owncloud_db.* to owncloud_user@localhost identified by “reallygoodpassword”’Make sure you use a really good password instead of ‘reallygoodpassword’. You shouldn’t need this password ever again, so you should make it really complex and hard to guess! Additionally, you should not use the ‘root’ MySQL user and password for ownCloud, because a compromise of that system would lead to all of your other databases being accessible. It’s just good security practice, and that’s what installing ownCloud is all about.
Now, we can feed this database information into the installer at the appropriate location:
- Database user: owncloud_user
- Database password: your really good password
- Database name: owncloud_db
Finally, if you want the ownCloud files to be stored outside the document root of the site, which I recommend for data safety, you should create a folder on your server elsewhere and give ownership to the www-data user, so that Apache can access it.
mkdir /owncloudchown www-data:www-data /owncloudNow you can change the ‘data folder’ line in the installer from /var/www/owncloud/data to /owncloud, the folder we just made.
Finally, we can click on ‘finish setup’ to write the configuration for ownCloud.
Post-install Tasks
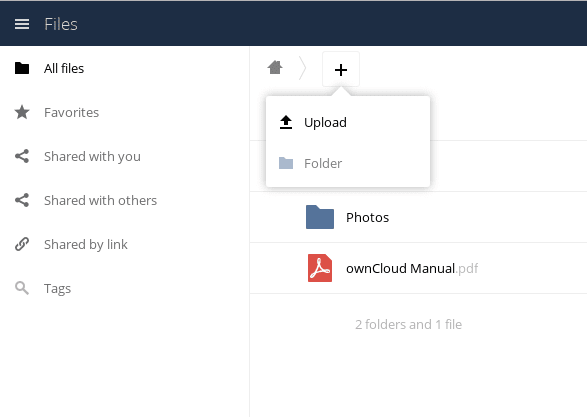
We should now be able to log into our fresh install! Let’s get logged in now, and do some post-installation configuration. The plus sign at the top of the main screen lets you create folders and add files to the current folder.

Try adding a file here to make sure that the storage is working. If there were a problem, it should have told you during the installer, but it doesn’t hurt to check. You can also flip through the ownCloud Manual stored in this home folder, to familiarize yourself with some of the other features of the system.
Set Up System Cron
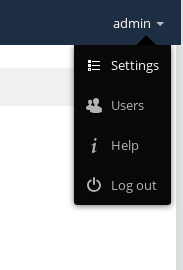
Next, we should perform some efficiency improvements. Moving the ajax cron into a system cron is a good first step. Head to the settings menu by clicking on your username in the top right of any screen.

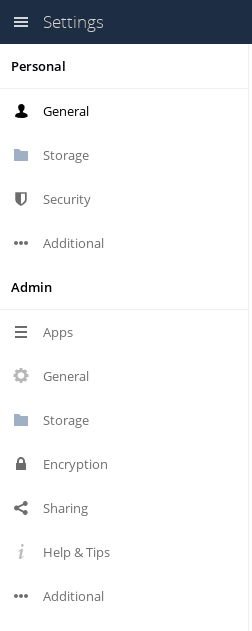
In this area, we’ll select the ‘General’ tab under ‘Admin’ from the left side (the second one, with the gear icon).

There may be some warnings at the top of the page about Security and Setup. Don’t worry, we should be able to address all of those errors in these instructions. Head down this page a ways to the Cron area.

The default selection here is ‘AJAX’, which runs the cron task once per page load. Not very efficient. Move this to the ‘Cron’ option, for which you must set up a system cron. Head back to your terminal window, and edit the crontab for the www-data user, like so.
crontab -u www-data -eIn this file, we will add the following line, which will execute the cron.php file every 15 minutes.
*/15 * * * * /usr/bin/php -f /var/www/owncloud/cron.phpSave this file and exit, and the crontab should now be working automatically. If you have a different PHP binary location, or if your system needs to use PHP-CLI, be sure to use that instead of the full path listed here. You can run which PHP to confirm the location of the PHP binary.
Configure Caching
One of the warnings that you might see at the top of your screen when you enter the settings area would tell you to use memory-based transactional file locking. This can be done in one of three ways, but the simplest is to use Redis, since it takes care of both file caching and memory caching. There are only a few commands needed to get this installed and set up.
apt-get install redis-server php-redissystemctl restart php7.0-fpmsystemctl reload apache2Test the install by running a quick command.
php -m | grep redisNow that this is installed, we need to add a few lines into the ownCloud configuration, which is stored at /var/www/owncloud/config/config.php. There are a good number of lines in here already, and most of them are encapsulated in a PHP array. We need to add another element inside that array to tell ownCloud that Redis is available, and where to reach it. Underneath the ‘version’ line, insert another line with the following text (the preceding spaces on each line aren’t too important, they are just there for readability).
'memcache.local' => '\OC\Memcache\Redis',
  'redis' => [
  'host' => 'localhost',
  'port' => 6379,
],
'memcache.locking' => '\OC\Memcache\Redis',
Don’t forget that last comma! Now, save the file and refresh your admin settings page, and the warning should disappear.
Add An SSL
You certainly will want end-to-end encryption for your site data when working with private files on your server. The simplest (and least expensive) way to get that set up is to turn on Let’s Encrypt for your Ubuntu system. The installation process looks like this.
add-apt-repository ppa:certbot/certbotapt-get updateapt-get install python-certbot-apacheNow that we have Let’s Encrypt’s certbot installed, we need to add a cron.
crontab -eInsert the following line into root's crontab.
45 2 * * 6 /usr/bin/certbot renew && systemctl reload apache2Now, we can get an SSL set up for our ownCloud installation! This requires that DNS be set up for your ownCloud domain, so make sure you have done so before proceeding.
certbot --apache -d owncloud.mydomain.comIf this is the first time you’ve run certbot, it will ask you for a little information about you to get your Let’s Encrypt account configured. Once the order is done, it will also ask you whether you should redirect all traffic to HTTPS; you should tell it to do so. Once the program is finished, you should be able to reload your browser page with the ownCloud settings, be automatically redirected to HTTPS, and the HTTPS error will be gone.
Further Hardening
There are a number of other suggested security settings that ownCloud recommends be implemented on installations, including HSTS and fail2ban, though not all are strictly necessary for every installation. You can read more about these optional changes and overall server security hardening on the ownCloud website.
The installation can now be considered fully complete! You might want at this time to add any desktop or mobile applications to your devices to access your ownCloud installation on the go and make new accounts for any other users you would like to have access to your system.
Don’t wait to secure your sensitive private data! Order an Ubuntu Cloud Dedicated server today to start protecting and sharing your files safely!
Related Articles:

About the Author: Andrej Walilko
Andrej Walilko (RHCE6) is a seasoned Linux Administrator, and he is a Migration Project Manager at Liquid Web, developing specialized processes for complex migration types. He enjoys doing woodworking, home improvement, and playing piano in his free time.
Our Sales and Support teams are available 24 hours by phone or e-mail to assist.
Latest Articles
How to use kill commands in Linux
Read ArticleChange cPanel password from WebHost Manager (WHM)
Read ArticleChange cPanel password from WebHost Manager (WHM)
Read ArticleChange cPanel password from WebHost Manager (WHM)
Read ArticleChange the root password in WebHost Manager (WHM)
Read Article


