Adminer MySQL (formerly phpMinAdmin) is one of the most excellent PHP-based full-featured database management tools. You can use Adminer MySQL to manage databases such as MySQL, MariaDB, Elasticsearch, MongoDB, PostgreSQL, SQLite, MSSQL, Oracle, and more. It is simple, lightweight, and built with good security and user experience in mind. The Adminer database manager is available in all Linux distributions. You may promptly manage multiple databases and conduct operations from the Adminer web interface.
You can quickly install and configure it on AlmaLinux using the terminal, and you can access its web interface using any browser.
Prerequisites
- Operating system and version: AlmaLinux OS 9.
- Root access to your Linux system or via the sudo command.
Install Adminer MySQL Database Management Tool on AlmaLinux
Step 1: Install LAMP Server
A LAMP stack includes four different software technologies: Linux, Apache, MySQL, and PHP. Before installing Adminer MySQL, you must install the Apache web server, the MariaDB database server, and PHP on your server. You can execute the below command to install each of them.
~]# dnf install httpd mariadb-server php php-mysqli php-curl php-json -yHere is the output.
[root@noufal-admin ~]# dnf install httpd mariadb-server php php-mysqli php-curl php-json -y
AlmaLinux 9 - AppStream                                                                                                                  3.8 MB/s | 9.6 MB     00:02
AlmaLinux 9 - BaseOS                                                                                                                     4.7 MB/s | 5.2 MB     00:01
AlmaLinux 9 - Extras                                                                                                                      17 kB/s |  17 kB     00:01
Dependencies resolved.
=========================================================================================================================================================================
 Package                                             Architecture                  Version                                        Repository                        Size
=========================================================================================================================================================================
Installing:
 httpd                                               x86_64                        2.4.53-7.el9_1.5                               appstream                         47 k
 mariadb-server                                      x86_64                        3:10.5.16-2.el9_0                              appstream                        9.3 M
 php                                                 x86_64                        8.0.27-1.el9_1                                 appstream                         10 k
 php-common                                          x86_64                        8.0.27-1.el9_1                                 appstream                        667 k
 php-mysqlnd                                         x86_64                        8.0.27-1.el9_1                                 appstream                        151 k
After finishing the installation of all the packages, use the below command to start and enable the Apache and MariaDB services.
~]# systemctl start httpd mariadb
~]# systemctl enable httpd mariadb
Here is the output.
[root@noufal-admin ~]# systemctl start httpd mariadb
[root@noufal-admin ~]# systemctl enable httpd mariadb
Created symlink /etc/systemd/system/multi-user.target.wants/httpd.service → /usr/lib/systemd/system/httpd.service.
Created symlink /etc/systemd/system/mysql.service → /usr/lib/systemd/system/mariadb.service.
Created symlink /etc/systemd/system/mysqld.service → /usr/lib/systemd/system/mariadb.service.
Created symlink /etc/systemd/system/multi-user.target.wants/mariadb.service → /usr/lib/systemd/system/mariadb.service.
Step 2: Create a Database for Adminer
For Adminer, you’ll need to create a database and a user. To do this, use the command below to log into the MariaDB prompt.
~]# mysqlHere is the output.
[root@noufal-admin ~]# mysql
Welcome to the MariaDB monitor.  Commands end with ; or \g.
Your MariaDB connection id is 3
Server version: 10.5.16-MariaDB MariaDB Server

Copyright (c) 2000, 2018, Oracle, MariaDB Corporation Ab and others.

Type 'help;' or '\h' for help. Type '\c' to clear the current input statement.

MariaDB [(none)]>
Once logged into MariaDB prompt, run the below command to create a database and user.
MariaDB [(none)]> CREATE DATABASE adminer;
Query OK, 1 row affected (0.001 sec)

MariaDB [(none)]> CREATE USER 'adminer'@'localhost' IDENTIFIED BY 'adminer@password';
Query OK, 0 rows affected (0.001 sec)
You can now grant all the privileges to the Adminer database with the below command.
MariaDB [(none)]> GRANT ALL ON adminer.* TO 'adminer'@'localhost';
Query OK, 0 rows affected (0.001 sec)
With the below command, you can flush the privileges and exit the MariaDB prompt.
MariaDB [(none)]> FLUSH PRIVILEGES;
Query OK, 0 rows affected (0.000 sec)

MariaDB [(none)]> EXIT;
Bye
Step 3: Download Adminer
First, you must create a directory for Adminer inside the Apache web root using the below command.
~]# mkdir /var/www/html/adminerTo change the directory to Adminer, you can use the below command.
~]# cd /var/www/html/adminerThen, you can download Adminer using the below command.
~]# wget -O index.php https://github.com/vrana/adminer/releases/download/v4.8.1/adminer-4.8.1.phpHere is the output.
[root@noufal-admin adminer]# wget -O index.php https://github.com/vrana/adminer/releases/download/v4.8.1/adminer-4.8.1.php
--2023-04-28 08:33:07--  https://github.com/vrana/adminer/releases/download/v4.8.1/adminer-4.8.1.php
Resolving github.com (github.com)... 140.82.121.4
Connecting to github.com (github.com)|140.82.121.4|:443... connected.
HTTP request sent, awaiting response... 302 Found
Location: https://objects.githubusercontent.com/github-production-release-asset-2e65be/627735/66e88b00-b488-11eb-97d3-a3fefb5f5d21?X-Amz-Algorithm=AWS4-HMAC-SHA256&X-Amz-Credential=AKIAIWNJYAX4CSVEH53A%2F20230428%2Fus-east-1%2Fs3%2Faws4_request&X-Amz-Date=20230428T083150Z&X-Amz-Expires=300&X-Amz-Signature=4b53051b26c16aa06224739176c79271910155ccace5cb4e014b0542053779e0&X-Amz-SignedHeaders=host&actor_id=0&key_id=0&repo_id=627735&response-content-disposition=attachment%3B%20filename%3Dadminer-4.8.1.php&response-content-type=application%2Foctet-stream [following]
--2023-04-28 08:33:07--  https://objects.githubusercontent.com/github-production-release-asset-2e65be/627735/66e88b00-b488-11eb-97d3-a3fefb5f5d21?X-Amz-Algorithm=AWS4-HMAC-SHA256&X-Amz-Credential=AKIAIWNJYAX4CSVEH53A%2F20230428%2Fus-east-1%2Fs3%2Faws4_request&X-Amz-Date=20230428T083150Z&X-Amz-Expires=300&X-Amz-Signature=4b53051b26c16aa06224739176c79271910155ccace5cb4e014b0542053779e0&X-Amz-SignedHeaders=host&actor_id=0&key_id=0&repo_id=627735&response-content-disposition=attachment%3B%20filename%3Dadminer-4.8.1.php&response-content-type=application%2Foctet-stream
Resolving objects.githubusercontent.com (objects.githubusercontent.com)... 185.199.110.133, 185.199.111.133, 185.199.108.133, ...
Connecting to objects.githubusercontent.com (objects.githubusercontent.com)|185.199.110.133|:443... connected.
HTTP request sent, awaiting response... 200 OK
Length: 476603 (465K) [application/octet-stream]
Saving to: 'index.php'

index.php                                  100%[=====================================================================================>] 465.43K  --.-KB/s    in 0.03s

2023-04-28 08:33:07 (15.6 MB/s) - 'index.php' saved [476603/476603]
The ownership and permissions of the Adminer directory must be changed to Apache user once the download is complete. You can use the below commands to change the ownership and permissions of the Adminer directory.
~]# chown -R apache:apache /var/www/html/adminer/
~]# chmod -R 775 /var/www/html/adminer/
Step 4: Configure Adminer
First, you must create an Apache virtual host file for the Adminer under /etc/httpd/conf.d/ directory using the below command.
~]# vi /etc/httpd/conf.d/adminer.confThen, add the below lines. You can update these lines as per your requirements.
<VirtualHost *:80>
     ServerAdmin [email protected]
     DocumentRoot /var/www/html/adminer/
     ServerName adminer.testdomain.com
     DirectoryIndex index.php
     ErrorLog /var/log/httpd/adminer-error.log
     CustomLog /var/log/httpd/adminer-access.log combined
</VirtualHost>
Once you add the lines, you can save and close the file. You must restart the Apache service to reflect the changes. You can restart the Apache service using the below command.
~]# systemctl restart httpdYou can use the below command to verify the status of the Apache service.
~]# systemctl status httpdHere is the output.
[root@noufal-admin ~]# systemctl status httpd
● httpd.service - The Apache HTTP Server
     Loaded: loaded (/usr/lib/systemd/system/httpd.service; enabled; vendor preset: disabled)
    Drop-In: /usr/lib/systemd/system/httpd.service.d
             └─php-fpm.conf
     Active: active (running) since Fri 2023-04-28 08:35:47 UTC; 6s ago
       Docs: man:httpd.service(8)
   Main PID: 12740 (httpd)
     Status: "Started, listening on: port 80"
      Tasks: 213 (limit: 12015)
     Memory: 27.4M
        CPU: 74ms
     CGroup: /system.slice/httpd.service
             ├─12740 /usr/sbin/httpd -DFOREGROUND
             ├─12741 /usr/sbin/httpd -DFOREGROUND
             ├─12742 /usr/sbin/httpd -DFOREGROUND
             ├─12743 /usr/sbin/httpd -DFOREGROUND
             └─12744 /usr/sbin/httpd -DFOREGROUND

Apr 28 08:35:47 noufal-admin systemd[1]: Starting The Apache HTTP Server...
Apr 28 08:35:47 noufal-admin httpd[12740]: AH00558: httpd: Could not reliably determine the server's fully qualified domain name, using fe80::cd6:2eff:fe95:ca72%eth0. S>
Apr 28 08:35:47 noufal-admin systemd[1]: Started The Apache HTTP Server.
Apr 28 08:35:47 noufal-admin httpd[12740]: Server configured, listening on: port 80
Step 5: Access the Adminer Web Interface
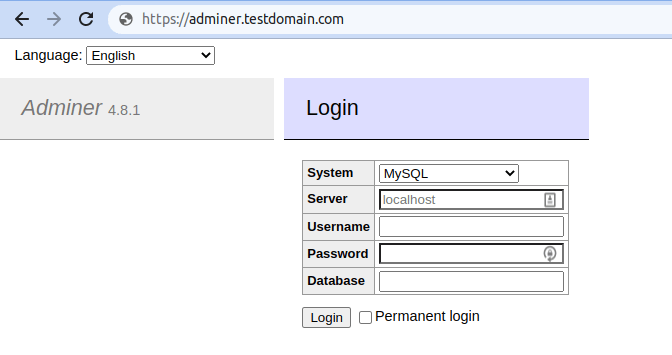
You can access the Adminer web interface using the URL https://adminer.testdomain.com in your web browser. You will be taken to the page shown below.

If you are running Adminer on your local system, you can access the Adminer web interface via http://127.0.0.1/adminer. However, if Adminer is installed on another server, you can access the Adminer web interface by entering its IP address, such as http://server-ip-address/adminer.
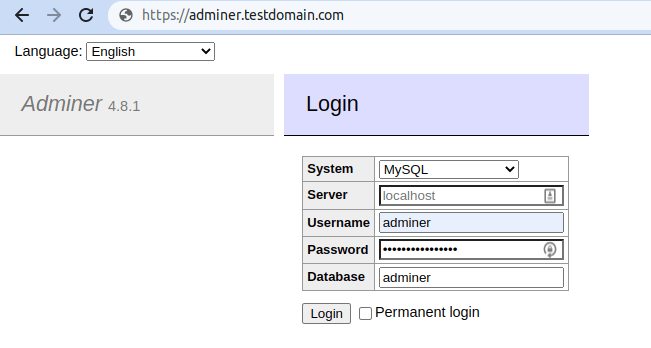
You can now enter your MySQL host address, database name, username, and password. Then click the Login button.

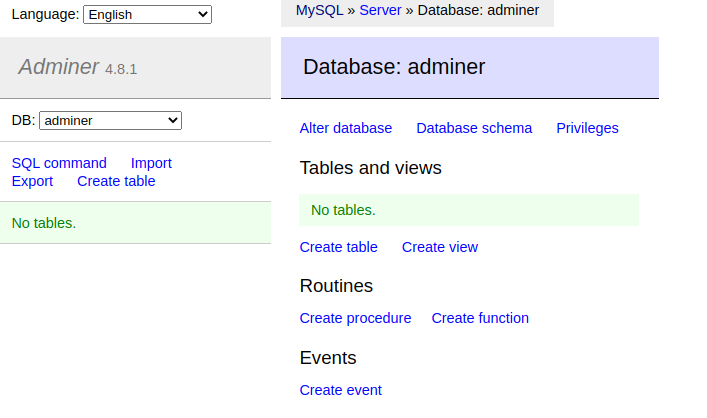
Once connected to MySQL, you should see the page shown below.

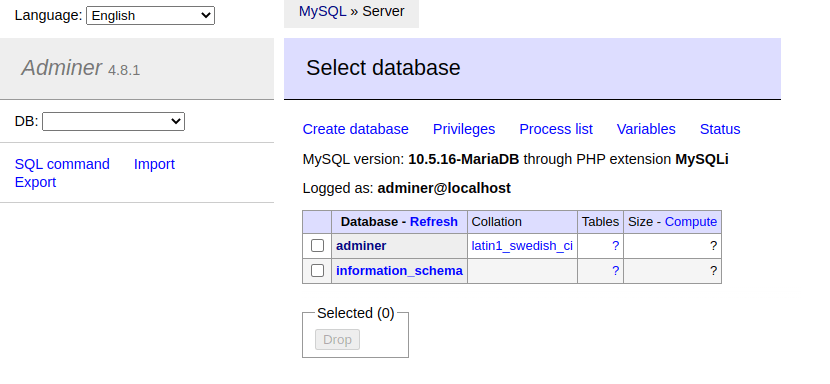
You should see the page below when you click the Server button on the top screen.

If you want to create a new database, click Create database. Then, enter the database name you want to create and press the Save button.

In addition, you can create tables, views, procedures, and functions, among other database activities.
Final Thoughts
Adminer MySQL Database Management Tool is one of the most excellent phpMyAdmin alternatives. It not only has a smaller footprint, but it also works considerably more quickly. It is evolving slowly but steadily. The most recent version of Adminer introduced support for PHP 8 environments. Now that you understand how to install Adminer MySQL Database Management Tool on AlmaLinux, you can now manage your MySQL or MariaDB database quickly with the Adminer web-based interface.
 Mohammed Noufal