How To Set Up Messenger In CSF — Part 2
- How To Set Up Messenger In CSF — Part 1
- How To Set Up Messenger In CSF — Part 2
(On Managed Servers)
In this article, we will provide an in depth explanation on how to set up and customize the messenger feature in CSF on a managed server.
What Is CSF?
Let's begin by defining exactly what CSF or ConfigServer Firewall is and what it does. As noted in our earlier article, CSF is:
“An open-source, Stateful Packet Inspection (or SPI) firewall, Login/Intrusion Detection and Security application for Linux servers.” It is a “secure, straightforward, platform that is flexible and easy to configure with extra checks included to ensure smooth operation. CSF can be used on any generic Linux OS. The CSF installation includes preconfigured configurations and control panel UI's for cPanel, DirectAdmin, and Webmin.”
Additionally, CSF is paired with LFD (or Login Failure Daemon).
The LFD process “runs continuously and will periodically (every X seconds) scan the latest log file entries for login attempts against your server that continually fail within a short period of time. Such attempts are often called “Brute-force attacks” and the daemon process responds quickly to such patterns and blocks offending IP's quickly. Other similar products run every x minutes via cron and as such, often miss break-in attempts until after they've finished, Our daemon eliminates such long waits and makes it much more effective at performing its task.”
What Is CSF Messenger?
The CSF messenger is a feature which displays a specific warning page to a user if they are blocked in the firewall, similar to the one seen below. CSF also provides the user with the blocked IP address so that when they contact the server owner or administrator to have the IP unblocked, they will have all the information they need to provide the info to whitelist the IP if appropriate.

Set Up Messenger Option
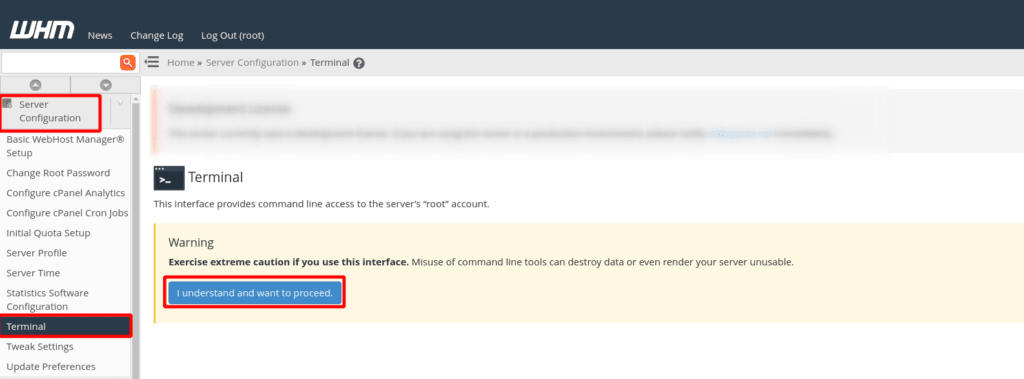
In the Terminal emulated page, type the following command on the command line and then press enter.
root@host:~# useradd csf -s /bin/false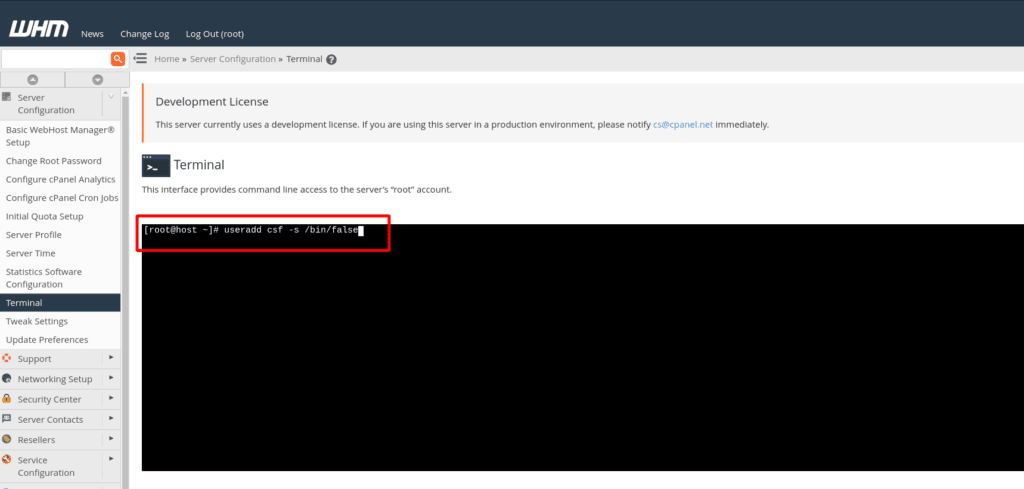
Next, to get to the CSF configuration settings page in WHM, select the “Plugins” category, and then click on “ConfigServer Security & Firewall”. After that, click on the CSF tab, and then click on the “Firewall Configuration” button.
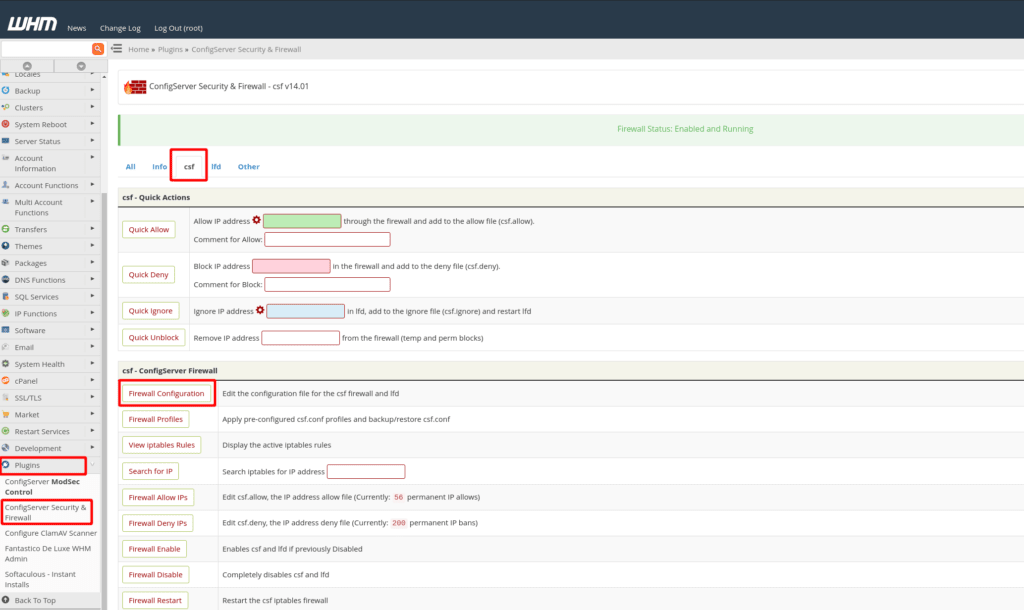
At the top of the Firewall Configuration page, click on the selection drop down menu, scroll to the bottom and click on “Messenger Service”, then change the value from “OFF” to “ON” for the option MESSENGER =

Then, scroll down 1 page to change the value from “O” to “1” for the option MESSENGERV2 =

Next, scroll down 1/2 page to change the blank value from “” to “443” for the option MESSENGER_HTTPS_IN =

Then, scroll all the way down to the end of the page and click on the “Change” button.
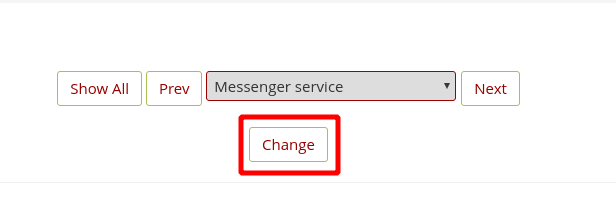
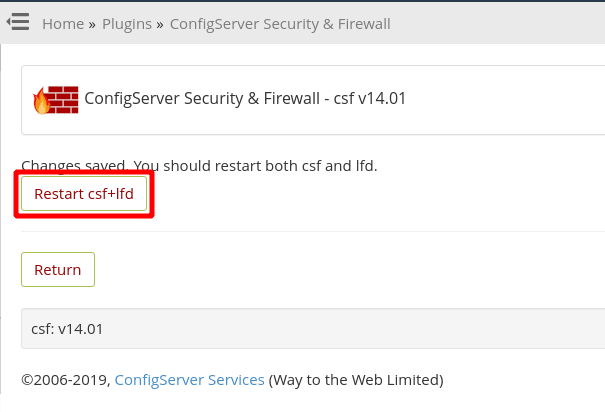
Lastly, click on the “Restart csf+lfd” button to restart the CSF service to implement the changes.
Test Messenger
To test this feature, we recommend using a different device that is NOT connected to the same network as the PC you are setting this up on. Once you are online with your other device that is operating in a different network, you will need to retrieve your public IP. You can do this by simply going to ip.liquidweb.com to review this setting.
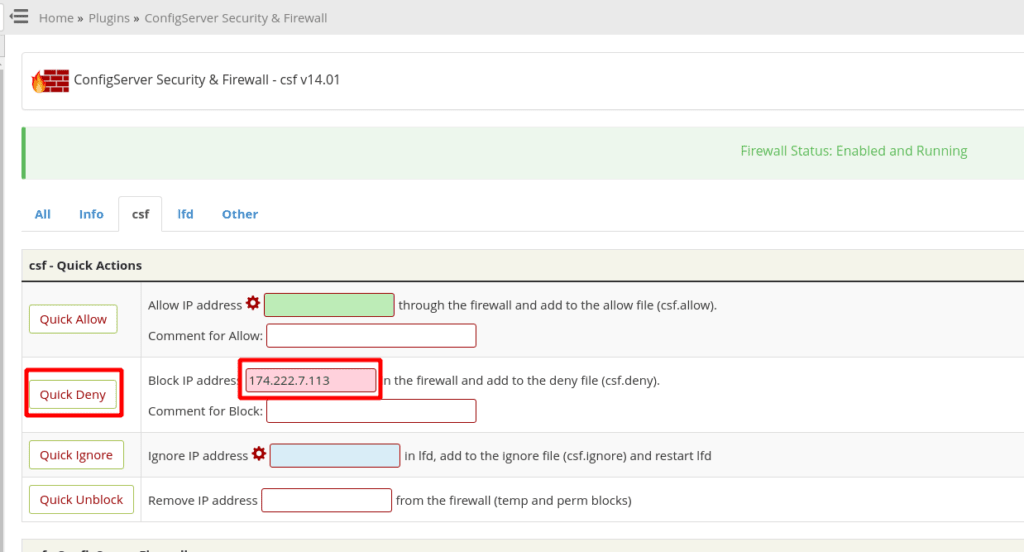
Once you have your IP address, copy or make a note of it as you'll need it to add it to the deny list in CSF. Next, go to the CSF interface in WHM again, and open the “Plugins” category, Then, click on “ConfigServer Security & Firewall”, then, click on the CSF tab, then in the RED box type in your IP address and click on “Quick Deny”. We used a test IP of 174.222.7.113 in the example below.
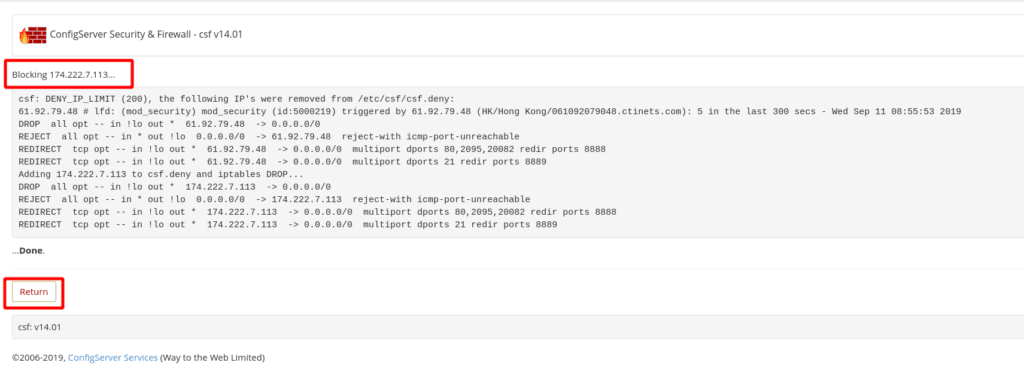
The next screen that comes up is simply a confirmation page informing you that the IP you have added to the deny list is now blocked. We can then click on the return button at the bottom of the page.
If you do not have an extra device or means to test with an alternative IP, you can block yourself temporarily for an “X number of seconds”. To accomplish this, again go into the CSF interface in WHM, then to the “Plugins” category. Click on “ConfigServer Security & Firewall”, and then click on the CSF tab and scroll down towards the bottom of the page until you see a button labeled “Temporary Allow/Deny”. Leave the drop down box on “Deny” and enter your IP address in and leave the ports option at *. In the text box to the left of the “seconds” drop down box, type in 30, and then click on the “Temporary Allow/Deny” button. We used a test IP of 174.222.7.113 in the example below.

Once blocked, try to access your domain. You will see a page similar to the one below.

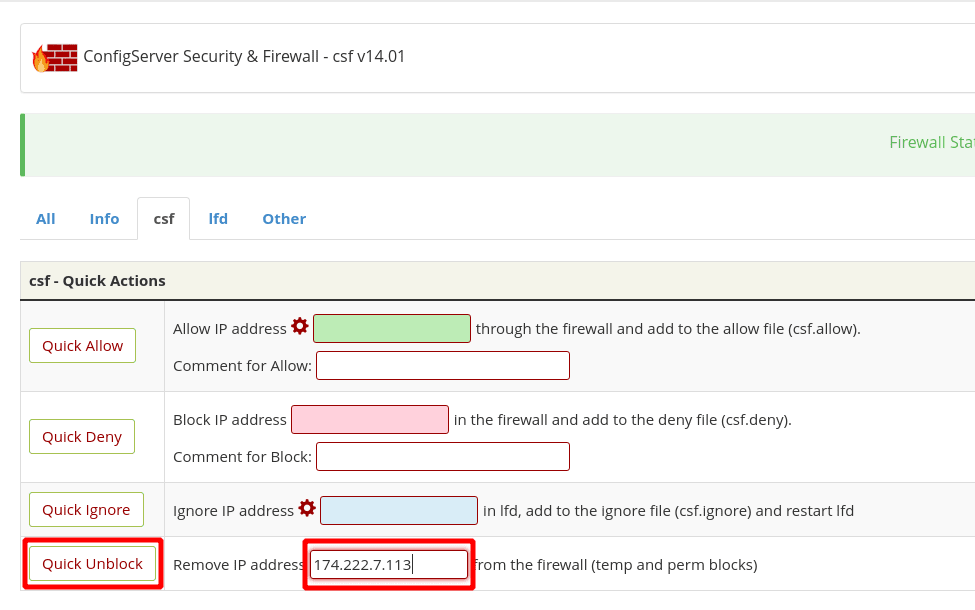
To unblock the alternative IP, go back into the CSF interface in WHM, then to the “Plugins” category, and click on “ConfigServer Security & Firewall”. Next, click on the CSF tab, then in the WHITE box, type if your IP address and click on “Quick Unblock”. Again, we used a test IP of 174.222.7.113 in the example below.
Enable reCAPTCHA Option — cPanel
Get Keys From Google reCAPTCHA
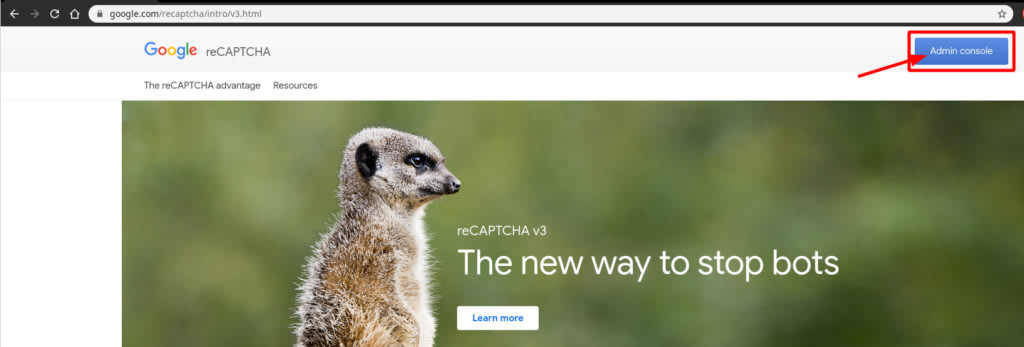
First, we will need to create a reCAPTCHA Site key & Secret key. To do this, go to Google, and then click on the “Admin Console” button on the top right of the page.
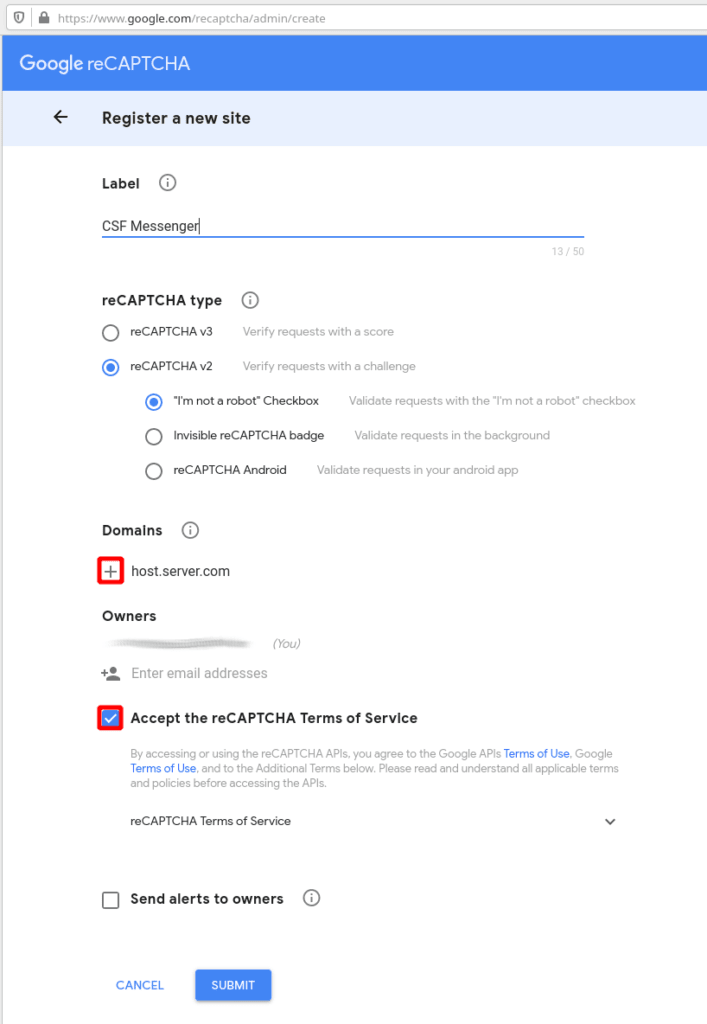
Once logged in to your Gmail account, you will be re-directed to a page with the title “Register a new site”. For the site label, you can add whatever entry name you would like, in order to reference the keys you are about to create e.g. “CSF Messenger”. Then, select the type of reCAPTCHA method you would like to implement. We prefer the “reCAPTCHA v2 Checkbox” option, but either option will work. For the domain entry, type in the hostname of your server
Make sure to click on the plus sign the left of the domain you typed to add it. Then, check the box next to accept TOS (if you agree with them), and click on the Submit button.
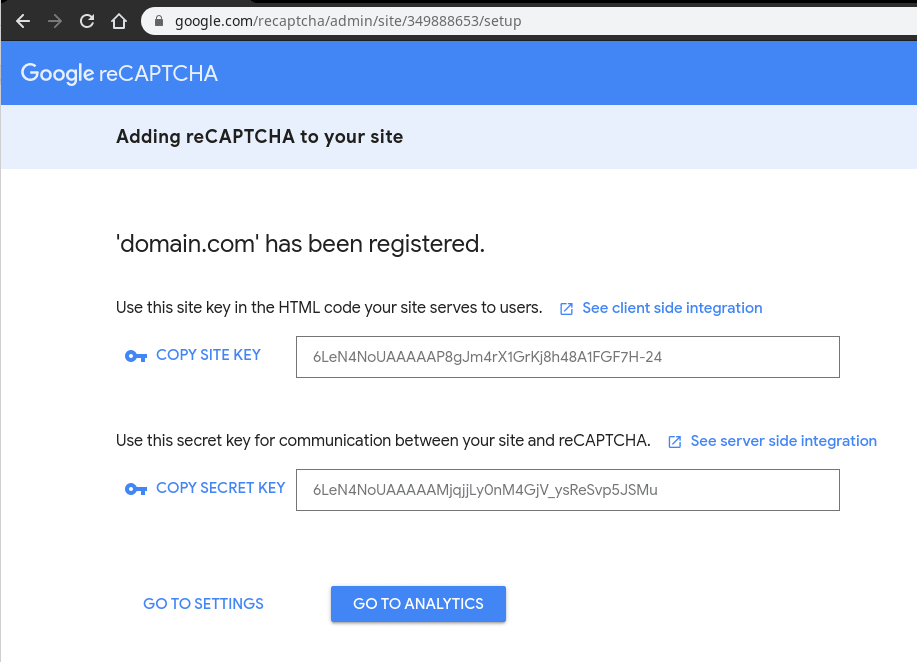
The subsequent page will display the Site key in the very first box and the Secret key in the second box. You will need to keep note those keys somewhere safe because you will need them to configure the reCAPTCHA option within CSF in the next step.
Add Keys to CSF
Next, we need to go back into the CSF configuration settings in WHM as we did previously. In WHM, go to the “Plugins” category, then click on “ConfigServer Security & Firewall”, and then click on the CSF tab. Finally, click on the “Firewall Configuration” button.

At the top of the Firewall Configuration page, click on the selection drop down menu and scroll to the bottom, and then click on “Messenger Service”, Next, scroll down towards the end of the page and key in the RECAPTCHA_SITEKEY and RECAPTCHA_SECRET keys that you generated from Google.

Then, scroll to the end of the page and click on the “Change” button.

Next, click on the “Restart csf+lfd” button to restart the CSF service to implement the changes.

Add reCAPTCHA Code
Lastly, we'll need to implement the site code for the reCAPTCHA option via another command via the Terminal. Again, to get to the Terminal via WHM, Go to the “Server Configuration” category, then click on “Terminal”

Once in the Terminal emulated page, type the following command into the terminal and then press enter.
root@host:~# cat /etc/csf/messenger/index.recaptcha.php > /home/csf/public_html/index.php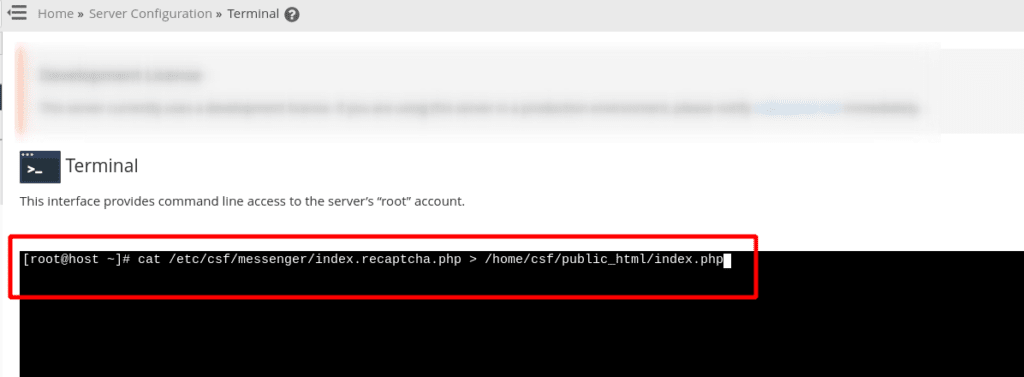
Test reCAPTCHA Setting
To test this feature, we recommend using a different device that is NOT connected to the same network as the PC you are setting this up on. Once you are online with your other device operating in a different network, you will need to retrieve your public IP. You can do this by simply going to ip.liquidweb.com.
Once you have your IP address, copy and make a note of it as you'll need it to add it to the deny list in CSF. Next, go to the CSF interface in WHM, then to the “Plugins” category and click on “ConfigServer Security & Firewall”, then click on the CSF tab. In the RED box, type in your IP address and click on “Quick Deny”. We used a test IP of 174.222.7.113 in the example below.

The next screen that loads is simply a confirmation page informing you that the IP you added to the deny list is now blocked. Lastly, click on the return button at the bottom.

If you do not have an extra device or a means to test the configuration with an alternative IP, you can temporarily block yourself for the X number of seconds. To accomplish this, again go into the CSF interface in WHM, and then to the “Plugins” category. Click on “ConfigServer Security & Firewall”, click on the CSF tab and scroll down the page until you see a button labeled “Temporary Allow/Deny”. Leave the drop down box on “Deny” and enter your IP address. Leave the port setting set to *, and in the text box to the left of the “seconds” drop down box, type in 30, and then click on the “Temporary Allow/Deny” button. We used a test IP of 174.222.7.113 in the example below.

Once the IP is blocked, try to access your domain and you will see a page similar to the one below.
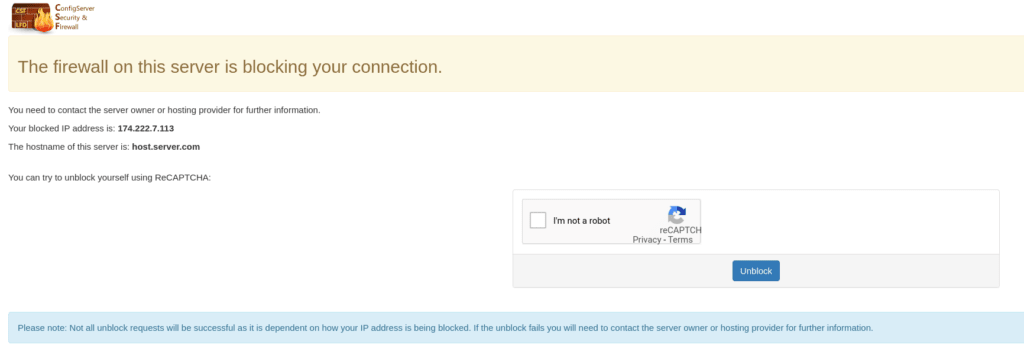
After 30 seconds has passed, go back to the CSF interface in WHM, and into the “Plugins” category. Click on the “ConfigServer Security & Firewall” icon and then click on the CSF tab. In the WHITE box, type in your IP address and click on “Quick Unblock”.

Conclusion
That's it! We have successfully configured CSF's messenger option to show the user a notification page as well as added a ReCAPTCHA option for verification purposes.
Related Articles:

About the Author: Scott Bixby
Our Sales and Support teams are available 24 hours by phone or e-mail to assist.
Latest Articles
How to use kill commands in Linux
Read ArticleChange cPanel password from WebHost Manager (WHM)
Read ArticleChange cPanel password from WebHost Manager (WHM)
Read ArticleChange cPanel password from WebHost Manager (WHM)
Read ArticleChange the root password in WebHost Manager (WHM)
Read Article


