How To Set Up a New Email Account on an iPhone, iPad, iOS 9
Pre-Flight Check
- These instructions are intended specifically for setting up POP3/IMAP email on an iPhone or iPad running iOS 9.
- If these instructions don’t quite work for you, check-out our tutorial How to Set up Any Email Client.
Step #1: Launch Settings
If you have re-arranged your home screen and Settings is not readily visible, you may swipe right and begin typing “Settings” into Spotlight to launch the app.
Step #2: Add the Email Account
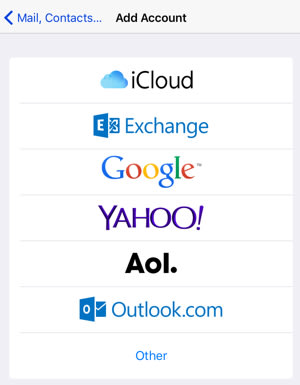
![]() In the Settings app, navigate to Mail, Contacts, Calendars, and then click on Add Account.
In the Settings app, navigate to Mail, Contacts, Calendars, and then click on Add Account.
Step #3: Select the Account Type
On the Add Account screen, select the last option, Other.

Step #4: Configure General Account Settings
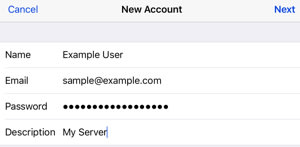
 Fill out the requested information on the New Account screen and tap the Next button in the top-right corner of the screen once complete:
- Name should be your name as you want it to appear in emails that you send.
- Email should be your full email address.
- Password is the email account’s password.
- Description is the name you want displayed for the account in your Mail app
Step #5: Configure Advanced Account Settings
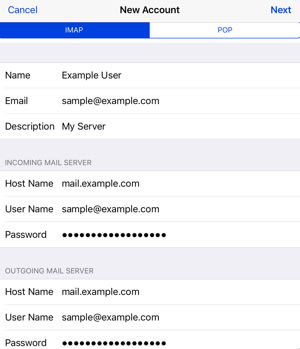
 The information from the previous screen will be pre-filled here, but you will need to fill in the rest now. Please note that, despite what the empty fields may suggest, none of the fields here are optional.
- Account Type
- Tap on IMAP or POP in the top field to select the account type.
- Generally, IMAP is recommended on mobile devices due to its ability to keep email in sync across multiple devices (desktop, laptop, phones and tablets).
- Incoming Mail Server
- If you are using non-SSL settings, the Host Name will be mail.yourdomainname.com.
- If you are using SSL settings, the Host Name will need to be set to the server’s hostname (host.yourdomainname.com).
- Username is your full email address.
- Password is the email account’s password.
- Outgoing Mail Server
- If you are using non-SSL settings, the Host Name will be mail.yourdomainname.com.
- If you are using SSL settings, the Host Name will need to be set to the server’s hostname (host.yourdomainname.com).
- Username is your full email address.
- Password is the email account’s password.
If you chose POP as the account type, tap Save; If you chose IMAP, tap Next.
Accept SSL Certificate if Needed
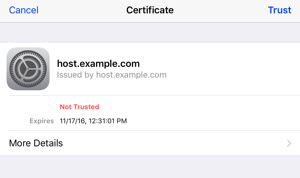
 If you elected to use a non-SSL (standard) connection (using mail.yourdomainname.com instead of the server’s host name), you should a “Cannot Connect Using SSL” Alert Notification, and you will need to tap Yes to proceed with the account setup.
- If you chose to use a secure (SSL) connection and your server has a self-signed (free) SSL certificate installed on the mail server, you will see a “Not Trusted” Alert Notification. You will need to tap on Trust in the upper-right corner to continue.
Step #6: Enable the Account
- Verify that the switch next to mail is toggled on.
- Tap Save.
- You’re now ready to start using your email address with iOS 9.
Related Articles:

About the Author: dpepper
Our Sales and Support teams are available 24 hours by phone or e-mail to assist.
Latest Articles
How to use kill commands in Linux
Read ArticleChange cPanel password from WebHost Manager (WHM)
Read ArticleChange cPanel password from WebHost Manager (WHM)
Read ArticleChange cPanel password from WebHost Manager (WHM)
Read ArticleChange the root password in WebHost Manager (WHM)
Read Article


