
When investigating site infections or defacing on a Windows VPS Server, the most common root cause is poor file security or poor configuration choices when it comes to how IIS should access file content. The easiest way to prevent this is to start with a secure site.
Setting up a website in IIS is exceedingly easy, but several of the default settings are not optimum when it comes to security or ease of management. Further, some practices that used to be considered necessary or standards are no longer or were never necessary, to begin with. As such, we recommend that you follow these steps to set up a website to ensure that it is set up correctly and securely. While some of these setting or permission changes may seem small, they go a long way on systems that host multiple domains or multiple tenants as they prevent any cross-site file access.
Add the Site to IIS

To add a website in IIS (Internet Information Services), open up the IIS manager, right-click on Sites, and select Add Website. When adding a site to IIS, we typically recommend using the domain name as the “Site name” for easy identification. Next, under “Physical path”, you will need to supply the path to where your website content is located or use the “…” to navigate to and select the folder. Configuration options under “Connect as…” and “Test Settings…” do not need to be modified.
When it comes to configuring site bindings, popular belief suggests that you should select a specific IP from the “IP address” drop dropdown; however, that is based on outdated practices typically related to how SSLs used to require dedicated IPs. This is no longer necessary and can actually cause issues when getting into any replicated or highly available configuration, so it is best to leave IP addresses set to All Unassigned and type the domain name you plan to host in the “Host name” field. Do note that you can only supply one value here; additional host names can be added after creating the site by right-clicking on the site and going to Bindings. Further, depending on your needs, you may opt to select “https” instead of “http”.
Set the Anonymous User
Technically, that is all you need to do to set up a site in IIS; however, the site may or may not work, and the security settings on the site are not optimum. The next step in securing your site is to configure the IIS user that will access your files. To do this, you will need to change the associated Anonymous user and make a few security changes on the website’s content folder.

In IIS, select your new site on the left, in the main window double-click on Authentication, select Anonymous Authentication, and then click “Edit…” on the right action bar.
What is IUSR in IIS?
By default, a new site in IIS utilizes the IUSR account for accessing files. This account is a built-in shared account typically used by IIS to access file content. This means that it will use the application pool’s identity (user) to access file content.
It may be okay to leave this configured if you only plan on hosting one domain; however, when it comes to hosting multiple domains, this is not secure as it would then be possible for any site using the same account to access files from another site. As such, and as a standard practice, we recommend switching away from using the IUSR account for sites, and instead selecting “Application pool identity” and clicking OK. Alternately, you could manually create a user on the system for each site; however, then you need to manage credentials for an additional user, need to configure permissions for two users (the anonymous user and the application pool user) and possible complications with password complexity and rotation requirements your server or organization may have.
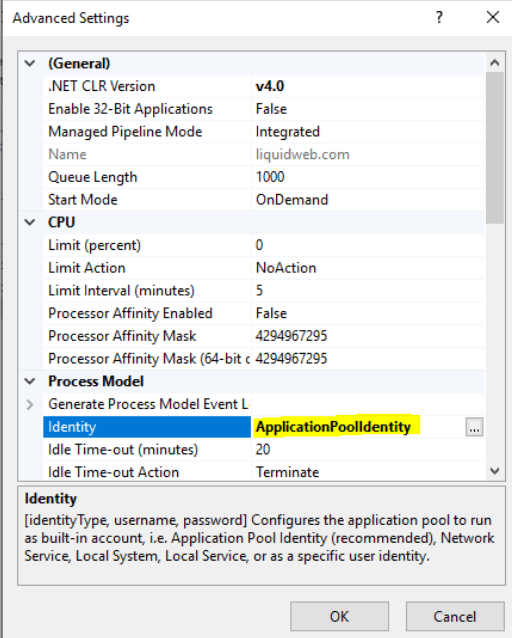
There is nothing further you need to configure in IIS in terms of security; however, for reference, let’s take a look at the application pool settings quickly. To check the settings on the application pool, in IIS, select Application Pools on the left menu, select the application pool for the site you created (typically the same name as the name of the site), and then click “Advanced Settings…” on the right action bar.
In here, the related setting is the identity, which by default is “ApplicationPoolIdentity”. This means to access file content, IIS and the associated application pool will use a hidden, dynamic user based off the name of the application pool to access files. This user has no associated password, can only be used by IIS, and only has access to files specifically granted to it. As such, it removes the requirement of managing system users and credentials.
Set Folder Permissions in IIS

Now, as mentioned, the “ApplicationPoolIdentity” user has very few permissions, so the next and last step is to ensure that the website files have proper security settings set on them. Browse through your file system and find the folder where you plan on hosting your site’s files. Right-click on the folder and go to properties. In the properties interface, select the Security tab.

By default, there are a number of security permissions set up on the folder that are unnecessary and potentially insecure (there may be more than shown here). To best secure a site, we recommend removing all but the “SYSTEM” and “Administrators” groups and adding the “ApplicationPoolIdentity” user (and possibly any other user you may require, such as an FTP user); however, to do this, you will need to disable inheritance. To do this, click on “Advanced”, then click on “Disable inheritance”.
Here you will get a popup asking if you want to copy the current settings or start with no settings. Either option can work; however, it is easier to copy the current settings and then remove the unnecessary permissions. So select “Convert inherited permissions into explicit permission on this object” and then click OK.

At this point, to remove the unnecessary permissions, click Edit and remove everything other than the “SYSTEM” and “Administrators” groups. Next, you need to add the “ApplicationPoolIdentity” user to this folder. To do this, click “Add…”. Now, depending on your server configuration, you may get a pop-up asking for you to authenticate to an active directory domain. Simply click the cancel button a few times until you get the Select Users or Groups screen shown below.
On this screen, you will want to make sure that the “Location” selected is your computer. If it is not, click “Locations…” and select your computer (should be at the top; you may also need to click cancel on some authentication windows here as well).
The “ApplicationPoolIdentity” user is a hidden user, so it is not possible to search for this user. As such, you will have to type the username to add it. The username you will need to type is “IIS AppPool\<applicationpoolname>“. Please see the following example and fill yours out accordingly:


Once you type the username, click OK. Now that you’ve added the user, which is by default only granted read permissions, you will want to verify your security settings look similar to the following image, and then click OK.
And with that, you’re done and have a secure site ready to be viewed by the masses without needing to fear that hackers will deface it.
Securing within Powershell
As a bonus, if you’re looking to get your fingers wet with some Powershell, the steps covered in this article can also be accomplished on a Windows Server 2012 or newer server through Powershell. Simply fill out the first two variables with your domain name and the path to your content, and then run the rest of the PowerShell commands to set up the site in IIS and configure folder permissions.
[String]$Domain = '<domain_Name>'
[String]$Root = '<path_to_your_content>'
Import-Module WebAdministration
#Create App pool & Website
 New-WebAppPool -Name $Domain
 New-Website -Name $Domain -HostHeader $Domain -PhysicalPath $Root -ApplicationPool $Domain
 Set-WebConfigurationProperty -Filter system.webServer/security/authentication/anonymousAuthentication -Location $Domain -PSPath MACHINE/WEBROOT/APPHOST -Name userName -Value ''
#Optionally add www. Binding
 New-WebBinding -Name $Domain -HostHeader www.$Domain -ErrorAction
#Remove inheritance (copy)
 $ACL = Get-ACL $Root
 $ACL.SetAccessRuleProtection($True,$True) | Out-Null
 $ACL.Access | ?{ !(($_.IdentityReference -eq 'NT AUTHORITY\SYSTEM') -or ($_.IdentityReference -eq 'BUILTIN\Administrators')) } | %{ $ACL.RemoveAccessRule( $_ ) } | Out-Null
 $ACL | Set-ACL
#Add IIS user permissions
 $ACL = Get-ACL $Root
 $acl.SetAccessRuleProtection($False, $True)
 $Rule = New-Object System.Security.AccessControl.FileSystemAccessRule("IIS AppPool\$Domain", "ReadAndExecute", "ContainerInherit, ObjectInherit", "None", "Allow")
 $acl.AddAccessRule($Rule)
 $acl | Set-Acl
Additional Notes: In some cases, sites may need additional write or modify permissions on specific files or folders for file uploads, cache files, or other content. You must not apply modified permissions to the entire site. Instead, modify specific directories or files as needed. To apply these settings, go to the file or folder that needs modification, right-click on it, and select Properties. Switch to the Security tab and click Edit. In there, select the user that has the name of the website (liquidweb.com in my example above), select modify under the Allow column, and then click OK. This will give the ApplicationPoolIdentity and IIS the ability to write to or modify the file(s) or folder(s).
Still need additional protection for your Liquid Web server? Our Server Protection packages provides a suite of security tools especially for Windows servers. You’ll get routine vulnerability scans, hardened server configurations, anti-Virus and even malware cleanup, should your site get hacked. Don’t wait another minute, check out how we can protect you.