
 Michelle Almendarez
 In this article, we detail how to install WordPress on CentOS 7. We are using a WordPress hosting solution provided by Liquid Web.
Step 1) Preflight Check:
This article assumes you have CentOS 7 installed and are logged into your server as the root user. We are also using the most recent version of WordPress for this install. This article also assumes you have already installed LAMP (Linux, Apache, MySQL, PHP) on your server and your PHP is updated to the latest version. You will also need to know your root mysql password so you can log into mysql as root.
Need help to install LAMP? Click this link!
mysql
If the above command isn’t working for you, then you may not be logged in as root user. In that case, you can run the following instead.
mysql -u root -p
Keep in mind that you will be prompted for the password you set earlier as root when you installed MySQL so you will need to have that handy. If you do not have your root password, you will have to reset it. If you need help with that, check out this article here and scroll down to the method via “Reset using command line“. Once you do gain access, you can safely move to step 2!
A successful login should look something like this:

To exit mysql at any time simply type: exit
exit
Step 2) Create a database
Hooray! We successfully logged in. Now we can create a database with the following command. You can call it whatever you would like, but for this article, we are calling it WordPress.
CREATE DATABASE wordpress;
While it’s easier to copy and paste directly in the command line. You should know that every mysql command will require a ; (colon) at the end of every statement in case you are getting an error.
Once our database is created, you need to create a user for that database. Once again I am using a very simple username, and password so feel free to make yours more secure. Do remember your username and password as we will need it later in this article. Type the following command.
CREATE USER adminuser@localhost IDENTIFIED BY 'password';
At this point, we have created a database user however, we still need to give that user permissions to access the database. We can add those permissions with the following command:
GRANT ALL PRIVILEGES ON wordpress.* TO adminuser@localhost IDENTIFIED BY 'password';
Replace anything in red with your database name, user, and password. Also, note that the password is contained in single quotes followed by a colon;
Remember your username and password you use in this step as will be needed later.
Now we want to flush MySQL so that it is made aware of those changes.
FLUSH PRIVILEGES;
and finally, exit MySQL
exit
Step 3) Install WordPress
cd ~
 wget http://wordpress.org/latest.tar.gz
if you do not have wget yet you can download it with yum using the following:
yum install wget
Now, let’s unzip that tar file
tar -xzvf latest.tar.gz
That should create a file named WordPress in our home directory. Next, we want to move that file and its contents to our public_html folder, so it can serve up the content for our website. We want to keep the same file permission, so we use the following rsync command.
sudo rsync -avP ~/wordpress/ /var/www/html/
For WordPress to be able to upload files, we need to create an uploads directory. Go ahead and use the following:
mkdir /var/www/html/wp-content/uploads
Lastly, update the Apache permissions for new WordPress files
sudo chown -R apache:apache /var/www/html/*
Step 4) Configuring WordPress
Next, we have to update the wp-config.php file in WordPress for it to connect to the database successfully. So let’s go to the html folder where your WordPress install is located.
cd /var/www/html
Create a wp-config.php file by copying the sample file WordPress has provided.
cp wp-config-sample.php wp-config.php
Now, we need to edit the new wp-config.php file with the correct database information we created in Step 1.
I used vim to make that change, but you can use any editor you are comfortable with.
vim wp-config.php
Next, we need to add info into the following fields of the database, user, and password we created in Step 1.
Old Settings:
// ** MySQL settings - You can get this info from your web host ** //
 /** The name of the database for WordPress */
 define( 'DB_NAME', 'database_name_here' );
 /** MySQL database username */
 define( 'DB_USER', 'username_here' );
 /** MySQL database password */
 define( 'DB_PASSWORD', 'password_here' );
New Settings:
// ** MySQL settings - You can get this info from your web host ** //
 /** The name of the database for WordPress */
 define( 'DB_NAME', 'wordpress' );
 /** MySQL database username */
 define( 'DB_USER', 'adminuser' );
 /** MySQL database password */
 define( 'DB_PASSWORD', 'password' );
Once you have made those changes, go ahead and save the file using the :wq command in Vim.
Step 5) Setup through wp-admin and verification
Now, let’s verify that your WordPress install is working. You should see something like the following on your server page. Replace server_domain_name_or_IP with your server name or IP.
http://server_domain_name_or_IP/wp-admin

If this is what you see then congrats!!! You have successfully installed WordPress on your Centos server, and you can close this article!
I have also listed a couple of common issues you might encounter in the sections below. Keep in mind that we cannot list every possible issue but, we have listed what we believe are the most common problems you may run into.
Database Error Establishing a Connection
If you are getting an Error about establishing a Database connection, verify that your wp-config.php file has the correct user, password and database name. There should be no spaces between the single quotes! This error usually means you have something going on in the wp-config.php file so be sure to check your syntax.
// ** MySQL settings - You can get this info from your web host ** //
 /** The name of the database for WordPress */
 define( 'DB_NAME', 'database_name_here' );
 /** MySQL database username */
 define( 'DB_USER', 'username_here' );
 /** MySQL database password */
 define( 'DB_PASSWORD', 'password_here' );
Troubleshooting and Verifying php
The most common issue with php is, that it may not be fully up to date in order for it to work with the newer versions of WordPress. Usually, you will get the error “WordPress requires at least php version…“
In this next step, we will verify the php version is at least PHP 7.1, by creating a phpinfo.php page. However, it is always preferable to have the most up to date version of PHP, which at the time of this article is PHP 7.2, especially for security reasons.
To create a phpinfo page go to your /var/www/html and create a file called phpinfo.php.
touch phpinfo.php
 chmod 644 phpinfo.php
and then, let’s add the following code:
<?php
 // Show all information, defaults to INFO_ALL
 phpinfo();
 ?>
Then, go to http://server_domain-name_or_IP/phpinfo.php
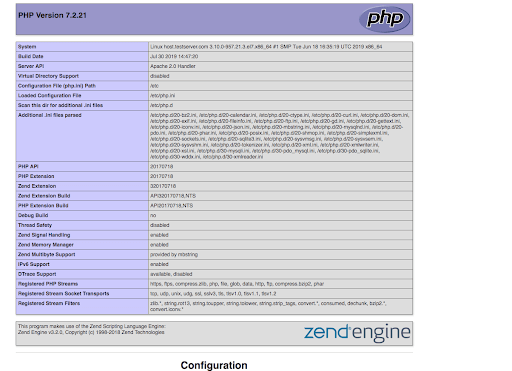
And you should see something like this if your php is set up successfully.
If for some reason your php is out of date, you may have to update yum’s config file to do so.
First, double-check you have to correct yum packages with the following command
yum install http://rpms.remirepo.net/enterprise/remi-release-7.rpm
To enable php 7.2, we need to enable the php 7.2 remi repo. At the time of the release of this article, we are using php 7.2. So, in going forward, when they release php 7.4 or php 7.5, you would edit the corresponding file.
These should be located in your /etc/yum.repos.d folder. Open the file with vim, and change the enabled field to a 1, and then save the file using vim’s :wq command
[remi-php72]
 name=Remi's PHP 7.2 RPM repository for Enterprise Linux 7 - $basearch
 #baseurl=http://rpms.remirepo.net/enterprise/7/php72/$basearch/
 #mirrorlist=https://rpms.remirepo.net/enterprise/7/php72/httpsmirror
 mirrorlist=http://cdn.remirepo.net/enterprise/7/php72/mirror
 enabled=1
 gpgcheck=1
 gpgkey=file:///etc/pki/rpm-gpg/RPM-GPG-KEY-remi
Update yum
yum update
Now, check for the php version of the php-fpm packages that should be on the server, under the field Version:
The output should look similar to this
Loaded plugins: fastestmirror
 Loading mirror speeds from cached hostfile
 * base: centos.myfahim.com
 * epel: mirror.ehost.vn
 * extras: centos.myfahim.com
 * remi-php72: mirrors.thzhost.com
 * remi-safe: mirrors.thzhost.com
 * updates: centos.myfahim.com
 remi-php72 | 2.9 kB 00:00:00
 remi-php72/primary_db | 195 kB 00:00:08
 Available Packages
 Name : php
 Arch : x86_64
 Version : 7.2.8
 Release : 1.el7.remi
 Size : 3.2 M
 Repo : remi-php72
 Summary : ........
Next, install, enable and then start php fpm with the following commands:
yum install php-fpm php-gd php-pdo php-mbstring php-pear -y
 systemctl enable php-fpm
 systemctl start php-fpm
Don’t forget to restart apache, and/or php, if changes where made.
If using Apache:
service httpd restart
If using Nginx:
service nginx restart
Once completed, your phpinfo.php page should show you using php 7.2 or later. If you are using Nginx, you may have to verify that it knows to how to send php requests to php-fpm. If you have an issue, double-check your nginx.conf for errors or misconfiguration problems.
If your php is working and up to date, check your web server settings.
Troubleshooting and verifying your web server
You should also check that your Apache or Nginx and ports configured correctly. You should be able to go here
http://server_domain_name_or_IP
and see something similar to this if apache is set up successfully.

Alternatively, if your using Nginx, something similar to this will appear
Lastly, don’t forget to restart your webserver any time you make changes.
If you are not getting one of these success pages, double check your configuration files in your Apache or Nginx settings. Also, you can check to see if you are listening to the proper ports.
And that’s it! You now have a fully functional, working version of WordPress on your new CentOS 7 dedicated server for WordPress.
Did you run into issues installing WordPress?
Give our support team a call at 800.580.4985 24 hours a day, 7 days a week, 365 days a year. We will help you correct any errors you run into! Open a chat with us or simply shoot us an email at [email protected] and we’ll be happy to assist!