How To Install VueJS 3 CLI, GUI & Plugins – Part 4
- How To Install Vue.JS 2019 – Part 1
- What Is Vue JS CLI 3 ? (Vue 3) – Part 2
- Vue JS CLI 3 (Vue 3) Part 3
- How To Install VueJS 3 CLI, GUI & Plugins – Part 4
Intro
In the last tutorial, we learned how to install Vue 3 CLI and gone over a few of the new features which were shipped with it.
In this article, we will go over two features that are really something new in the world of JavaScript Frameworks. These features are Plugins and Graphical User Interface.
Plugins
Plugins give us the possibility to add new functionalities to our project regardless of whether the program is a new or ongoing one. You can think of plugins as additional packages that are like typical project dependencies but supercharged with extra abilities to edit our project configuration source files.
They can be seen inside package.json file
  "devDependencies": {
    "@vue/cli-plugin-eslint": "^3.0.5",   <----
    "@vue/cli-service": "^3.0.5",
    "babel-eslint": "^10.0.1",
    "eslint": "^5.16.0",
    "eslint-plugin-vue": "^5.0.0",
    "node-sass": "^4.12.0",
    "sass-loader": "^8.0.0",
    "vue-template-compiler": "^2.6.10"
  }
The naming convention for all the plugins is as follows:
cli-plugin-( name of the plugin )
How Do We Add A New Plugin?
We can do that with the following command:
[lwvuejs@host vue add ( name of the plugin ) In this case, we added vuetify,
Vuetify is a Material Design Component Framework for the Vue framework.
https://lqwb.us/2ON2G4M
To install this plugin, we use the following command:
[lwvuejs@host lwvuejs-custom]$ vue add vuetify

📦  Installing vue-cli-plugin-vuetify...

+ vue-cli-plugin-vuetify@2.0.2
added 4 packages from 7 contributors and audited 25170 packages in 9.021s
found 0 vulnerabilities

✔  Successfully installed plugin: vue-cli-plugin-vuetify

? Choose a preset: (Use arrow keys)
❯ Default (recommended)
  Prototype (rapid development)
  Configure (advanced)
We will select the "Default (recommended)" option for this install. Next, we press "Enter" and the output will look like this:
🚀  Invoking generator for vue-cli-plugin-vuetify...
📦  Installing additional dependencies...

added 3 packages from 2 contributors and audited 27325 packages in 8.335s
found 0 vulnerabilities

⚓  Running completion hooks...

✔  Successfully invoked generator for plugin: vue-cli-plugin-vuetify
   The following files have been updated / added:

     babel.config.js
     src/assets/logo.svg
     src/plugins/vuetify.js
     vue.config.js
     package-lock.json
     package.json
     public/index.html
     src/App.vue
     src/components/HelloWorld.vue
     src/main.js
     src/views/Home.vue

   You should review these changes with git diff and commit them.

 vuetify  Discord community: https://community.vuetifyjs.com
 vuetify  Github: https://github.com/vuetifyjs/vuetify
 vuetify  Support Vuetify: https://github.com/sponsors/johnleider
From the output noted above, we can see that some of the files were modified. We initially mentioned in the introduction that plugins could alter the files. Let’s see what changes took place. Example file:
src/components/HelloWorld.vue with vuetify[lwvuejs@host lwvuejs-custom]$ cat src/components/HelloWorld.vue
<template>
<v-container>
<v-layout
text-center
wrap
>
<v-flex xs12>
<v-img
:src="require('../assets/logo.svg')"
class="my-3"
contain
height="200"
></v-img>
</v-flex>
<v-flex mb-4>
<h1 class="display-2 font-weight-bold mb-3">
Welcome to Vuetify
</h1>
<p class="subheading font-weight-regular">
For help and collaboration with other Vuetify developers,
<br>please join our online
<a href="https://community.vuetifyjs.com" target="_blank">Discord Community</a>
</p>
</v-flex>In looking back, we see that the look of the default site was as follows:
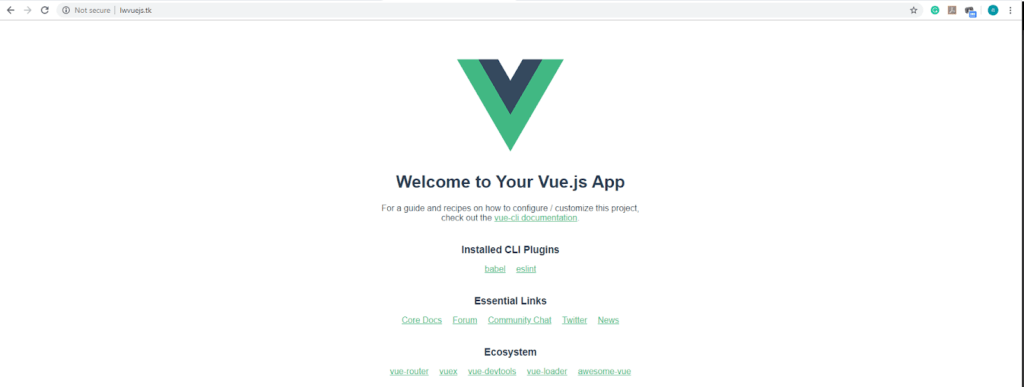
After installing the vuetify plugin, the default page now looks like this:
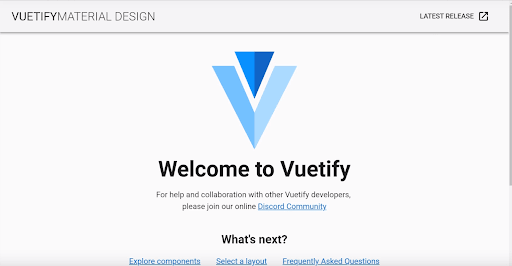
We can now see that our components are updated with the Material Design looks and that the plugin is noted within the package.json file.
[lwvuejs@host lwvuejs-custom]$ grep cli-plugin-vuetify package.json
  "vue-cli-plugin-vuetify": "^2.0.2",
We can also see that the plugin was added to the src/plugins/ folder as vutify.js
[lwvuejs@host plugins]$ cat vuetify.js
import Vue from 'vue';
import Vuetify from 'vuetify/lib';

Vue.use(Vuetify);

export default new Vuetify({
});
Starting The Dev Server On A Domain
On a live server, there is a smart way to start the dev server on a domain. We accomplish this by adding the following code to the vue.config.js file inside the project folder. The code that needs to be added is noted below.
[root@host lwvuejs-custom]# cat vue.config.js
module.exports = {
  "transpileDependencies": [
    "vuetify"
  ]

}
module.exports = {
  devServer: {
    host: 'lwvuejs.tk'

  }
}
Once the code is added, we run the command below to start the dev server:
[root@host lwvuejs-custom]# npm run serve

 DONE Compiled successfully in 18351ms                                                                                               8:29:26 AM

  App running at:
  - Local: http://lwvuejs.tk:8080/
  - Network: http://lwvuejs.tk:8080/
Note that the development build is not optimized.
To create a production build:
[root@host lwvuejs-custom]# run npm run build.We can now see that the dev server is running on our domain!
We also need to ensure that port 8080 is open. If it is not accessible, we can open it with the following command:
[root@host lwvuejs-custom]# iptables -I INPUT -p tcp --dport 8080 -j ACCEPT ( Port open for all the traffic)

[root@host lwvuejs-custom]# iptables -I OUTPUT -p tcp --dport 8080-j ACCEPT ( Port open for all the traffic)

[root@host lwvuejs-custom]# Iptables-save
Vue CLI GUI
A graphical user interface is something new in the world of JavaScript frameworks. If you are not adept with the command line, this option provides you with a GUI in which you can do all the things which are usually done via the command line.
These features include:
- Creating projects
- The ability to manage projects
- The ability to install Plugins
- The ability to install other dependencies
- The ability to configure alternative options
We will delve into a more in-depth view of the GUI in the following sections.
Starting Vue UI
Usually, if you are on a local development server, a UI is started with the following command:
[root@host lwvuejs-custom]# vue ui This command should produce the following output:
[root@host ~]# vue ui
🚀 Starting GUI...
🌠 Ready on http://localhost:8000
If you press on the link, it should produce the following image.
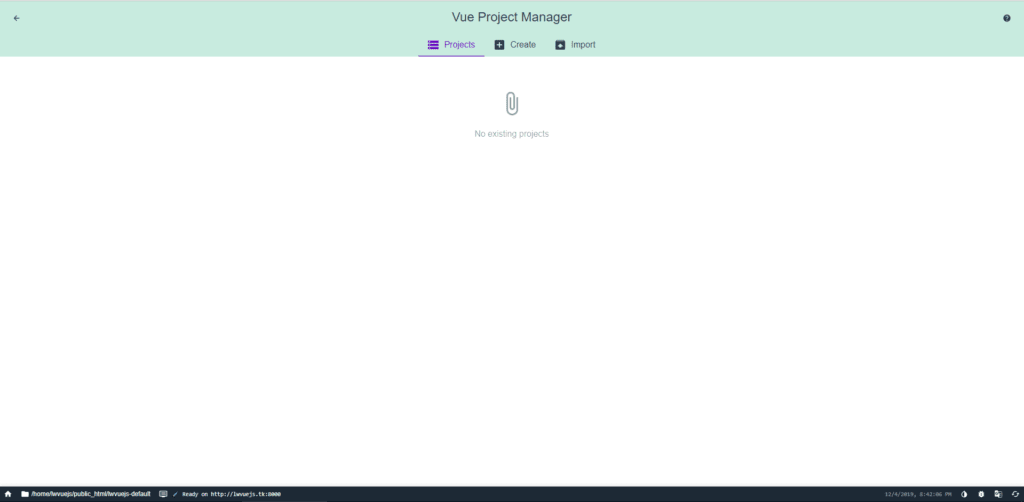
As we can see when we type:
[root@host ~]# vue ui -h Unfortunately, there is no option to run the UI on a specific host.
[root@host ~]# vue ui -h
Usage: ui [options]

start and open the vue-cli ui

Options:
  -p, --port <port>  Port used for the UI server (by default search for available port)
  -D, --dev          Run in dev mode
  --quiet            Don't output starting messages
  --headless         Don't open browser on start and output port
  -h, --help         output usage information

vue --version

3.0.5
If you want to run the UI on a live server, we would need to do a minor version upgrade since the UI does not work on a live server with version 3.0.5, which we have installed in this tutorial.
So the command to update to new minor version would be as follows:
npm install -g @vue/cli@3.1.3 ( UI able to run on live server ) The output of this command should be as follows:
[root@host ~]# npm install -g @vue/cli@3.1.3
npm WARN deprecated fsevents@1.2.9: One of your dependencies needs to upgrade to fsevents v2: 1) Proper nodejs v10+ support 2) No more fetching binaries from AWS, smaller package size
/usr/bin/vue -> /usr/lib/node_modules/@vue/cli/bin/vue.js

> core-js@3.4.5 postinstall /usr/lib/node_modules/@vue/cli/node_modules/core-js
> node -e "try{require('./postinstall')}catch(e){}"

Thank you for using core-js ( https://github.com/zloirock/core-js ) for polyfilling JavaScript standard library!

The project needs your help! Please consider supporting of core-js on Open Collective or Patreon:
> https://opencollective.com/core-js
> https://www.patreon.com/zloirock

Also, the author of core-js ( https://github.com/zloirock ) is looking for a good job -)


> @apollo/protobufjs@1.0.3 postinstall /usr/lib/node_modules/@vue/cli/node_modules/@apollo/protobufjs
> node scripts/postinstall


> nodemon@1.19.4 postinstall /usr/lib/node_modules/@vue/cli/node_modules/nodemon
> node bin/postinstall || exit 0

Love nodemon? You can now support the project via the open collective:
 > https://opencollective.com/nodemon/donate


> ejs@2.7.4 postinstall /usr/lib/node_modules/@vue/cli/node_modules/ejs
> node ./postinstall.js

Thank you for installing EJS: built with the Jake JavaScript build tool (https://jakejs.com/)

npm WARN optional SKIPPING OPTIONAL DEPENDENCY: fsevents@1.2.9 (node_modules/@vue/cli/node_modules/fsevents):
npm WARN notsup SKIPPING OPTIONAL DEPENDENCY: Unsupported platform for fsevents@1.2.9: wanted {"os":"darwin","arch":"any"} (current: {"os":"linux","arch":"x64"})

+ @vue/cli@3.1.3
added 700 packages from 527 contributors and updated 3 packages in 23.288s
We can see that when Vue is updated to version 3.1.3, there is now a Host option when using the Vue ui command.
[root@host ~]# vue --version
3.1.3
[root@host ~]# vue ui -h
Usage: ui [options]

start and open the vue-cli ui

Options:
  -H, --host <host>  Host used for the UI server (default: localhost)
  -p, --port <port>  Port used for the UI server (by default search for available port)
  -D, --dev          Run in dev mode
  --quiet            Don't output starting messages
  --headless         Don't open browser on start and output port
  -h, --help         output usage information
But before we can start using the UI on the live server, we need to open port 8000 to traffic since the UI listens on that port.
To do that we can run the following commands:
[root@host ~]# iptables -I INPUT -p tcp --dport 8000 -j ACCEPT ( Port open for all the traffic)

[root@host ~]# iptables -I OUTPUT -p tcp --dport 8000 -j ACCEPT ( Port open for all the traffic)

[root@host ~]# iptables-save
That should open port 8000 for all the traffic. A better command to use would restrict the port to a specific IP address:
[root@host ~]# iptables -I INPUT -p tcp -s IP.ADD.RE.SS --dport PORT.NUMBER -j ACCEPT

[root@host ~]# iptables -I INPUT -p tcp -s IP.ADD.RE.SS --dport PORT.NUMBER -j ACCEPT

[root@host ~]# iptables-save
Finally, we can start the UI with the following command:
[root@host ~]# vue ui -H lwvuejs.tk
🚀  Starting GUI...
🌠  Ready on http://lwvuejs.tk:8000
Using The UI
Once we have started the UI, we are presented with several options on the first screen.
- Projects
- Create
- Import
Projects
Projects will display all existing projects. In this case, since we did not use the UI to create a project, none will be listed. But wait! We did create two projects called lwvuejs-default and lwvuejs-custom. So why didn't they display on the projects page?
They do not display here because they were created via the command line.
Is there a way for them to show up in the UI? Yes, there is! We can import them into the UI using the "Import Option." By clicking on the Import option on the main page, we are presented with the following screen.
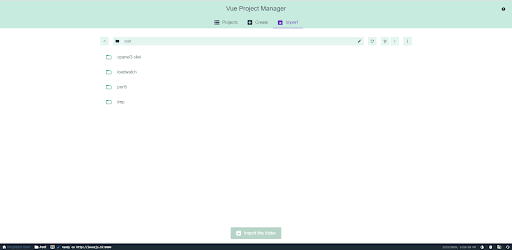
On this screen, once we click the black pen icon in the upper right hand corner, we can type in the path to our project. In this case, that location would be:
[root@host ~]# /home/lwvuejs/public_html/lwvuejs-default and
[root@host ~]# /home/lwvuejs/public_html/lwvuejs-custom If we press enter it will move us to our project folder. After that, on the bottom, we can click on the Import this folder button.
And now, we can see both projects on our Project tab.

If we want to manage the projects, we can press the project name, and it will take us to a new window in which we can modify all the above-mentioned projects.
Create a Project via UI
To create a project via the UI, we need to navigate to the home page of the UI. By pressing on the "Create" Tab, we will be presented with the following screen.
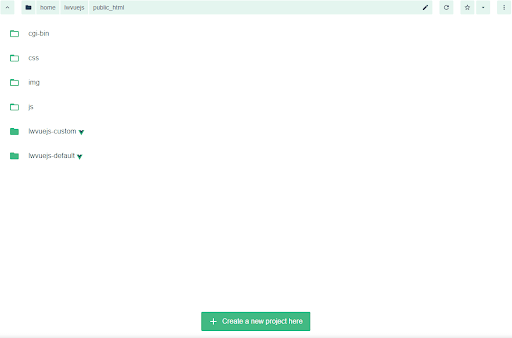
We can now see that a vue Icon indicates our two Projects. To create a new Project, we press Create a new project here button.

After we have done that we will be presented with the following screen.
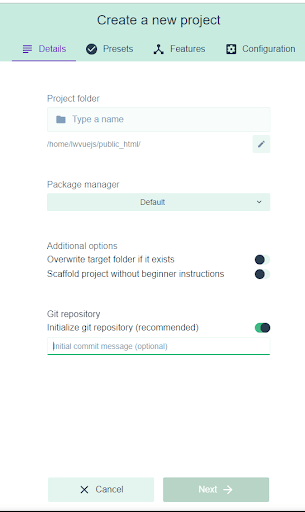
The screen shows us the same thing that we have done via the command line in our First Tutorial in this series.
Select the following options:
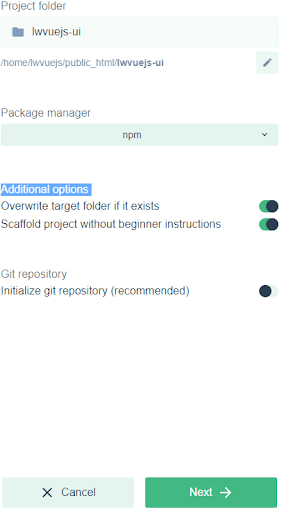
By clicking Next, we are presented with the following screen on which we will select the default option.
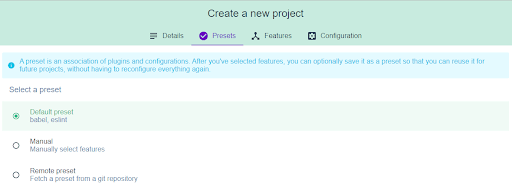
If we choose any other option than the default, it will take us through additional steps to select different options. But in this case, we can press the "Create Project" button for now, and after a few minutes, when the project is created, we will be redirected to the project Dashboard.
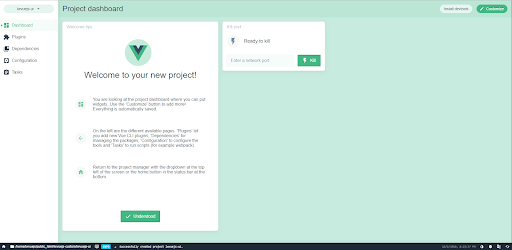
We should also note that when using the command line and run the command
[root@host ~]# vue ui -H lwvuejs.tk we can see some additional lines which indicate that the project was created.
[root@host ~]# vue ui -H lwvuejs.tk
🚀 Starting GUI...
🌠 Ready on http://lwvuejs.tk:8000
✨ Creating project in /home/lwvuejs/public_html/lwvuejs-custom/lwvuejs-ui.
⚓ Running completion hooks...
📄 Generating README.md...
The rest of the options are pretty straight forward. This can be much easier than utilizing the command line version as it gives Vue JS a whole new way of managing the Javascript Framework.
Reserve Your Spot Today!
Because of Javascript's capacity to function both on the frontend as well as the backend, it can provide the underlying mechanics of multiple frameworks. Liquidweb's Hybrid Cloud services are a perfect fit for SMB's looking to host both development and production environments utilizing the benefits of VueJS technology.
Related Articles:
- Using MySQL Command Line to Create a User
- How to Use Disk Quotas in Dedicated Linux Servers With cPanel
- How to Use Disk Quotas in Dedicated Linux Servers with Plesk
- Remove a MySQL User on Linux via Command Line
- Remove Permissions for a MySQL User on Linux via Command Line
- Grant Permissions to a MySQL User on Linux via Command Line

About the Author: Nickolas Newell
Our Sales and Support teams are available 24 hours by phone or e-mail to assist.
Latest Articles
How to use kill commands in Linux
Read ArticleChange cPanel password from WebHost Manager (WHM)
Read ArticleChange cPanel password from WebHost Manager (WHM)
Read ArticleChange cPanel password from WebHost Manager (WHM)
Read ArticleChange the root password in WebHost Manager (WHM)
Read Article


