
 Ronald Caldwell
 What is Samba?
Samba is a free and open-source software that allows files to be shared across Windows and Linux systems simply and easily. To be exact, it is an open-source implementation of the SMB/CIFS protocol.
The (SMB) Server Message Block Protocol is a client-server communication protocol that is used for sharing access to files, printers, serial ports, and other resources on a network. The (CIFS) Common Internet File System Protocol is a dialect of the SMB protocol. A collection of message bundles that describes a distinct variant of a protocol is called a dialect.
Briefly, when using Samba, we can share files and printing services, use authentication and authorization, name resolution, and service announcements between Linux/Unix servers and Windows clients.
There are five basic tasks that can be accomplished using Samba.
- We can share a Linux drive with Windows machines.
- We can access an SMB share with Linux machines.
- We can share a Linux printer with Windows machines.
- We can share a Windows printer with Linux machines.
- We can set up a domain controller on a Unix/Linux server and integrate Windows clients to the Domain controller.
Samba can also function as both a domain controller or as a regular domain member. This option makes Samba almost a must-have if you have a blended networking environment containing both Windows and Linux computers.
Prerequisites
- In order to install Samba, we will need to log into our Linux server as a user with sudo privileges, or as the root user.
- To simplify the steps in this tutorial, we will use the root user. In case you decide to move forward and install the software as your user (with sudo privileges), do not forget to type the “sudo” command at the beginning of each command.
- We will also need a Windows computer that we will connect from/to
Installation of Samba on CentOS 7
As installations on CentOS and other RedHat based distributions are mostly managed best using the yum tool, we’ll be using it to install Samba on our CentOS 7 and to get our system up to date.
Firstly let’s remove all packages that might still be cached in our system. To clean all the cached files from any enabled repository at once, we’ll use the following command.
[root@host ~]# yum clean allNext, let’s ensure all our system packages are updated. We are using the -y flag to auto-confirm on any prompts.
[root@host ~]# yum -y updateNow, we can move on to the Samba installation. Samba can be easily installed with the following command. Notice how we are using the -y flag once again to auto-confirm the installation prompts.
[root@host ~]# yum -y install samba samba-client samba-commonYum, being such a great tool, will automatically install any dependencies needed for Samba. At the end of the installation output, you should see something similar to this output.
Installed:
  samba.x86_64 0:4.9.1-10.el7_7 samba-client.x86_64 0:4.9.1-10.el7_7 samba-common.noarch 0:4.9.1-10.el7_7

Dependency Installed:
  libsmbclient.x86_64 0:4.9.1-10.el7_7 libwbclient.x86_64 0:4.9.1-10.el7_7
  samba-client-libs.x86_64 0:4.9.1-10.el7_7 samba-common-libs.x86_64 0:4.9.1-10.el7_7
  samba-common-tools.x86_64 0:4.9.1-10.el7_7 samba-libs.x86_64 0:4.9.1-10.el7_7

Complete!
As soon as the installation is completed, we can check our Samba version.
[root@host ~]# smbd --version
Version 4.9.1
Configuring Samba
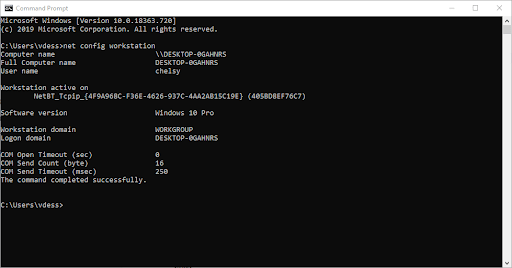
After we install Samba, we will need to configure it to conform to our set up and standards. Before we start with Samba configuration on our Linux machine, we’ll need to verify the workgroup on our Windows computer. To do this, you can right-click on “This PC” or “My Computer” → Properties → Advanced System Settings → Computer Name which will show you the following window with the data we need

Alternatively, you can run cmd (from the Windows start box) and run the following command.
net config workstationThis command will display the information we need about the workstation domain. You see something like this.
Now that we have information about our Windows computer’s workgroup, we can move on to the Samba configuration on our Linux system.
The Samba configuration file can be found at /etc/samba/smb.conf. Before we make any changes, please make sure to create a backup copy of the original configuration file.
To create a backup of our original configuration file smb.conf, we’ll use the following command to create a backup copy called smb.conf_orig.
[root@host ~]# cp /etc/samba/smb.conf /etc/samba/smb.conf_origNow we are fully prepared for editing. We’ll start by configuring Samba for anonymous file-sharing services. In this share, any user will be able to read or write. We’ll start by creating a directory called “anonymous_shared_directory” where our files will be stored.
[root@host ~]# mkdir -p /samba/anonymous_shared_directoryNext, we need to apply the appropriate permissions on our directory.
[root@host ~]# chmod -R 0775 /samba/anonymous_shared_directory
[root@host ~]# chown -R nobody:nobody /samba/anonymous_shared_directory
In case you are using SELinux like we are, you will need to change the SELinux security context for the samba shared directory.
[root@host ~]# chcon -t samba_share_t /samba/anonymous_shared_directoryNext, to make the changes needed in our configuration file, we will need to open the /etc/samba/smb.conf file with preferred CLI text editor (Nano or Vim).
[root@host ~]# vim /etc/samba/smb.confNow we’ll configure our anonymous share by adding and editing the following directives
[global]
        workgroup = WORKGROUP
        security = user
        netbios name = centos7
        printcap name = cups
        idmap config * : backend = tdb
        cups options = raw
        map to guest = bad user

[Anonymous]
        comment = anonymous file share
        path = /samba/anonymous_shared_directory
        browseable = yes
        writable = yes
        guest ok = yes
        guest only = yes
        read only = no
        force user = nobody
Our Samba configuration file should now look like this.
[root@host samba]# cat /etc/samba/smb.conf

# See smb.conf.example for a more detailed config file or
# read the smb.conf manpage.
# Run 'testparm' to verify the config is correct after
# you modified it.

[global]
        workgroup = WORKGROUP
        security = user
        netbios name = centos7
        printcap name = cups
        idmap config * : backend = tdb
        cups options = raw
        map to guest = bad user

[Anonymous]
        comment = anonymous file share
        path = /samba/anonymous_shared_directory
        browseable = yes
        writable = yes
        guest ok = yes
        guest only = yes
        read only = no
        force user = nobody

[homes]
        comment = Home Directories
        valid users = %S, %D%w%S
        browseable = No
        read only = No
        inherit acls = Yes

[printers]
        comment = All Printers
        path = /var/tmp
        printable = Yes
        create mask = 0600
        browseable = No

[print$]
        comment = Printer Drivers
        path = /var/lib/samba/drivers
        write list = @printadmin root
        force group = @printadmin
        create mask = 0664
        directory mask = 0775
Next, don’t forget to save the changes made and close the text editor. To verify our current samba settings, we’ll run the following command.
[root@host samba]# testparm
rlimit_max: increasing rlimit_max (1024) to minimum Windows limit (16384)
Registered MSG_REQ_POOL_USAGE
Registered MSG_REQ_DMALLOC_MARK and LOG_CHANGED
Load smb config files from /etc/samba/smb.conf
rlimit_max: increasing rlimit_max (1024) to minimum Windows limit (16384)
Processing section "[Anonymous]"
Processing section "[homes]"
Processing section "[printers]"
Processing section "[print$]"
Loaded services file OK.
Server role: ROLE_STANDALONE
Now, press enter to see a dump of your service definitions.
Before we continue starting the Samba service, we’ll need to configure our firewall to work with it. Samba will need the following ports open to operate correctly.
Port 137 (TCP) - netbios-ns - NETBIOS Name Service
Port 138 (TCP) - netbios-dgm - NETBIOS Datagram Service
Port 139 (TCP) - netbios-ssn - NETBIOS session service
Port 445 (TCP) - microsoft-ds - if you are using Active Directory
Other ports:
Port 389 (TCP) - for LDAP (Active Directory Mode)
Port 445 (TCP) - NetBIOS was moved to 445 after 2000 and beyond, (CIFS)
Port 901 (TCP) - for SWAT service (not related to client communication)
How we open these ports for the Samba services will depend on the type of firewall you have on your Linux server. Since most of our Linux servers use the csf firewall, we’ll start by configuring the csf.conf file. Let’s open our csf configuration file with your chosen text editor.
[root@host ~]# vim /etc/csf/csf.confNow, make sure to add the ports to the appropriate section.
# Allow incoming TCP ports
TCP_IN = "20,21,25,53,80,110,139,143,443,445,465,587,993,995,53835"
# Allow outgoing TCP ports
TCP_OUT = "20,21,25,53,80,110,139,143,113,443,445,587,993,995,53835"
Finally, save the changes and reload the firewall rules.
[root@host ~]# csf -rIn case you are running the firewalld service, simply add the service using the following command.
[root@host ~]# firewall-cmd --permanent --zone=public --add-service=sambaNow, reload the firewalld service.
[root@host ~]# firewall-cmd --reloadLastly, let’s start the Samba services and ensure that it is started automatically on system boot. Samba uses two system services to operate: the smb.service and nmb.service.
The smbd service implements a file sharing and printing service which listens on ports 139 and 445. The nmbd service implements the NetBIOS over IP naming services to clients and listens on port 137.
Let’s start both with the following commands
[root@host ~]# systemctl start smb.service
[root@host ~]# systemctl start nmb.service
To make sure those services are started automatically on system boot, we need to enable them
[root@host ~]# [root@host ~]# systemctl enable smb.service
Created symlink from /etc/systemd/system/multi-user.target.wants/smb.service to /usr/lib/systemd/system/smb.service.
[root@host ~]# systemctl enable nmb.service
Created symlink from /etc/systemd/system/multi-user.target.wants/nmb.service to /usr/lib/systemd/system/nmb.service.
To test our newly implemented anonymous share, we will go to our Windows computer and click Start -> Run, and we are going to input are server IP address like so.
Next, press OK and our Anonymous directory will be shown in our file explorer.
Now, double-click to access the directory, and then right-click to create a new text document.
Choose a file name and then save it. We will name our file testfile for this purpose.
Once the file is created, let’s make sure it’s available on our Linux machine as well
[root@host ~]# [root@host ~]# ls -l /samba/anonymous_shared_directory
total 0
-rwxr--r--. 1 nobody nobody 0 Mar 30 22:03 testfile.txt
As we have learned how to configure Samba to use an anonymous share, let’s move on to a secure one.
Configuring Samba for Private Shares
This type of share requires a username and a password for access, so we’re going to need to create a user/group of users that are allowed to access our share. Once we have a group for our Samba users we can easily assign any needed privileges to all of them at once.
To create a new group we’ll use the following command
[root@host ~]# groupadd sambausergroupWe have now successfully created a group for our users called “sambausergroup”.
Let’s move on and create our user as well.
We’ll name it “newtestuser” and we’ll assign it to our group in a single command along with denying him shell access (as it’s not needed for Samba share or a password for it), this way we ensure a bit more security).
Samba user accounts are separate from system accounts, so our user, to which we intended to grant privileges only for Samba, will not require shell access/password. However, if you decide to combine, you can install “samba-winbind” package which is used to sync system users and passwords with the samba user database among other features.
To add our user we’ll use the following command
[root@host ~]# useradd -s /sbin/nologin -g sambausergroup newtestuserNotice how we used -s flag to deny our user shell access and then we used a second flag -g to assign it to our group.
There is one more thing our user will need to access our share and that’s a password so let create a Samba access password for him.
[root@host ~]# smbpasswd -a newtestuser
New SMB password:
Retype new SMB password:
Added user newtestuser.
Our samba users for this password protected share will now need a place to store their files so we need to create a directory for them.This one will be called “password_protected_directory”
[root@host samba]# mkdir -p /samba/password_protected_directoryUsers from group we created “sambausergroup”,will need permissions to read, write and execute files in this directory so we’ll grant them those with the following command.
root@host samba]# setfacl -R -m "g:sambausergroup:rwx" /samba/password_protected_directoryAnd we’ll need to apply SELinux security context on this one as well
[root@host samba]# chcon -t samba_share_t /samba/password_protected_directory/We can now move on to configuration for this share. Open samba configuration file and add the setting for our private share
[root@host ~]# vim /etc/samba/smb.conf[Password Protected]
comment = needs username and password to access
path = /samba/password_protected_directory
valid users = @sambausergroup
guest ok = no
writable = yes
browsable = yesFull configuration file will now look like the following
# See smb.conf.example for a more detailed config file or
# read the smb.conf manpage.
# Run 'testparm' to verify the config is correct after
# you modified it.
[global]
workgroup = WORKGROUP
security = user
netbios name = centos7
printcap name = cups
idmap config * : backend = tdb
cups options = raw
map to guest = bad user
[Password Protected]
		comment = needs username and password to access
		path = /samba/password_protected_directory
		valid users = @sambausergroup
		guest ok = no
		writable = yes
		browsable = yes
[Anonymous]
comment = anonymous file share
path = /samba/anonymous_shared_directory
browseable = yes
writable = yes
guest ok = yes
guest only = yes
read only = no
force user = nobody
[homes]
comment = Home Directories
valid users = %S, %D%w%S
browseable = No
read only = No
inherit acls = Yes
[printers]
comment = All Printers
path = /var/tmp
printable = Yes
create mask = 0600
browseable = No
[print$]
comment = Printer Drivers
path = /var/lib/samba/drivers
write list = @printadmin root
force group = @printadmin
create mask = 0664
directory mask = 0775Once the changes are saved let’s test our configuration with “testparm” command.
[root@host samba]# testparm
rlimit_max: increasing rlimit_max (1024) to minimum Windows limit (16384)
Registered MSG_REQ_POOL_USAGE
Registered MSG_REQ_DMALLOC_MARK and LOG_CHANGED
Load smb config files from /etc/samba/smb.conf
rlimit_max: increasing rlimit_max (1024) to minimum Windows limit (16384)
Processing section "[Password Protected]"
Processing section "[Anonymous]"
Processing section "[homes]"
Processing section "[printers]"
Processing section "[print$]"
Loaded services file OK.
Server role: ROLE_STANDALONE

Press enter to see a dump of your service definitions
Just before we test our new share let’s restart the Samba services to make sure the changes we made are in effect.
[root@host samba]# systemctl restart smb nmbAccessing Samba Linux Files on Windows
For testing, let’s connect from our Windows computer again and click on Start -> Run and input our server IP \\serverIP ->Okay

And now, we’ll have both directories available, our Anonymous directory and our Password protected directory

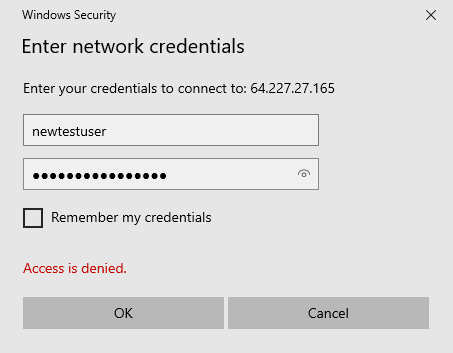
Double-click on our Password Protected directory will open up the following prompt where we’ll need to input our “newtestuser” credentials.
To make sure everything is working as it’s supposed to let’s create a new directory in our Password Protected one.

This one will be named “test_directory” for this purpose.

And finally let’s confirm the existence of our directory from our Linux machine.
[root@host /]# ls -l /samba/password_protected_directory/
total 0
drwxr-xr-x. 2 newtestuser sambausergroup 6 Apr  3 21:12 test_directory
Conclusion
Samba is very flexible. You can connect to Samba from Linux, Windows, or macOS. You can also configure and use it to access a printer connected to a Windows system from Linux and vice versa, or it can be set as Active Directory Domain Controller to integrate a Linux server. Since setting up Samba is fast and easy, it is worth considering if you want easy file sharing across mixed networking environments with Windows and Linux machines.
Liquid Web offers VPS hosting, cloud servers, and dedicated servers for Windows and Linux. Whether you’re setting up Samba for seamless file sharing, managing a VPS with an ASP.NET application, or remotely accessing your server via RDP VPS, our hosting solutions ensure a secure and high-performance environment.
Contact our sales team today to find the perfect server solution for your needs!