
 Katherine Kelly
 What is MongoDB?

MongoDB is a documented database management system that does not require the description of a table scheme. It is representative of a NoSQL based system (NoSQL is an approach to implement a scalable database storage system within a flexible data model), which uses JSON like documents and database schemas often used in web development. It is written in C, C++, JavaScript, and since it is cross-platform, it allows one to deploy it on any platform.
This article will discuss what MongoDB is, where it can be used, and how to install it. This software implements an approach to creating databases with no tables, schemes, SQL queries, external keys, etc., used in object-relational databases. For many years, relational databases (like MySQL) were primarily used. Everything worked there based on the connections between schemas and tables. Since there were no alternatives, it was not so dependent upon whether they were suitable to store the data of some given type or not. On the other hand, MongoDB suggests a document-oriented data model. Using this model, it works faster, more scalable, and is easier to use.

It’s essential to keep in mind that based on the disadvantages of relational databases and the advantages of MongoDB, different tools are used to solve various tasks.
Suitable Tasks MongoDB
Some tasks that MongoDB are best suited for are listed below.
- Big data
- Content management and delivery
- Mobile and social infrastructure
- User data management
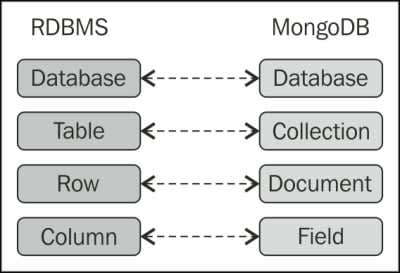
How Does the Schema Relate
In a typical RDBMS (Relational DataBase Management System), you have the database itself which is composed of tables, rows and columns. In the MongoDB and others like it, you have a database, a collection, documents and fields. Here is a simplified version of how they correspond to each other.
MongoDB Administration Tools
Here are the primary tools used with the software.
- Mongo – interactive administration shell
- Mongostat – command-line tool
- Mongotop – used primarily for monitoring
- Mongoimport and mongoexport – a means of exporting and importing to and from JSON files
- Mongodump and mongorestore – These tools are used to create a backup copy and restore databases from it.
MongoDB Installation on CentOS 8
Prerequisites
- We are installing MongoDB on CentOS 8
- All commands will run as the root user
In CentOS 8, there is no official MongoDB package. To install and use it, we need to add the software repository to CentOS, as this points us to the official Mongo repository. This way, our package manager will know where to download and install the software and its dependencies. We will install it using the DNF package manager since it is the standard package manager in CentOS 8.
Add Repo File
First, we begin by adding a file with the .repo extension to our /etc/yum.repos.d/ catalog. DNF checks all files in this catalog while looking for the package sources. To create and edit this file, we will use the nano editor. Because Nano is not built into CentOS 8 by default, we will install it. (Feel free to use vi if you so choose, which is included by default in CentOS 8) At the time this article was written, the official version of MongoDB is 4.4. If we need to install a different version or if a newer version has been released, it can be found and downloaded from the official download page. Additional information can also be found in the MongoDB documentation pages.
Next, let’s update our system.
[root@host ~]# dnf update -y
Last metadata expiration check: 0:14:51 ago on Wed 18 Nov 2020 08:05:16 AM UTC.
Dependencies resolved.
Nothing to do.
Complete!
[root@host ~]#
Install Nano
Now, let’s begin by installing the nano editor.
[root@host ~]# dnf install nano -y
Last metadata expiration check: 0:18:57 ago on Wed 18 Nov 2020 08:05:16 AM UTC.
Dependencies resolved.
=====================================================
 Package Architecture Version Repository Size
=====================================================Installing:
 nano x86_64 2.9.8-1.el8 BaseOS 581 k

Transaction Summary
=====================================================
Install 1 Package

Total download size: 581 k
Installed size: 2.2 M
Downloading Packages:
nano-2.9.8-1.el8.x86_64.rpm 8.3 MB/s | 581 kB 00:00
----------------------------------------------------------------------------
Total 1.8 MB/s | 581 kB 00:00
Running transaction check
Transaction check succeeded.
Running transaction test
Transaction test succeeded.
Running transaction
  Preparing : 1/1
  Installing : nano-2.9.8-1.el8.x86_64 1/1
  Running scriptlet: nano-2.9.8-1.el8.x86_64 1/1
  Verifying : nano-2.9.8-1.el8.x86_64 1/1

Installed:
  nano-2.9.8-1.el8.x86_64

Complete!
[root@host ~]#
Create Repo File
Now we are going to create and edit a unique repo file using the following command.
[root@host ~]# nano /etc/yum.repos.d/mongodb-org.repo
[root@host ~]#
Next, we add the following relevant information to the file.
[mongodb-org]
name=MongoDB Repository
baseurl=https://repo.mongodb.org/yum/redhat/$releasever/mongodb-org/4.4/x86_64/
gpgcheck=1
enabled=1
gpgkey=https://www.mongodb.org/static/pgp/server-4.4.asc
Finally, save the file and exit the Nano editor using the keyboard Ctrl+S and Ctrl+X commands.
Review File Information
Now, let’s review what each line performs.
- [mongodb-org] – this is the identifier for the repository
- name – is used to describe the repository we used
- baseurl – this info points to the link where the repository can be found. We used the following link: https://repo.mongodb.org/yum/redhat/$releasever/mongodb-org/4.4/x86_64/
- gpgcheck=1 – this parameter is responsible for checking and verifying the GPG keys. Setting this value to 1 implies that the DNF package manager needs to check for a GPG signature. If you would like to disable that, set gpgcheck to 0 (zero). Matching keys can help detect whether the packages are not broken or forged
- enabled=1 – is responsible for using this source as the main one for the software packages. Setting enabled to 0 disables that
- gpgkey=https://www.mongodb.org/static/pgp/server-4.4.asc – this parameter denotes the URL where the GPG key can be verified for the check
Verify Repository
Before installing MongoDB, we should verify DNF can locate the repository.
[root@host ~]# dnf repolist
repo id repo name
AppStream CentOS-8 - AppStream
BaseOS CentOS-8 - Base
epel Extra Packages for Enterprise Linux 8 - x86_64
epel-modular Extra Packages for Enterprise Linux Modular 8 - x86_64
extras CentOS-8 - Extras
mongodb-org MongoDB Repository
[root@host ~]#
Install MongoDB
Now, we install the mongodb-org package. This software package contains the main database software and additional packages needed to work with the tool.
[root@host ~]# dnf install mongodb-org -y
Last metadata expiration check: 0:00:17 ago on Wed 18 Nov 2020 08:54:34 AM UTC.
Dependencies resolved.
=====================================================
 Package Arch Version Repository Size
=====================================================
Installing:
 mongodb-org x86_64 4.4.1-1.el8 mongodb-org 10 k
Installing dependencies:
 cyrus-sasl x86_64 2.1.27-1.el8 BaseOS 96 k
 cyrus-sasl-gssapi x86_64 2.1.27-1.el8 BaseOS 49 k
 cyrus-sasl-plain x86_64 2.1.27-1.el8 BaseOS 47 k
 mongodb-database-tools x86_64 100.2.1-1 mongodb-org 55 M
 mongodb-org-database-tools-extra x86_64 4.4.1-1.el8 mongodb-org 20 k
 mongodb-org-mongos x86_64 4.4.1-1.el8 mongodb-org 22 M
 mongodb-org-server x86_64 4.4.1-1.el8 mongodb-org 28 M
 mongodb-org-shell x86_64 4.4.1-1.el8 mongodb-org 18 M
 mongodb-org-tools x86_64 4.4.1-1.el8 mongodb-org 10 k
 python2 x86_64 2.7.17-1.module_el8.2.0+381+9a5b3c3b AppStream 108 k
 python2-libs x86_64 2.7.17-1.module_el8.2.0+381+9a5b3c3b AppStream 6.0 M
 python2-pip-wheel noarch 9.0.3-16.module_el8.2.0+381+9a5b3c3b AppStream 1.2 M
 python2-setuptools-wheel noarch 39.0.1-11.module_el8.2.0+381+9a5b3c3b AppStream 289 k
Installing weak dependencies:
 python2-pip noarch 9.0.3-16.module_el8.2.0+381+9a5b3c3b AppStream 1.9 M
 python2-setuptools noarch 39.0.1-11.module_el8.2.0+381+9a5b3c3b AppStream 643 k
Enabling module streams:
 python27 2.7

Transaction Summary
=====================================================
Install 16 Packages

Total download size: 133 M
Installed size: 421 M
Downloading Packages:
(1/16): python2-2.7.17-1.module_el8.2.0+381+9a5b3c3b.x86_64.rpm 2.7 MB/s | 108 kB 00:00
(2/16): python2-pip-wheel-9.0.3-16.module_el8.2.0+381+9a5b3c3b.noarch.rpm 3.5 MB/s | 1.2 MB 00:00
(3/16): python2-pip-9.0.3-16.module_el8.2.0+381+9a5b3c3b.noarch.rpm 3.9 MB/s | 1.9 MB 00:00
(4/16): python2-setuptools-39.0.1-11.module_el8.2.0+381+9a5b3c3b.noarch.rpm 3.4 MB/s | 643 kB 00:00
(5/16): python2-setuptools-wheel-39.0.1-11.module_el8.2.0+381+9a5b3c3b.noarch.rpm 3.0 MB/s | 289 kB 00:00
(6/16): cyrus-sasl-2.1.27-1.el8.x86_64.rpm 3.9 MB/s | 96 kB 00:00
(7/16): cyrus-sasl-gssapi-2.1.27-1.el8.x86_64.rpm 2.0 MB/s | 49 kB 00:00
(8/16): cyrus-sasl-plain-2.1.27-1.el8.x86_64.rpm 2.0 MB/s | 47 kB 00:00
(9/16): mongodb-org-4.4.1-1.el8.x86_64.rpm 37 kB/s | 10 kB 00:00
(10/16): python2-libs-2.7.17-1.module_el8.2.0+381+9a5b3c3b.x86_64.rpm 6.4 MB/s | 6.0 MB 00:00
(11/16): mongodb-org-database-tools-extra-4.4.1-1.el8.x86_64.rpm 109 kB/s | 20 kB 00:00
(12/16): mongodb-org-mongos-4.4.1-1.el8.x86_64.rpm 2.3 MB/s | 22 MB 00:09
(13/16): mongodb-database-tools-100.2.1.x86_64.rpm 5.4 MB/s | 55 MB 00:10
(14/16): mongodb-org-tools-4.4.1-1.el8.x86_64.rpm 42 kB/s | 10 kB 00:00
(15/16): mongodb-org-server-4.4.1-1.el8.x86_64.rpm 2.7 MB/s | 28 MB 00:10
(16/16): mongodb-org-shell-4.4.1-1.el8.x86_64.rpm 6.4 MB/s | 18 MB 00:02
----------------------------------------------------------------------------
Total 9.6 MB/s | 133 MB 00:13
warning: /var/cache/dnf/mongodb-org-cef71e585db45e10/packages/mongodb-database-tools-100.2.1.x86_64.rpm: Header V3 RSA/SHA1 Signature, key ID 90cfb1f5: NOKEY
MongoDB Repository 2.1 kB/s | 1.6 kB 00:00
Importing GPG key 0x90CFB1F5:
 Userid : "MongoDB 4.4 Release Signing Key <[email protected]>"
 Fingerprint: 2069 1EEC 3521 6C63 CAF6 6CE1 6564 08E3 90CF B1F5
 From : https://www.mongodb.org/static/pgp/server-4.4.asc
Key imported successfully
Running transaction check
Transaction check succeeded.
Running transaction test
Transaction test succeeded.
Running transaction
  Preparing : 1/1
  Installing : mongodb-org-shell-4.4.1-1.el8.x86_64 1/16
  Installing : mongodb-org-mongos-4.4.1-1.el8.x86_64 2/16
  Installing : mongodb-org-database-tools-extra-4.4.1-1.el8.x86_64 3/16
  Installing : cyrus-sasl-plain-2.1.27-1.el8.x86_64 4/16
  Installing : cyrus-sasl-gssapi-2.1.27-1.el8.x86_64 5/16
  Running scriptlet: cyrus-sasl-2.1.27-1.el8.x86_64 6/16
  Installing : cyrus-sasl-2.1.27-1.el8.x86_64 6/16
  Running scriptlet: cyrus-sasl-2.1.27-1.el8.x86_64 6/16
  Running scriptlet: mongodb-database-tools-100.2.1-1.x86_64 7/16
  Installing : mongodb-database-tools-100.2.1-1.x86_64 7/16
  Running scriptlet: mongodb-database-tools-100.2.1-1.x86_64 7/16
  Installing : mongodb-org-tools-4.4.1-1.el8.x86_64 8/16
  Installing : python2-setuptools-wheel-39.0.1-11.module_el8.2.0+381+9a5b3c3b.noarch 9/16
  Installing : python2-pip-wheel-9.0.3-16.module_el8.2.0+381+9a5b3c3b.noarch 10/16
  Installing : python2-libs-2.7.17-1.module_el8.2.0+381+9a5b3c3b.x86_64 11/16
  Installing : python2-pip-9.0.3-16.module_el8.2.0+381+9a5b3c3b.noarch 12/16
  Installing : python2-setuptools-39.0.1-11.module_el8.2.0+381+9a5b3c3b.noarch 13/16
  Installing : python2-2.7.17-1.module_el8.2.0+381+9a5b3c3b.x86_64 14/16
  Running scriptlet: python2-2.7.17-1.module_el8.2.0+381+9a5b3c3b.x86_64 14/16
  Running scriptlet: mongodb-org-server-4.4.1-1.el8.x86_64 15/16
  Installing : mongodb-org-server-4.4.1-1.el8.x86_64 15/16
  Running scriptlet: mongodb-org-server-4.4.1-1.el8.x86_64 15/16
Created symlink /etc/systemd/system/multi-user.target.wants/mongod.service → /usr/lib/systemd/system/mongod.service.

  Installing : mongodb-org-4.4.1-1.el8.x86_64 16/16
  Running scriptlet: mongodb-org-4.4.1-1.el8.x86_64 16/16
  Verifying : python2-2.7.17-1.module_el8.2.0+381+9a5b3c3b.x86_64 1/16
  Verifying : python2-libs-2.7.17-1.module_el8.2.0+381+9a5b3c3b.x86_64 2/16
  Verifying : python2-pip-9.0.3-16.module_el8.2.0+381+9a5b3c3b.noarch 3/16
  Verifying : python2-pip-wheel-9.0.3-16.module_el8.2.0+381+9a5b3c3b.noarch 4/16
  Verifying : python2-setuptools-39.0.1-11.module_el8.2.0+381+9a5b3c3b.noarch 5/16
  Verifying : python2-setuptools-wheel-39.0.1-11.module_el8.2.0+381+9a5b3c3b.noarch 6/16
  Verifying : cyrus-sasl-2.1.27-1.el8.x86_64 7/16
  Verifying : cyrus-sasl-gssapi-2.1.27-1.el8.x86_64 8/16
  Verifying : cyrus-sasl-plain-2.1.27-1.el8.x86_64 9/16
  Verifying : mongodb-database-tools-100.2.1-1.x86_64 10/16
  Verifying : mongodb-org-4.4.1-1.el8.x86_64 11/16
  Verifying : mongodb-org-database-tools-extra-4.4.1-1.el8.x86_64 12/16
  Verifying : mongodb-org-mongos-4.4.1-1.el8.x86_64 13/16
  Verifying : mongodb-org-server-4.4.1-1.el8.x86_64 14/16
  Verifying : mongodb-org-shell-4.4.1-1.el8.x86_64 15/16
  Verifying : mongodb-org-tools-4.4.1-1.el8.x86_64 16/16

Installed:
  cyrus-sasl-2.1.27-1.el8.x86_64
  cyrus-sasl-gssapi-2.1.27-1.el8.x86_64
  cyrus-sasl-plain-2.1.27-1.el8.x86_64
  mongodb-database-tools-100.2.1-1.x86_64
  mongodb-org-4.4.1-1.el8.x86_64
  mongodb-org-database-tools-extra-4.4.1-1.el8.x86_64
  mongodb-org-mongos-4.4.1-1.el8.x86_64
  mongodb-org-server-4.4.1-1.el8.x86_64
  mongodb-org-shell-4.4.1-1.el8.x86_64
  mongodb-org-tools-4.4.1-1.el8.x86_64
  python2-2.7.17-1.module_el8.2.0+381+9a5b3c3b.x86_64
  python2-libs-2.7.17-1.module_el8.2.0+381+9a5b3c3b.x86_64
  python2-pip-9.0.3-16.module_el8.2.0+381+9a5b3c3b.noarch
  python2-pip-wheel-9.0.3-16.module_el8.2.0+381+9a5b3c3b.noarch
  python2-setuptools-39.0.1-11.module_el8.2.0+381+9a5b3c3b.noarch
  python2-setuptools-wheel-39.0.1-11.module_el8.2.0+381+9a5b3c3b.noarch

Complete!
[root@host ~]#
Verify Database Version
Next, let’s verify MongoDB installed correctly using version command.
[root@host ~]# mongo --version
MongoDB shell version v4.4.1
Build Info: {
    "version": "4.4.1",
    "gitVersion": "ad91a93a5a31e175f5cbf8c69561e788bbc55ce1",
    "openSSLVersion": "OpenSSL 1.1.1c FIPS 28 May 2019",
    "modules": [],
    "allocator": "tcmalloc",
    "environment": {
        "distmod": "rhel80",
        "distarch": "x86_64",
        "target_arch": "x86_64"
    }
}
[root@host ~]#
Now, although we have verified it installed successfully, we still need to configure it.
Configuration
Disable Transparent Huge Pages
By default, CentOS 8 enables THP (Transparent Huge Pages is the memory management system used in Linux, which uses large memory pages to lower the search load in the memory buffer). Although THP is used to speed up working with memory, it can negatively affect our database performance. For this reason, the official page recommends disabling it. We will create a systemd system file to disable this option. Now, let’s create a file with .service extension in the /etc/systemd/system/disable-thp.service catalog.
 [root@host ~]# nano /etc/systemd/system/disable-thp.service
 [root@host ~]#
And then, add the following data into the file.
[Unit]
Description=Disable Transparent Huge Pages (THP)
DefaultDependencies=no
After=sysinit.target local-fs.target
Before=mongod.service

[Service]
Type=oneshot
ExecStart=/bin/sh -c 'echo never | tee /sys/kernel/mm/transparent_hugepage/enabled > /dev/null'

[Install]
WantedBy=basic.target
Next, we save the changes and exit the editor using Ctrl+S and Ctrl+X.
Configure THP File
Now let’s define what the lines in the file mean.
- [Unit] – contains general information
- Description=Disable Transparent Huge Pages (THP) – description of the file
- After=sysinit.target local-fs.target – After – points that disable-thp service will start up only after the two specified targets — predefined groups of systemd units
- Before=mongod.service – Before – points that disable-thp service will finish starting mongod service before MongoDB module starts
- [Service] – description of services work
- Type=oneshot – parameters points that module oneshot is going to be a one-off task and systemd will need to wait for the process to end
- ExecStart=/bin/sh -c ‘echo never | tee /sys/kernel/mm/transparent_hugepage/enabled > /dev/null’ – ExecStart parameter is used to point the path and arguments to start the processes. We use the path with null catalogue (/dev/null’) so that the information we do not need could be sorted there
- [Install] – contains information needed for installation
- WantedBy=basic.target – will start disable-thp
Restart Systemctl
Now we need to restart systemctl to apply the changes (created disable-thp).
Reload Systemctl
 [root@host ~]# systemctl daemon-reload
 [root@host ~]#
Start the Service
Now let’s start the service.
 [root@host ~]# systemctl start disable-thp.service
 [root@host ~]#
Now to check whether THP is disabled, we can read the /sys/kernel/mm/transparent_hugepage/enabled file.
 [root@host ~]# cat /sys/kernel/mm/transparent_hugepage/enabled
 always madvise [never]
 [root@host ~]#
The following output always madvise [never] means that everything has been completed correctly.
Enable Service
Now let’s enable the disable-thp service to start automatically whenever the server loads.
[root@host ~]# systemctl enable disable-thp
 Created symlink /etc/systemd/system/basic.target.wants/disable-thp.service → /etc/systemd/system/disable-thp.service.
 [root@host ~]#
Now disable-thp will start whenever the server loads and stop when MongoDB is started.
Modify Tuned
It is essential to ensure that THP remains disabled on the server. In CentOS 8, there is a kernel configuration tool called tuned. Tuned uses a range of pre-configured tuning profiles. We can create and edit them, so now we are going to create a new tuned profile for MongoDB.
First, let’s create a catalogue to store the profile:
 [root@host ~]# mkdir /etc/tuned/no-thp
 [root@host ~]#
Now let’s create a tuned.conf file.
 [root@host ~]# nano /etc/tuned/no-thp/tuned.conf
 [root@host ~]#
Add the following to the file:
 [main]
 include=virtual-guest
 [vm]
 transparent_hugepages=never
Save the changes and exit the editor using Ctrl+S and Ctrl+X.
Let’s look through the configuration we added:
- [main] – this parameter should be included in every tuned file;
- include=virtual-guest – using this parameter, we point that the profile is inherited from the other configuration file;
- [vm] – the parameter used to indicate whether THP is enabled or disabled;
- transparent_hugepages=never – points out that THP should never be enabled.
Enable Profile
Now, let’s enable this profile.
 [root@host ~]# tuned-adm profile no-thp
 [root@host ~]#
Start MongoDB
Now we can start MongoDB and check whether it works.
 [root@host ~]# systemctl start mongod
 [root@host ~]#
Verify Status
Next, let’s check the status.
[root@host ~]# systemctl status mongod
● mongod.service - MongoDB Database Server
   Loaded: loaded (/usr/lib/systemd/system/mongod.service; enabled; vendor preset: disabled)
   Active: active (running) since Wed 2020-11-18 11:26:05 UTC; 37s ago
     Docs: https://docs.mongodb.org/manual
  Process: 26204 ExecStart=/usr/bin/mongod $OPTIONS (code=exited, status=0/SUCCESS)
  Process: 26202 ExecStartPre=/usr/bin/chmod 0755 /var/run/mongodb (code=exited, status=0/SUCCESS)
  Process: 26200 ExecStartPre=/usr/bin/chown mongod:mongod /var/run/mongodb (code=exited, status=0/SUCCESS)
  Process: 26197 ExecStartPre=/usr/bin/mkdir -p /var/run/mongodb (code=exited, status=0/SUCCESS)
 Main PID: 26206 (mongod)
   Memory: 63.0M
   CGroup: /system.slice/mongod.service
           └─26206 /usr/bin/mongod -f /etc/mongod.conf

Nov 18 11:26:05 host systemd[1]: Starting MongoDB Database Server...
Nov 18 11:26:05 host mongod[26204]: about to fork child process, waiting until server is ready for connections.
Nov 18 11:26:05 host mongod[26204]: forked process: 26206
Nov 18 11:26:05 host mongod[26204]: child process started successfully, parent exiting
Nov 18 11:26:05 host systemd[1]: Started MongoDB Database Server.
[root@host ~]#
Enable MongoDB using Systemctl
MongoDB is running, but let’s enable it to start automatically.
 [root@host ~]# systemctl enable mongod
 [root@host ~]#
Connect to Database
Now let’s connect to the db and check whether everything is working as intended.
[root@host ~]# mongo --eval 'db.runCommand({ connectionStatus: 1 })'
MongoDB shell version v4.4.1
connecting to: mongodb://127.0.0.1:27017/?compressors=disabled&gssapiServiceName=mongodb
Implicit session: session { "id" : UUID("9141091d-8749-409e-aee1-8dd9345c0a47") }
MongoDB server version: 4.4.1
{
        "authInfo" : {
                "authenticatedUsers" : [ ],
                "authenticatedUserRoles" : [ ]
        },
        "ok" : 1
}
[root@host ~]#
In the last field, we received “ok” : 1, which indicates that everything is working as expected. Please note that MongoDB uses port 27017 and local address 127.0.0.1.
MongoDB Commands
Here are some of the basic commands for managing the MongoDB service.
 systemctl status mongod - shows the status of MongoDB;
 systemctl stop mongod - stops MongoDB;
 systemctl start mongod - starts MongoDB;
 systemctl restart mongod - restarts MongoDB;
 systemctl disable mongod - prevents MongoDB from starting automatically;
 systemctl enable mongod - enables MongoDB to start automatically.
Conclusion
In this article, we learned about MongoDB, where it can be used, and its tools; also, we added and configured the repository in CentOS 8 and configured the service disabling THP to make MongoDB work better. The service is ready for use.
Get Started Today!
We pride ourselves on being The Most Helpful Humans In Hosting™!
Our Support Teams are filled with experienced Linux technicians and talented system administrators who have intimate knowledge of multiple web hosting technologies, especially those discussed in this article.
Should you have any questions regarding this information, we are always available to answer any inquiries with issues related to this article, 24 hours a day, 7 days a week 365 days a year.
If you are a VPS server, Cloud Dedicated, VMWare Private Cloud, Private Parent server, Managed Cloud Servers, or a Dedicated server owner and you are uncomfortable with performing any of the steps outlined, we can be reached via chat or support ticket to assisting you with this process.