Marco Bacco
 This tutorial will cover what MediaWiki is and how to install MediaWiki on CentOS 7, from downloading the latest version to database creation and installation completion.
What is MediaWiki?
MediaWiki is a free and open source software that helps users collect and organize information. It is a centralized place where users collaborate and share knowledge. Wikipedia is an example of MediaWiki’s software use case, as it was initially developed for creating Wikipedia.
Many companies and organizations use MediaWiki on their websites because it is a powerful and scalable software tool with a feature-rich wiki implementation. It relies on PHP to process and display data stored in a database.
Let’s cover how to install MediaWiki.
Requirements
- MediaWiki version 1.36.1 (at the time of writing).
- Server with CenOS 7.
- Root user access.
- The LAMP stack (Linux, Apache, MySQL, and PHP).
- Working knowledge of command line.
How to Install MediaWiki Software
MediaWiki Installation
Step 1: Updating Repositories
Before getting started, verify the server has the latest updates and software installed. To accomplish this, run the following yum commands. Yum stands for Yellowdog Updater Modified and is a package manager for Redhat Packaging Manager (RPM) based Linux systems.
The yum check-update command automatically locates and obtains the correct RPM packages from the repositories.
root@host:~# yum check-update
Loaded plugins: fastestmirror, priorities
Loading mirror speeds from cached hostfile
 * base: mirrors.lug.mtu.edu
 * extras: mirrors.liquidweb.com
 * updates: mirrors.gigenet.com

root@host:~# yum clean all
Loaded plugins: fastestmirror, priorities
Cleaning repos: base extras updates
Cleaning up list of fastest mirrors


root@host:~# yum update
Loaded plugins: fastestmirror, priorities
Determining fastest mirrors
 * base: mirrors.liquidweb.com
 * extras: atl.mirrors.clouvider.net
 * updates: bay.uchicago.edu
base                                                     | 3.6 kB     00:00
extras                                                   | 2.9 kB     00:00
updates                                                  | 2.9 kB     00:00
(1/4): base/7/x86_64/group_gz                              | 153 kB   00:00
(2/4): extras/7/x86_64/primary_db                          | 243 kB   00:00
(3/4): updates/7/x86_64/primary_db                         |  11 MB   00:00
(4/4): base/7/x86_64/primary_db                            | 6.1 MB   00:00
No packages marked for update
Step 2: Creating the MediaWiki Database
First, install the LAMP stack on CentOS 7.
Next, launch the MySQL command client using the following MySQL commands.
root@host:~# mysql -u root -pUse the below commands to create the database and grant the privileges for the database and user. Replace the database name, username, and password based on your setup.
mysql> CREATE DATABASE mediawiki_db;
Query OK, 1 row affected (0.01 sec)

mysql> GRANT ALL PRIVILEGES ON mediawiki_db.* TO 'wiki_user'@'localhost' IDENTIFIED BY 'P@ssWord@123#' WITH GRANT OPTION;
Query OK, 0 rows affected (0.00 sec)


mysql> FLUSH PRIVILEGES;
mysql> exit;
Step 3: Downloading MediaWiki
Use the wget command to download MediaWiki.
root@host:~# wget https://releases.wikimedia.org/mediawiki/1.36/mediawiki-1.36.1.tar.gz
--2021-09-17 07:32:40--  https://releases.wikimedia.org/mediawiki/1.36/mediawiki-1.36.1.tar.gz
Resolving releases.wikimedia.org (releases.wikimedia.org)... 198.35.26.96, 2620:0:863:ed1a::1
Connecting to releases.wikimedia.org (releases.wikimedia.org)|198.35.26.96|:443... connected.
HTTP request sent, awaiting response... 200 OK
Length: 49645517 (47M) [application/x-gzip]
Saving to: 'mediawiki-1.36.1.tar.gz'

100%[======================================>] 49,645,517  10.4MB/s   in 5.4s

2021-09-17 07:32:47 (8.84 MB/s) - 'mediawiki-1.36.1.tar.gz' saved [49645517/49645517]
Next, unarchive or extract the MediaWiki file using the tar command. Then, in the terminal console, execute the following command.
root@host:~# tar -zxpvf mediawiki-1.36.1.tar.gzMove the MediaWiki to the appropriate directory. For example, this tutorial uses /var/www/html/mediawiki for its directory, so choose the appropriate one for your site.
root@host:~# mv mediawiki-1.36.1 /var/www/html/mediawikiNow, establish the directory ownership and permissions with the following commands.
root@host:~# chown -R apache:apache /var/www/mediawiki/
root@host:~# chmod 755 /var/www/mediawiki/
[su_box title=”Note:” style=”glass” box_color=”#3ac6eb” radius=”20″]This tutorial used apache, but it may differ depending on your PHP handler.[/su_box]
Step 4: MediaWiki Web Browser Installation
Open a web browser and input http://IP_Address/mediawiki to access your MediaWiki. Then, click set up the wiki.

Choose your language and click Continue.

The next screen provides an environmental check ensuring all prerequisites have been met. Proceed by clicking Continue.

Next, connect your database. Input the MariaDB/MySQL database settings and click Continue.

Name your wiki and establish your login credentials and email address. Click Continue.

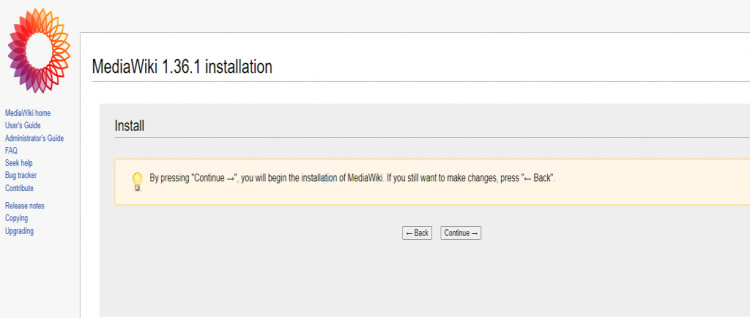
At this point, the wiki can be installed by clicking Continue and skipping the remaining configuration options like User rights profile, Copyright and license, Email settings, and Extensions.

Click Continue to begin your MediaWiki installation.
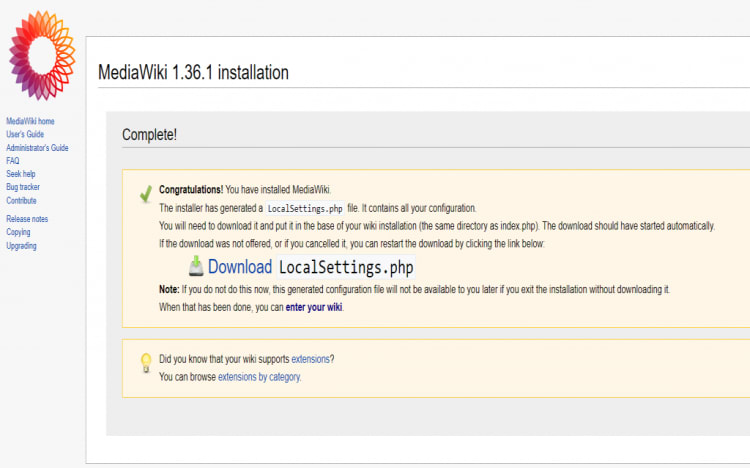
The MediaWiki installation is now complete. The installer will generate a localsettings.php file that contains the database configurations. Download the file and put it in the same directory that includes index.php. MediaWiki is now ready for use.
Conclusion
We hope you have found this guide on how to install MediaWiki helpful and you find MediaWiki useful. With its functionality and support for specialized content, such as mathematical formulas, hieroglyphs, and media galleries, MediaWiki is suitable for almost any purpose. Many websites run their own wikis on the web or intranets and in schools.
Are you ready to set up your MediaWiki website but are not sure what managed hosting plan is right for you? Contact our sales team to get your CentOS server set up today!