How To Install Apache Spark on Ubuntu
What is Apache Spark?

Apache Spark is a distributed open-source, general-purpose framework for clustered computing. It is designed with computational speed in mind, from machine learning to stream processing to complex SQL queries. It can easily process and distribute work on large datasets across multiple computers.
Further, it employs in-memory cluster computing to increase the applications’ speed by reducing the need to write to disk. Spark provides APIs for multiple programming languages including Python, R, and Scala. These APIs abstract away the lower-level work that might otherwise be required to handle big data.
Efficiently gathering data is on the upswing. Increased efficiency and effectiveness in producing data has necessitated the proliferation of new methodologies to analyze that data. Paramount among individuals and industries’ concerns in parsing through the veritable mountain of information presented from all fronts is speed. As the amount of data increases, the technology employed to make sense of it all must keep pace. Apache Spark is one of the newest open-source technologies to provide this functionality. In this tutorial, we will walk through how to install Apache Spark on Ubuntu.
Pre-Flight Check
- These instructions were performed on a Liquid Web Self-Managed Ubuntu 18.04 server as the root user.
Install Dependencies
It is always best practice to ensure that all our system packages are up to date. To get started, run the following command.
root@ubuntu1804:~# apt update -yBecause Java is required to run Apache Spark, we must ensure that Java is installed. To verify this, run the following command.
root@ubuntu1804:~# apt install default-jdk -yDownload Apache Spark
The next step is to download Apache Spark to the server. The Mirrors with the latest Apache Spark version can be found here on the Apache Spark download page. As of the writing of this article, version 3.0.1 is the newest release. Download Apache Spark using the following command.
root@ubuntu1804:~# wget https://downloads.apache.org/spark/spark-3.0.1/spark-3.0.1-bin-hadoop2.7.tgz
--2020-09-09 22:18:41--  https://downloads.apache.org/spark/spark-3.0.1/spark-3.0.1-bin-hadoop2.7.tgz
Resolving downloads.apache.org (downloads.apache.org)... 88.99.95.219, 2a01:4f8:10a:201a::2
Connecting to downloads.apache.org (downloads.apache.org)|88.99.95.219|:443... connected.
HTTP request sent, awaiting response... 200 OK
Length: 219929956 (210M) [application/x-gzip]
Saving to: 'spark-3.0.1-bin-hadoop2.7.tgz'

spark-3.0.1-bin-hadoop2.7.tgz                   100%[=========================================================================>] 209.74M  24.1MB/s    in 9.4s

2020-09-09 22:18:51 (22.3 MB/s) - 'spark-3.0.1-bin-hadoop2.7.tgz' saved [219929956/219929956]
Once the program has finished downloading, extract the Apache Spark tar file using this command.
root@ubuntu1804:~# tar -xvzf spark-*Finally, move the extracted directory to /opt:
root@ubuntu1804:~# mv spark-3.0.1-bin-hadoop2.7/ /opt/spark
root@ubuntu1804:~#
Configure the Environment
Before starting the Spark master server, there are a few environmental variables that need to be configured. First, set the environment variables in the .profile file by running the following commands:
root@ubuntu1804:~# echo "export SPARK_HOME=/opt/spark" >> ~/.profile

root@ubuntu1804:~# echo "export PATH=$PATH:/opt/spark/bin:/opt/spark/sbin" >> ~/.profile

root@ubuntu1804:~# echo "export PYSPARK_PYTHON=/usr/bin/python3" >> ~/.profile
To ensure that these new environment variables are accessible within the shell and available to Apache Spark, it is also necessary to run the following command.
root@ubuntu1804:~# source ~/.profile
root@ubuntu1804:~#
Start Apache Spark
With the environment configured, next up is to start the Spark master server. The previous command added the necessary directory to the system PATH variable, so it should be possible to run this command from any directory:
root@ubuntu1804:~# start-master.sh
starting org.apache.spark.deploy.master.Master, logging to /opt/spark/logs/spark-root-org.apache.spark.deploy.master.Master-1-ubuntu1804.awesome.com.out
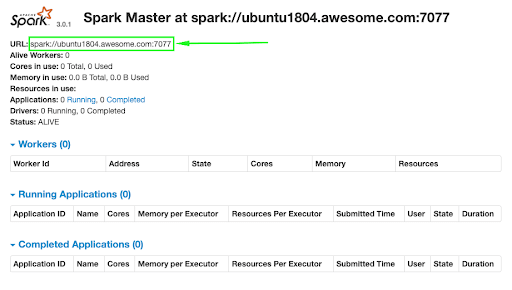
In this case, the Apache Spark user interface is being run locally on a remote server. To view the web interface, it is necessary to use SSH tunneling to forward a port from the local machine to the server. Logout of the server and then run the following command replacing the hostname for your server’s hostname or IP:
ssh -L 8080:localhost:8080 root@ubuntu1804.awesome.comIt should now be possible to view the web interface from a browser on your local machine by visiting http://localhost:8080/. Once the web interface loads, copy the URL as it will be needed in the next step.

Start Spark Worker Process
In this case, the installation of Apache Spark is on a single machine. For this reason, the worker process will also be started on this server. Back in the terminal to start up the worker, run the following command, pasting in the Spark URL from the web interface.
root@ubuntu1804:~# start-slave.sh spark://ubuntu1804.awesome.com:7077
starting org.apache.spark.deploy.worker.Worker, logging to /opt/spark/logs/spark-root-org.apache.spark.deploy.worker.Worker-1-ubuntu1804.awesome.com.out
root@ubuntu1804:~#
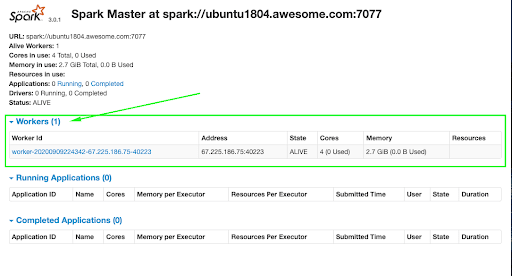
Now that the worker is running, it should be visible back in the web interface.

Verify Spark Shell
The web interface is handy, but it will also be necessary to ensure that Spark’s command-line environment works as expected. In the terminal, run the following command to open the Spark Shell.
root@ubuntu1804:~# spark-shell
WARNING: An illegal reflective access operation has occurred
WARNING: Illegal reflective access by org.apache.spark.unsafe.Platform (file:/opt/spark/jars/spark-unsafe_2.12-3.0.1.jar) to constructor java.nio.DirectByteBuffer(long,int)
WARNING: Please consider reporting this to the maintainers of org.apache.spark.unsafe.Platform
WARNING: Use --illegal-access=warn to enable warnings of further illegal reflective access operations
WARNING: All illegal access operations will be denied in a future release
20/09/09 22:48:09 WARN NativeCodeLoader: Unable to load native-hadoop library for your platform... using builtin-java classes where applicable
Using Spark's default log4j profile: org/apache/spark/log4j-defaults.properties
Setting default log level to "WARN".
To adjust logging level use sc.setLogLevel(newLevel). For SparkR, use setLogLevel(newLevel).
Spark context Web UI available at http://ubuntu1804.awesome.com:4040
Spark context available as 'sc' (master = local[*], app id = local-1599706095232).
Spark session available as 'spark'.
Welcome to
      ____              __
     / __/__  ___ _____/ /__
    _\ \/ _ \/ _ `/ __/  '_/
   /___/ .__/\_,_/_/ /_/\_\   version 3.0.1
      /_/

Using Scala version 2.12.10 (OpenJDK 64-Bit Server VM, Java 11.0.8)
Type in expressions to have them evaluated.
Type :help for more information.

scala> println("Welcome to Spark!")
Welcome to Spark!

scala>
The Spark Shell is not only available in Scala but also Python! Exit the current Spark Shell by holding the CTRL key + D. To test out pyspark run the following command.
root@ubuntu1804:~# pyspark
Python 3.6.9 (default, Jul 17 2020, 12:50:27)
[GCC 8.4.0] on linux
Type "help", "copyright", "credits" or "license" for more information.
WARNING: An illegal reflective access operation has occurred
WARNING: Illegal reflective access by org.apache.spark.unsafe.Platform (file:/opt/spark/jars/spark-unsafe_2.12-3.0.1.jar) to constructor java.nio.DirectByteBuffer(long,int)
WARNING: Please consider reporting this to the maintainers of org.apache.spark.unsafe.Platform
WARNING: Use --illegal-access=warn to enable warnings of further illegal reflective access operations
WARNING: All illegal access operations will be denied in a future release
20/09/09 22:52:46 WARN NativeCodeLoader: Unable to load native-hadoop library for your platform... using builtin-java classes where applicable
Using Spark's default log4j profile: org/apache/spark/log4j-defaults.properties
Setting default log level to "WARN".
To adjust logging level use sc.setLogLevel(newLevel). For SparkR, use setLogLevel(newLevel).
Welcome to
      ____              __
     / __/__  ___ _____/ /__
    _\ \/ _ \/ _ `/ __/  '_/
   /__ / .__/\_,_/_/ /_/\_\   version 3.0.1
      /_/

Using Python version 3.6.9 (default, Jul 17 2020 12:50:27)
SparkSession available as 'spark'.
>>> print('Hello pyspark!')
Hello pyspark!Shut Down Apache Spark
If it becomes necessary for any reason to turn off the main and worker Spark processes, run the following commands:
root@ubuntu1804:~# stop-slave.sh
stopping org.apache.spark.deploy.worker.Worker

root@ubuntu1804:~# stop-master.sh
stopping org.apache.spark.deploy.master.Master
Conclusion
Apache Spark offers an intuitive interface to work with big datasets. In this tutorial, we covered how to get a basic setup going on a single system but, Apache Spark thrives on distributed systems. This information should help you get off and running with your next big data project! To take things a step further, head over to the Apache Spark Documentation.
How Can We Help?
Our Support Teams are filled with talented individuals with intimate knowledge of web hosting technologies, especially those discussed in this article. If you are uncomfortable walking through the steps outlined here, we can be reached via a phone call at 1-800-580-4985, or chat, or you can open a ticket with us to aid you through the process. If you’re running one of our Fully managed servers, we are happy to pick up the torch and carry it for you, directly implementing the changes in this article that you require.
Related Articles:
- Managed Server vs. Unmanaged Server Defined
- Change cPanel password from WebHost Manager (WHM)
- Blocking IP or whitelisting IP addresses with UFW
- Fail2Ban install tutorial for Linux (AlmaLinux)
- How to set up NGINX virtual hosts (server blocks) on AlmaLinux
- Integrating Cloudflare Access with a Bitwarden instance

About the Author: Justin Palmer
Justin Palmer is a professional application developer with Liquid Web
Our Sales and Support teams are available 24 hours by phone or e-mail to assist.
Latest Articles
Managed Server vs. Unmanaged Server Defined
Read ArticleChange cPanel password from WebHost Manager (WHM)
Read ArticleChange cPanel password from WebHost Manager (WHM)
Read ArticleChange cPanel password from WebHost Manager (WHM)
Read ArticleChange the root password in WebHost Manager (WHM)
Read Article


