
 Justin Palmer
 When looking to host websites or services from a Windows server, there are several options to consider. It is worth reviewing the strengths and weaknesses of each server type to determine which one is most likely to meet your particular needs before you spend the time installing and configuring a web service.
Some of the most common web servers available for Windows services are Tomcat, Microsoft IIS (Internet Information Services), and of course the Apache server. Many server owners will choose to use a control panel which manages most of the common tasks usually needed to administer a web server such as e-mail and firewall configuration.
At Liquid Web, that option means you’re using one of our fully managed VPS servers with Plesk. Alternately, some administrators who need more flexibility choose one of our Core or Self-Managed Windows Servers. This article is intended for the latter type of server with no Plesk (or other) server management control panel.

Preflight Check
This guide was written for a 64-bit Windows server since a modern server is more likely to utilize that platform.
Downloading Apache:
While there are several mirrors to choose from for downloading the pre-compiled Apache binaries for windows, we’ll be using ApacheHaus for this task.
Download Here: Apache 2.4.46
(This is the 64-bit version with OpenSSL version 1.1.1a included). If you would like to utilize an alternate version they are listed here: Available Versions Page
Install Apache on Windows
We will assume that you have installed all the latest available updates for your version of Windows. If not, it is critical to do so now to avoid unexpected issues. These instructions are specifically adapted from the directions provided by ApacheHaus where we obtained the binary package. You may find the entire document in the extracted Apache folder under the file “readme_first.html”.
Visual C++ Installation
Before installing Apache, we first need to install the below package. Once it has been installed, it is often a good idea to restart the system to ensure any remaining changes requiring a restart are completed.
Download the Visual C++ 2008 Redistributable Package and install it.
Note: Download the x64 version for 64-bit systems.
Restart – This is optional but recommended.
Apache Installation
Step 1:
Extract the compressed Apache download. While you can extract it to any directory, it is the best practice to extract it to the root directory of the drive it is located on (our example folder is located in C:\Apache24). This is the location we will be using for these instructions. Once installed, you can see Apache’s base path by opening the configuration file and checking the “ServerRoot” directive.

Step 2:
Open an “Administrator” command prompt. (Click the Windows “Start” icon, then type “cmd”. Right-click the “Command Prompt” item which appears, and select “Run As Administrator.”)
Step 3:
Change to the installation directory (For our purposes C:\Apache24\bin).
Step 4:
Run the program httpd.exe.
Step 5:
You will likely notice a dialogue box from the Windows Firewall noting that some features are being blocked. If this appears, place a checkmark in “Private Networks…” as well as “Public Networks…”, and then click “Allow access.”
Test Apache Installation
As noted in the ApacheHaus instructions: “You can now test your installation by opening up your Web Browser and typing in the address: http://localhost. If everything is working properly, you should see the ApacheHaus’ test page.“

To shut down the new Apache server instance, you can go back to the Command Prompt and press “Control-C”.
Install Apache Service
Now that we have confirmed the Apache server is working and shut it down, we are ready to install Apache as a system service.
Step 1:
In your Command Prompt window, enter (or paste) the following command:
httpd.exe -k install -n "Apache HTTP Server"Output:
Installing the 'Apache HTTP Server' service
 The 'Apache HTTP Server' service is successfully installed.
 Testing httpd.conf....
 Errors reported here must be corrected before the service can be started.
Step 2:
From your Command Prompt window enter the following command and press ‘Enter.’services.msc and look for the service “Apache HTTP Server.” Looking towards the left of that line you should see “Automatic.” If you do not, double-click the line and change the Startup Type to “Automatic.”
Step 3:
Restart your server and open a web browser once you are logged back in. Go to this page in the browser’s URL bar: http://localhost/.
Configure Windows’ Firewall
To allow connections from the Internet to your new web server, you will need to configure a Windows Firewall rule to do so. Follow these steps.
Step 1:
Click the “Windows Start” button, and enter “firewall.” Click the “Windows Firewall With Advanced Security” item.
Step 2:
Click “New Rule” on the right-hand sidebar.

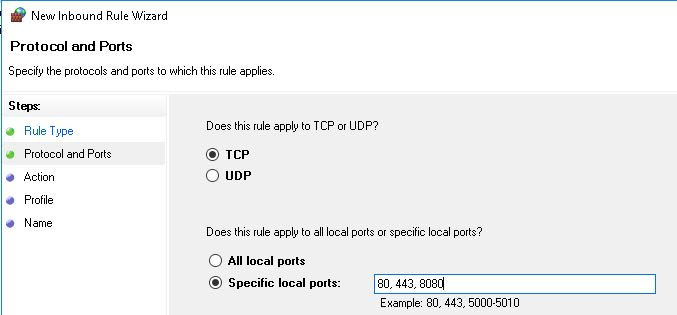
Step 3:
Select “Port,” and click Next. Select the radio button next to “Specific remote ports:” Enter the following into the input box: 80, 443, 8080
Step 4:
Click Next, then select the radio button next to “Allow the connection.”
Step 5:
Click Next, ensure all the boxes on the next page are checked, then click Next again.
Step 6:
For the “name” section, enter a description that is familiar enough that you will be able to recognize the rule’s purpose later such as: “Allow Incoming Apache Traffic.”
Step 7:
Click “finish”.
Step 8:
Try connecting to your server’s IP address from a device other than the one you are using to connect to the server right now. Open a browser and enter the IP address of your server. For example, http://192.168.1.21/. You should see the test web page.
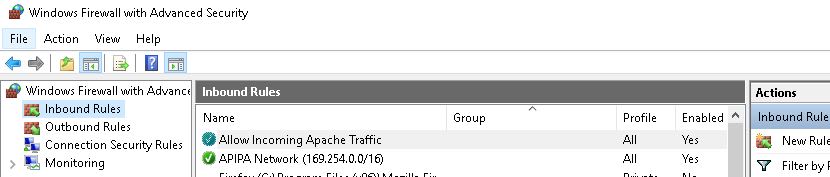
Step 9:
For now, go back to the Windows firewall and right-click the new rule you created under the “Inbound Rules” section. Click “Disable Rule.” This will block any incoming connections until you have removed or renamed the default test page as it exposes too much information about the server to the Internet. Once you are ready to start serving your new web pages, re-enable that firewall rules, and they should be reachable from the Internet again.
That’s it! We now have the Apache Web Server installed on our Windows server. From here you’ll likely want to install additional Apache modules like the PHP and MySQL modules for Apache.
Our technical support staff is always available to assist with any issues related to this article, 24 hours a day, 7 days a week 365 days a year.
We are available, via our ticketing systems at [email protected], by phone (at 800-580-4986) or via a LiveChat or whatever method you prefer. We work hard for you so you can relax.