
 Joseph Molloy
 Introduction
Most Linux distributions ship with a command-line based text editor, usually Vi/Vim or Nano. While both are excellent choices, Vim has a steeper learning curve and can be confusing for beginners. Nano, on the other hand, will feel much more familiar to anyone who has used notepad or other simple text editors in a desktop or other graphical user interface. This is not to say that Nano is not as feature rich as Vim; it is simply more accessible.
In this article, we will cover the basics of using the Nano text editor, as well as installing it and making some standard adjustments to its configuration. This article is primarily intended for people with little to no experience using the Linux command line, but even experienced users may learn a thing or two. We will be using a basic CentOS 8 Linux server distribution to demonstrate the many uses of Nano. Still, these commands and interfaces are mostly the same on all Linux distros by default.
Installing Nano
Before we can start creating and editing text files, we need to check and see if nano is installed on our system. We can do that by simply trying to start it:
[joseph@CentOS8 ~]$ nano
bash: nano: command not found
If the editor started up for you, feel free to skip ahead to the use and configuration sections. In case we do not have it installed, we can install it now. The installation command will be different depending on which family of Linux distributions we are using. We will show the two most popular ones, Red Hat and Debian based systems. We need to be logged in as the root user or a user with sudo permissions to be able to install the new package. If we are logged in as root, we can drop the sudo command and run the rest of the command. We can also use the -y flag to auto-confirm on the installation prompts.
CentOS / RHEL / Fedora
[joseph@CentOS8 ~]$ sudo yum install -y nanoUbuntu / Debian / Mint
joseph@ubuntu1804:~$ sudo apt-get install -y nanoIf Nano installed successfully, we will see a large amount of text ending with a confirmation message:
Installed:
  nano-2.9.8-1.el8.x86_64
Complete!
Since Nano works right out of the box, let’s review its usage and then check out its various configuration options further down in the article.
Using the Nano Editor
Getting Started
To start the Nano editor, we can invoke it using the following command.
[joseph@CentOS8 ~]$ nanoWe can use the same command along with a filename to create a new file or open an existing one:
[joseph@CentOS8 ~]$ nano example.txtNext, let’s familiarize ourselves with the different sections of the Nano user interface. For clarity, the sections are specified and separated by yellow lines.

- Title bar – The title bar is the topmost line. It shows the name of the open file. If we started Nano without declaring a filename, it will say “New Buffer.” It will also show the version of Nano that we are running in the top left corner. It will say “modified” in the top right corner if we have made any changes to a file since we opened or last saved it.
- Text area – This is where the contents of our file are displayed and where we do our writing and editing.
- Status bar – The status bar displays informational messages and errors from nano. We will also use it for additional inputs such as filenames, search terms, and answering question prompts.
- Shortcut list – The shortcut list is only present in Nano’s basic mode since the advanced mode assumes we already know most of the shortcuts. It displays keyboard combinations for some of the most common functions, such as searching, saving, or exiting a file. It is also contextual, meaning it changes the displayed shortcuts depending on what action we are taking. We can think of it as displaying menus and sub-menus.
Nano works much like any GUI-based editor, and we can start typing as soon as we start it up. The enter, backspace, delete, and arrow keys work like any other text editor. Things can get a bit tricky when we get to the commands.

Nano’s commands and shortcuts are unique. There are two types of commands that we see on the shortcut list:
- ‘^’ – This is the caret symbol. It represents the control+x commands or shortcuts using a combination of the Ctrl key and a character. Alternatively, we can double-tap the Esc key and press the character.
- ‘M-’ – The M stands for ‘meta’ commands. These are combinations of the Alt, Cmd, or Esc key (depending on your keyboard setup) and an additional character.
The shortcuts listed here are the usual defaults and may not be the same on all machines if Nano’s settings were customized. We can always check the ^G (hold Ctrl and press G) for the “Get Help” menu to review the command shortcuts and additional commands not listed in the shortcut list. Keep in mind that we can exit most contextual menus using the ^C or “cancel” command.
Exiting Nano
To exit, we use the ^X shortcut.

If we make any modifications to a file since opening it or last saving it, we are prompted to save the changes. Pressing N will close nano without saving the changes. Pressing Y provides some additional options before saving the file and exiting.
Saving Files
When saving files, Nano will ask us what filename we want to use. If we confirm the suggested name by pressing Enter, it overwrites the existing file name. If we change the name, we get another Yes/No prompt asking if we want to save the file under a different name. The shortcut list also shows us additional options, such as saving the file in a different encoding format or appending it to another existing file.

We can also save changes to the open file without exiting Nano by using the ^O – or “Write Out” command instead of the ^X command. Alternatively, we can press ^S to save changes using the current filename.

Regardless if we used the ^O or ^S commands, Nano tells us it “wrote” or saved the six lines into a file, and the editor stays open.
Navigating in Nano
In this section, we’ll take a look at how to navigate within a file. There are too many commands to cover, so we’ll just go over the most commonly used ones. To give a better example of these, we’ll use a file of filler text that’s much bigger than our first example file.
Our position in a file is defined by the location of our cursor:

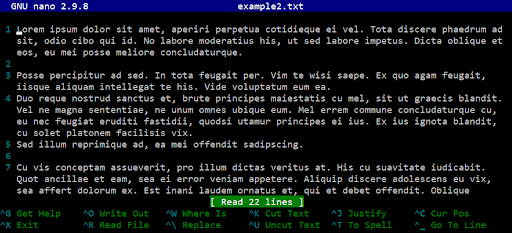
Outside the contextual menus, the ^C command will display the cursor’s current position: line, column, and character position in the status bar, as shown below.

Starting nano with the -c flag will enable consistently show the cursor’s position in the status bar:
[joseph@CentOS8 ~]$ nano -c example2.txtWe can see that many lines in this file ends with a $ symbol. In nano, this implies that the line is longer than the width of our screen (or window, if we’re using a terminal in a GUI). In the image below, we also see that the line in which our cursor is located begins with a $. This is because we have already scrolled to the right, past the first screen-length of the line.

This behavior is because line wrapping is disabled by default in nano. We enable soft (visual) wrapping using the M-$ command:

Alternatively, we can start nano with soft line wrapping enabled by passing the -$ flag to it:
[joseph@CentOS8 ~]$ nano -$ example2.txtIn some cases, we may want to display line numbers continually. We can do so with the M-# command. This view is useful when looking at wrapped text, as it helps us differentiate wrapped lines from actual new lines.

It is highly recommended disabling line wrapping, or run nano with the -w (no wrap) flag when editing configuration files to avoid formatting mistakes.[
The primary navigation keys mostly work as expected, but their functionality is often expanded with control or meta combinations. Nano also provides some alternatives to specific keys or commands to make navigation less dependent on the particular keyboard layout we are using. These alternative shortcuts are provided in brackets, so feel free to use whichever you’re more comfortable with.
Arrow keys:
- up [^P] – go to previous line
- down [^N] – go to next line
- left [^B] – go back one character
- right [^F] – go forward one character
- ^up – previous block of text
- ^down – next block of text
- ^left [M-space] – previous word
- ^right [^space] – next word
Navigation keys:
- page up [^Y] – go one screen up
- page down [^V] – go one screen down
- home [^A] – go to the beginning of the line;
- end [^E] – go to the end of the line
- ^home [M-\] – go to the first line of the file
- ^end [M-/] – go to the last line of the file
Other commands:
- ^space – go forward one word
- M-space – go back one word
- M– [M-_] – scroll up one line without moving the cursor
- M-+ [M-=] – scroll down one line without moving the cursor
We can also tell nano to go directly to a specific position in the text file using the ^_ [M-G] “go to” command.

We can either pass just a line number, a line number, and column number separated by a comma (7,16), or just a column number, indicated by a preceding comma (,52). In the last case, the command will be treated as “go to the current line, column 52. We can do the same when starting nano, by passing a line and column number to it as an argument:
[joseph@CentOS8 ~]$ nano +5,30 example2.txtSelecting, Cutting, Copying, Pasting
There are two main methods of selecting text in nano. The simpler and more familiar one is to hold down the shift key while using the arrow or navigation keys to move the cursor. Alternatively, we can use the M-A [^6] (mark) command to mark our starting position, then move using the arrow or navigation keys.

When we have selected the desired text, we can cut it with the ^K [F9] command. The cut text is stored in the cut buffer (a location in memory, similar to the clipboard in Windows). The cut command also doubles as that delete command by removing the marked text. We can also copy the marked text into the cut buffer using the copy command M-6 [M-^].
If no text were selected, these commands would cut/copy the whole current line. Using the cut command consecutively (with no other keystrokes in between) will cut the next line and add it to
the cut buffer.
Pasting is done using the ^U [F10] (uncut) command and pastes the entire cutbuffer at the position of our cursor. We can paste the cutbuffer multiple times since it is only overwritten the next time we use a cut or copy command.
If we accidentally cut something we shouldn’t have but already overwrote the cutbuffer and can’t paste it, we can use the M-U “undo” and M-E “redo” commands to fit.
Search and Replace
We can search for a specific word or string using the ^W “where is” command. A search prompt appears in the status bar:

By default, the ^W command will move our cursor to the earliest next occurrence of the searched string. We can reverse the search direction using the M-B command in the search menu. To quickly repeat the last search, we can use the M-W shortcut. We can also enable case-sensitive searching using the M-C command. To quickly navigate to the next or previous occurrence, we can use M-down-arrow and M-up-arrow shortcuts, respectively.
A more interactive alternative is the replace tool. With it, we can run the ^R command from within the search tool, or with the ^\ [M-R] shortcut from the main command list.

In both the search and replace tools, nano shows us the last term we searched for in [brackets], so we can easily repeat the search by just pressing enter. We can also look for other previously searched terms by scrolling through the search history using the ^P and ^N commands. Pressing ^R will toggle us back to search mode.
The “Replace with” prompt asks us what word we want to replace our searched word with:

Unlike the search feature, the replace tool will toggle through each instance of the string, asking us if we want to replace it. The rest is self-explanatory:

When we’re done, the status bar gives us a count of how many instances were replaced:

We can also limit the scope of the search and replace operations by selecting a portion of the text beforehand.

In this case, the replace tool will only check for matching strings within the marked text. If we select the replace all option, only the matches within the selected text will be replaced.

Configuring Nano
Like we demonstrated in the use section, we can start nano with a flag such as -$ or -c to run it with additional options enabled. We can also make these changes in Nano’s configuration files using a series of “set” and “unset” commands. This way, we can enable individual options without needing to pass them at the command line.
Nano loads two configuration files on startup. The first is the system-wide configuration file that is usually located at /etc/nanorc. The second one is the user-specific configuration file. This file typically found in the user’s home directory.
Options passed at the command line always override any conflicting options in the configuration files.
We can edit our user’s .nanorc file with nano itself:
[joseph@CentOS8 ~]$ nano ~/.nanorcThe tilde ~ stands for the home directory. In this particular case, the file is actually located at /home/joseph/.nanorc
If the .nanorc file is empty, it means one does not exist yet. Regardless, we can just write and save our configuration changes, and nano will use them the next time we start it. Since there are many possible options in nano, we’ll just take a look at an example nanorc file with some commonly used options.
Here’s an example of what our example2.txt might look like when using a non-default nano configuration:
Here’s the nanorc we used. We’ll go through the commands one by one.

- set softwrap – enables soft (visual) wrapping of text, just like the -$ command line option
- set suspend – allows us to suspend the nano editor program. This option is useful if we need to temporarily exit the editor but don’t want to close it fully. We suspend it by pressing the ^Z shortcut.
[joseph@CentOS8 ~]$ nano ~/.nanorc
Use "fg" to return to nano.

[1]+ Stopped  nano ~/.nanorc
We can reopen it by using the fg command:
[joseph@CentOS8 ~]$ fg- set linenumbers – consistently display line numbers in the leftmost column of the editor
- set atblanks – This wraps text when blank characters are seen. This option indicates that Nano will display the entire word in the next line rather than just breaking it if it does not fit on the screen.
- set autoindent – indent new lines to the same number of spaces and tabs as the previous line
- set casesensitive – sets search and replace commands to be case sensitive by default
The next few options deal with the color scheme of nano’s interface. We won’t go into detail here as many operating systems come with predefined alternative color schemes, but this is how we can customize them.
The last line is used to enable syntax highlighting. This feature is handy for code readability. Nano comes with a good deal of syntax readability configuration files. These are located in the /usr/share/nano/ directory.

Instead of loading individual files, in our example, we loaded all of these configuration files by using an asterisk * as a wildcard in our command: include “/usr/share/nano/*.nanorc”
We hope this article has provided a solid understanding of using the Nano editor for essential file modification. Nano has many other advanced features, settings, and command-line options that are not covered here. These features and more are detailed in the official nano command manual.
Conclusion
Nano is a must-have tool that should be a part of every ones tool set. Being able to open, find, edit, and then save a file using this editor will increase your overall capabilities and aptitude for modifying files in Linux.
If you would like more information about this feature or run into issues with its use, open a chat or ticket with us. One of our knowledgeable Systems Administrators or Solutions Providers will be glad to lend a hand today!