How to Install and Configure phpMyAdmin on Ubuntu 14.04
PhpMyAdmin is an open-source tool used for the administration of MySQL. In addition to offering the capability to perform administration tasks such as creating, editing, or deleting databases, and managing users and permissions, PhpMyAdmin provides a graphical user interface to do these tasks and more.
Preflight Check
- These instructions are intended specifically for installing PhpMyAdmin on Ubuntu 14.04 LTS.
- I’ll be working from a Liquid Web Core Managed Ubuntu VPS server, logged in as root.
- A LAMP, Linux, Apache, MySQL, and PHP, must be installed and running on your server. If you’re working from a Liquid Web Core Managed Ubuntu 14.04 LTS server as I am, then the LAMP stack is already installed!
Installing PhpMyAdmin
Step 1: Install PhpMyAdmin
First, you’ll follow a simple best practice: ensuring the list of available packages is up to date before installing anything new.
apt-get -y update
Then it’s a matter of just running one command for installation via apt-get:
apt-get -y install phpmyadmin
Step 2: Basic Configuration
As the installation runs you’ll be asked a few simple questions regarding the basic configuration of PhpMyAdmin.
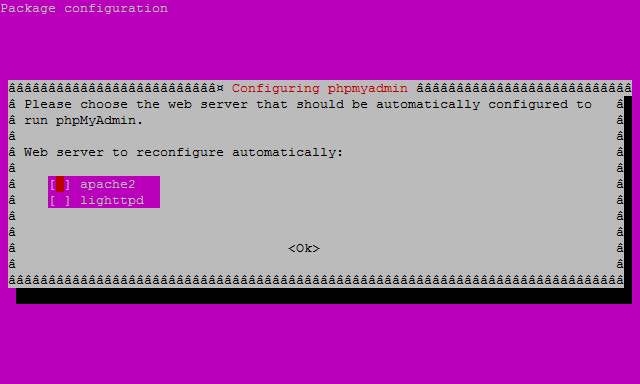
At the first screen, select apache2 by using the space bar, then hit enter to continue.
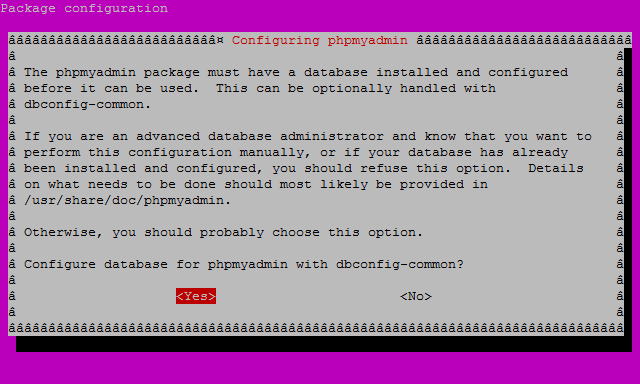
At the second screen, which asks “configure the database for PhpMyAdmin with dbconfig-common?”, select Yes, then hit enter to continue.
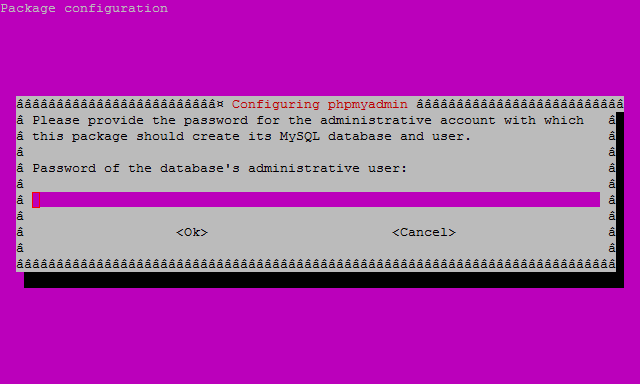
In this third screen enter your administrative password this is also the MySQL root (admin) user password, hit enter to continue.
Finally, at the fourth screen set the password you’ll use to log into PhpMyAdmin, hit enter to continue, and confirm your password.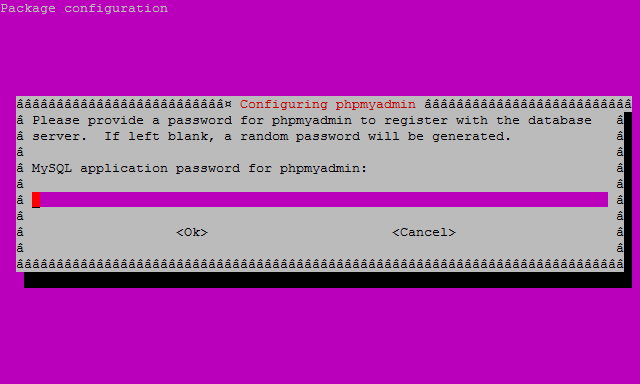
Step 3: Finish the Configuration of Apache
For a refresher on editing files with vim see: New User Tutorial: Overview of the Vim Text Editor
vim /etc/apache2/apache2.conf
Add the following to the bottom of the file:
# phpMyAdmin Configuration

Include /etc/phpmyadmin/apache.conf
Then exit and save the file with the command :wq.
Restart Apache 2 with the following command:
service apache2 restart
Verify that PhpMyAdmin is working by visiting the_IP_of_your_server/PhpMyAdmin. For example http://127.0.0.1/phpmyadmin
Securing PhpMyAdmin
Like all applications and software that are popular, they expose points to exploit. You can add a layer of security to your PhpMyAdmin installation to prevent any unwanted guests.
Securing with Pop Up Login
Step 1: Edit Apache for .htaccess Overrides
vim /etc/apache2/conf-available/phpmyadmin.conf
Insert the code below into the file between the <Directory> </Directory> tags. Afterward, save and exit by typing :wq and then hitting Enter
<Directory /usr/share/phpmyadmin>

Options FollowSymLinks

DirectoryIndex index.php

AllowOverride All

</Directory>
Step 2: Create the .htaccess File
/usr/share/phpmyadmin/.htaccess
Paste in the code below:
AuthType Basic

AuthName "Restricted Files"

AuthUserFile /etc/phpmyadmin/.htpasswd

Require valid-user
Step 3: Create the .htpasswd File and Username
Pasting the code below conveniently makes a .htpasswd file while simultaneously creating a user. Replace the username in this example with the username of your choice. I’m going to choose the username, tom, which we will use in Step 4.
htpasswd -c /etc/phpmyadmin/.htpasswd username
If we read this file we will find that it has added this user and has encrypted their password:
~# cat /etc/phpmyadmin/.htpasswd

tom:$apr1$fi4fis3.$oDVeDWxsp5eDhk.gc/DT991
Step 4: Verify Pop-Up Functionality
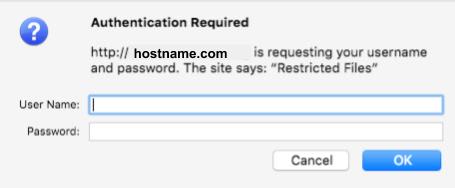
Visit http://yourhostname.com/phpmyadmin/ (replacing yourhostname.com with your server’s hostname or IP) to display a pop-up box where I will enter my username, tom, that I created in Step 3.
Securing by Changing URL to PhpMyAdmin
Open the /etc/phpmyadmin/apache.conf file:
vim /etc/phpmyadmin/apache.conf
Comment out the line Alias /phpmyadmin /usr/share/phpmyadmin with a # (as pictured below) and add in your new URL you want to access your PhpMyAdmin instance.
#Alias /phpmyadmin /usr/share/phpmyadmin

Alias /mynewurl /usr/share/phpmyadmin
Hit the ESC button and type :wq to save and quit.
Not getting the support you need? Liquid Web’s servers outmatch the competition on performance and support. We can migrate your data over to our environment for free. Check out how the difference in quality today!
Related Articles:
- Change cPanel password from WebHost Manager (WHM)
- Blocking IP or whitelisting IP addresses with UFW
- Fail2Ban install tutorial for Linux (AlmaLinux)
- How to set up NGINX virtual hosts (server blocks) on AlmaLinux
- Integrating Cloudflare Access with a Bitwarden instance
- How to install Yarn on Linux (AlmaLinux)

About the Author: J. Mays
As a previous contributor, JMays shares his insight with our Knowledge Base center. In our Knowledge Base, you'll be able to find how-to articles on Ubuntu, CentOS, Fedora and much more!
Our Sales and Support teams are available 24 hours by phone or e-mail to assist.
Latest Articles
Change cPanel password from WebHost Manager (WHM)
Read ArticleChange cPanel password from WebHost Manager (WHM)
Read ArticleChange cPanel password from WebHost Manager (WHM)
Read ArticleChange cPanel password from WebHost Manager (WHM)
Read ArticleChange the root password in WebHost Manager (WHM)
Read Article

