


How to Install and Configure KubeKey
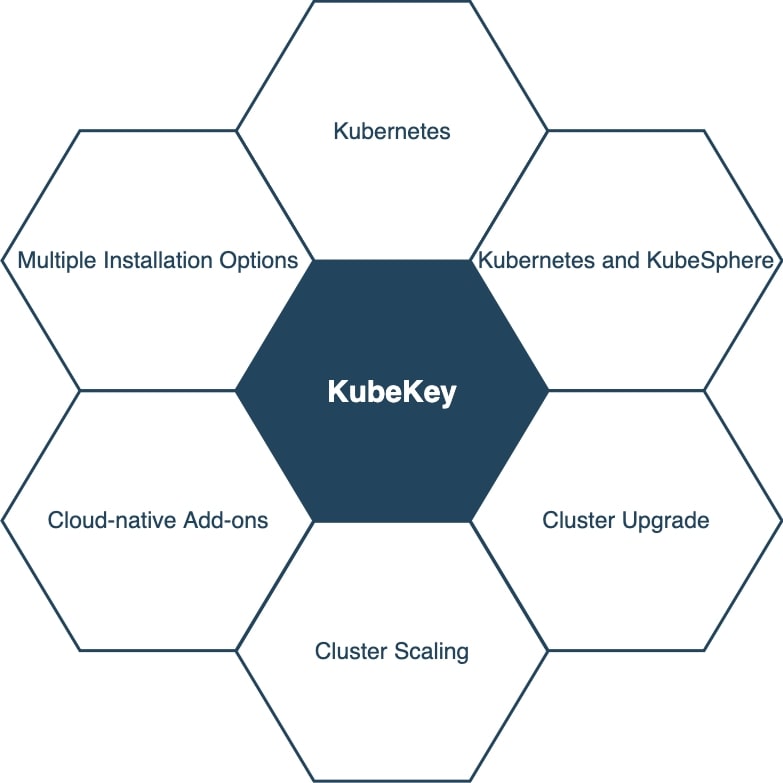
What is KubeKey?

KubeKey is the newest Kubernetes installer for KubeSphere. KubeSphere is a distributed OS management system for cloud-native applications using Kubernetes as its kernel. It provides a plug-and-play structure for seamless integration of many third-party applications. It is somewhat similar in nature to MiniKube for installing Kubernetes.
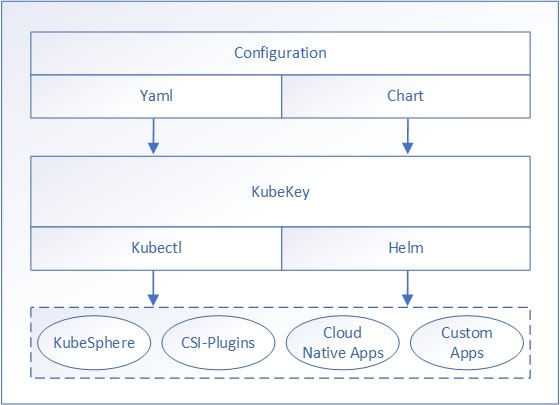
KubeKey was developed using the Go programming language. It provides a quick method to install Kubernetes and any additional add-ons using Chart or YAML files. KubeKey uses the kubeadm application to install a Kubernetes cluster on multiple nodes in a synchronous manner to reduce the complexity of the installation and improve efficiency. Using KubeKey reduces installation time considerably compared to many other installation techniques.
Typically, there are three situations in which we can employ the use of KubeKey:
- To simply install Kubernetes.
- Install Kubernetes and KubeSphere using a single command.
- Install Kubernetes first, and then install KubeSphere using the ks-installer tool.
Kubernetes clusters are now deployed in multiple on-premises environments like bare metal, private clouds, and public clouds. KubeKey can assist with deploying Kubernetes on any of these environments. Because each environment requires a different configuration, KubeKey addresses this concern during installation.
Supported Environment
- CentOS/RHEL 7
- Ubuntu 16.04, 18.04
- Debian Buster, Stretch
- SUSE Linux Enterprise Server 15
Supported Versions of Kubernetes
- v1.15: v1.15.12
- v1.16: v1.16.13
- v1.17: v1.17.9 (default)
- v1.18: v1.18.6
Prerequisites
Here are the minimum resource requirements for installing a small version KubeSphere:
- 2 vCPUs
- 4 GB RAM
- 20 GB Storage
The /var/lib/docker folder is utilized to save container info, and it will progressively grow larger in size during the use and operation of the cluster. In a production environment, recommendations state that the /var/lib/docker folder be mounted as a separate drive.
Node Requirements
All nodes must:
- Have SSH access.
- Be time-synchronized.
- Have sudo/curl/openssl installed.
- Have a clean OS. Conflicts may arise if additional software is installed.
- Have OpenEBS (installed by KubeKey) to provision a LocalPV (local persistent volume) for a testing and development environment. Production clients should use GlusterFS, NFS, Ceph, or other commercial-grade products for persistent storage use and then install that client in all relevant nodes.
- Turn off SELinux to change SELinux to Permission Mode because Red Hat uses SELinux in its Linux version. If you see “Permission denied” errors when copying, check SELinux to ensure it is turned off. (Recommended)
Networking and DNS Requirements
- Ensure the DNS address is noted in the /etc/resolv.conf file is open and available because if not, it might cause DNS issues in the cluster.
- Ensure all elements of the infrastructure can communicate via specific ports.
- If using a firewall or security group, the recommendation is to turn off the firewall or use the Network Access guidelines.
Install Kubernetes
Basic Installation
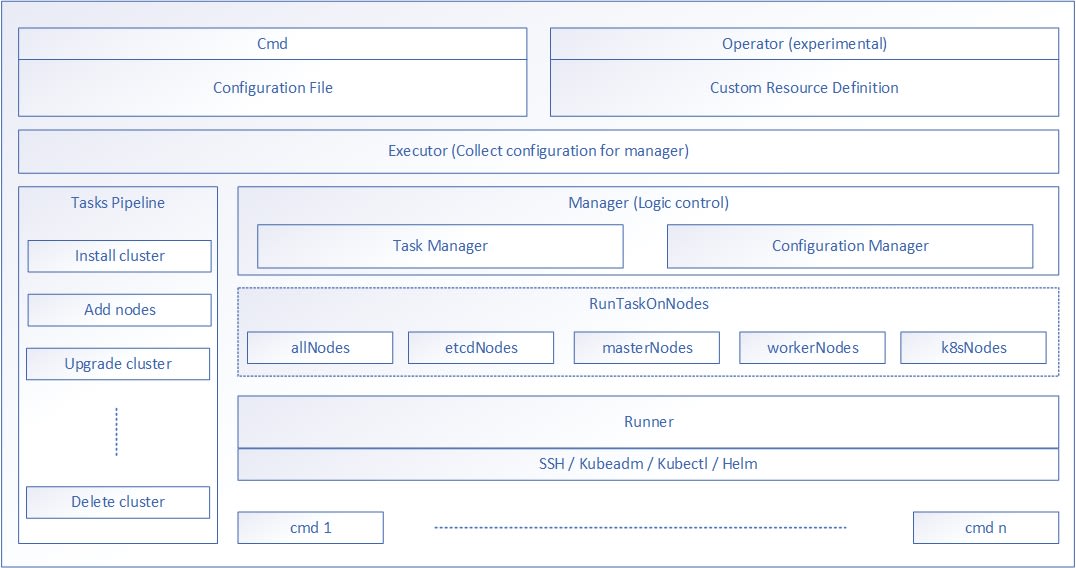
Here are the generic steps used to install Kubernetes with KubeKey:
- Download KubeKey.
- Generate a configuration file that contains the cluster information.
- Run KubeKey. The installation begins automatically using the provided configuration file. Other tools like docker are also installed dynamically.
Detailed Installation
First, we will use the command below to download version 1.0.1 of KubeKey. It also can be downloaded from the GitHub release page.
root@host:~# curl -sfL https://get-kk.kubesphere.io | VERSION=v1.0.1 sh -Once KubeKey is downloaded, unzip the file. The installation folder now contains a file called kk that should be made executable.
root@host:~# chmod +x kkCreate the Cluster
Quick Start is used for an all-in-one installation that familiarizes us with KubeSphere.
root@host:~# export KKZONE=cn
root@host:~# ./kk create cluster [--with-kubernetes version] [--with-kubesphere version]
Other Installation Examples
When creating a simple cluster using the default version of Kubernetes, use this command.
./kk create clusterTo install a Kubernetes cluster using a specified version, use the command below.
./kk create cluster --with-kubernetes v1.17.9If generate a Kubernetes cluster where KubeSphere is installed, run this command.
./kk create cluster --with-kubesphere [version]
./kk create cluster --with-kubesphere v3.0.0
We can use also employ a configuration file to generate a customized version of a cluster. To accomplish this, use this command to create a configuration file.
./kk create config [--with-kubernetes version] [--with-kubesphere version] [(-f | --file) path]Alternatively, we can create a default config file using our configurations (-f ~/folder/myconfig.yaml) or using the flag --with-kubesphere.
./kk create config [-f ~/folder/myconfig.yaml]
./kk create config --with-kubesphere
The config-sample.yaml file generated by the above command should be modified to our environmental standards.
Now we can create the cluster using our configuration file.
./kk create cluster -f config-sample.yamlEnable Components
KubeSphere starts with a limited number of pluggable components. These add-ons can be enabled either before or after the installation. It’s recommended that we install these elements to explore all the features and capabilities of the full-stack afforded by KubeSphere. Make sure your servers have a satisfactory amount of CPU and memory available before enabling them. For more detail, see the Pluggable Components page.
Working With Nodes and Clusters
Add Nodes
To add a new node, append the new node information to the cluster config file (config-sample.yaml) and then apply the changes using the following command.
./kk add nodes -f config-sample.yamlDelete Nodes
To delete a node, use the below command, which should indicate the nodeName to be removed.
./kk delete node <nodeName> -f config-sample.yamlDelete Cluster
To delete a cluster, use one of the below commands. If you started with the quick start (all-in-one):
./kk delete clusterIf you started with the advanced (created with a configuration file):
./kk delete cluster [-f config-sample.yaml]Upgrade Cluster
There are two options here.
- We can use the All-in-one method to upgrade the cluster to a specific version. This approach supports upgrading Kubernetes, KubeSphere, or both Kubernetes and KubeSphere.
./kk upgrade [--with-kubernetes version] [--with-kubesphere version]
2. Using the Multi-node process, we can upgrade the cluster using a specific configuration file.
./kk upgrade [--with-kubernetes version] [--with-kubesphere version] [(-f | --file) path]
If running the commands using the --with-kubernetes or --with-kubesphere flags, the configuration file will also be amended. Alternatively, we can use the -f flag to specify which configuration file was built for the cluster creation.
./kk create config [--from-cluster] [(-f | --file) path] [--kubeconfig path]Here we define the flags used above.
- --from-cluster: This flag indicates that we are retrieving the cluster's information from an existing cluster.
- -f: This flag refers to the path where the configuration file will be generated.
- --kubeconfig: This flag refers to the path where kubeconfig is located.
Once the configuration file is generated, several parameters need to be added, like the ssh information for the nodes.
Conclusion
Using KubeKey, we can install different versions of KubeSphere and Kubernetes, either separately or as an entire unit. It offers a simple, efficient, and flexible method of installation. Newer users of Kubernetes can use KubeKey to set up a cluster easily. It installs the Kubernetes cluster on the nodes in parallel to diminish the complexity of installation and improve overall efficiency in the process. It saves a significant amount of installation time in comparison to the older install methodology. Overall, KubeKey is a handy tool we can use to scale our Kubernetes cluster and is a welcome addition to the Kubernetes landscape.
We pride ourselves on being The Most Helpful Humans In Hosting™!
Have questions? Our knowledgeable Solutions and Experienced Hosting advisors will explain how you can take advantage of this software to use on your Managed Cloud or Private Cloud Powered by VMware and NetApp platform!
If you are on a Fully Managed VPS server, Cloud Dedicated, Private Parent server, or a Dedicated server owner and want to make a change to experience the newest tech, give us a call at 800.580.4985, or open a chat or ticket with us to find out how!
Related Articles:


About the Author: David Singer
I am a g33k, Linux blogger, developer, student, and former Tech Writer for Liquidweb.com. My passion for all things tech drives my hunt for all the coolz. I often need a vacation after I get back from vacation....


Our Sales and Support teams are available 24 hours by phone or e-mail to assist.
Latest Articles
How to use kill commands in Linux
Read ArticleChange cPanel password from WebHost Manager (WHM)
Read ArticleChange cPanel password from WebHost Manager (WHM)
Read ArticleChange cPanel password from WebHost Manager (WHM)
Read ArticleChange the root password in WebHost Manager (WHM)
Read Article