How to Install and Configure Gogs on CentOS 7

Gogs is one of the most famous and widely used Git applications. It offers a low consumption alternative to other services like Gitlab or Gitea. Gogs is an open-source self-hosted Git service that provides all the essential features and benefits to set up a private and secure versioning control system.
Advantages and Tradeoffs
As with everything, Gogshas a few disadvantages and tradeoffs. The most noticeable one is that the development has been limited lately, and thus, updates and new features might take some time to be implemented. Gogs also lacks advanced features like a built-in CI/CD, support for Git LFS 2.0 or Git Protocol V2,squash merging, and limited third-party integrations.
However, because Gogs is characterized by its efficiency, low memory footprint, and painless core functionality, it has many advantages:
- Low resource usage (RAM/CPU).
- Platform-independent.
- Repository management and web code editor.
- Built-in wiki.
- Documentation and tracking capabilities for new releases and bugs.
- External Git mirroring.
- Easy setup.
We’ll be covering the installation, configuration, and upgrade process on Gogs for CentOS 7. If you use Ubuntu, check out our tutorial on How to Install and Configure Gogs on Ubuntu 18.04.
Requirements
Before beginning the installation process, we need three things:
- Database Management Software (any of the following is supported):
- MySQL (version 5.7 or higher) / MariaDB (version 10.2 or higher)
- PostgreSQL (version 9.4.4 or higher)
- SQLite3
- Git:
- Version 1.8.3 or higher for both server and client sides
- SSH access
It is good practice to check that the local package index is updated before installing git to your server.
LiquidWeb_Ubuntu # sudo apt-get update
Reading package lists... Done
Now let’s proceed to install git. We can verify which version is installed by running git with the version tag.
LiquidWeb_Ubuntu # sudo apt-get install git
...
Preparing to unpack .../git_1%3a2.17.1-1ubuntu0.8_amd64.deb ...
Unpacking git (1:2.17.1-1ubuntu0.8) ...
Setting up git (1:2.17.1-1ubuntu0.8) …

LiquidWeb_Ubuntu # git --version
git version 2.17.1
Gogs Installation
1. Setting up the Environment
As a security measure, it’s best to create a new user for gogs to prevent any user with advanced privileges (especially root) from interacting with this service.
LiquidWeb_Ubuntu # sudo adduser --disabled-login --home /home/git --shell /bin/bash --gecos 'Gogs' git
Adding user `git' ...
Adding new group `git' (1001) ...
Adding new user `git' (1001) with group `git' ...
Creating home directory `/home/git' ...
Copying files from `/etc/skel' ...
2. Installing from Binaries
Next, we will download the necessary files to install from binaries, extract the files, start the service, and run the initial configuration script.
After confirming our server’s architecture (which was amd64 or x86_64), download the core files.
LiquidWeb_Ubuntu # uname -m
x86_64

LiquidWeb_Ubuntu # su git
git@host:/root$ cd ~
git@host:~$ pwd
/home/git

##Download the files (we can pull the link from the official download page)
git@host:~$ curl -O https://dl.gogs.io/0.12.3/gogs_0.12.3_linux_amd64.tar.gz
...
git@host:~$ ls|grep gogs
gogs_0.12.3_linux_amd64.tar.gz
The next step is to extract the file and make sure the directory was created.
tar -xzvf gogs_0.12.3_linux_amd64.tar.gz

ls|grep gogs
gogs
If we are executing as root (or another user), we need to make sure the directory and files have the proper permissions.
sudo chown -R git: /home/git/gogsCopy the configured unit file to the service manager’s directory.
sudo cp -a /home/git/gogs/scripts/systemd/gogs.service /etc/systemd/system/The last step is to start and enable the service.
sudo systemctl start gogs

sudo systemctl enable gogs
Created symlink /etc/systemd/system/multi-user.target.wants/gogs.service → /etc/systemd/system/gogs.service.
As a precaution, verify the service started.
systemctl status gogs
● gogs.service - Gogs
   Loaded: loaded (/etc/systemd/system/gogs.service; enabled; vendor preset: enabled)
   Active: active (running)
By default, gogs will start an HTTP service at port 3000. If another service already uses this port, we must edit the configuration file before the first run and change the HTTP port to a free one. Unless we set a different installation directory, this file is located at /home/git/gogs/custom/conf/app.ini.
/home/git/gogs/custom/conf/app.ini
[server]
...
HTTP_PORT        = 3000
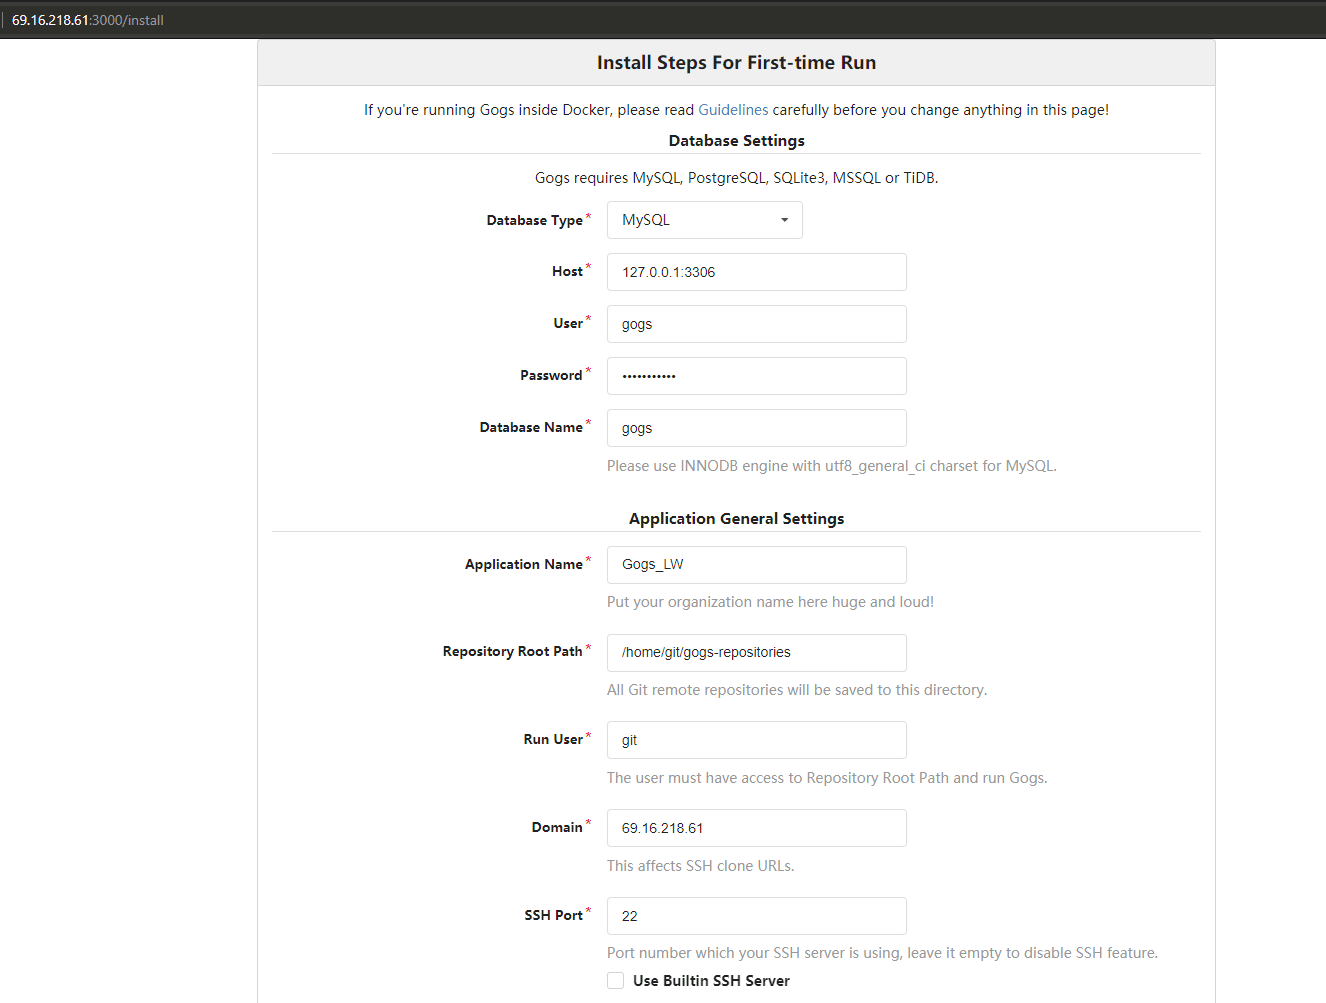
Access the configuration settings for the first run via a web browser using the server’s IP address (http://Server_IP:3000).

We can leave most of the default settings in place but keep in mind:
- Database Type: It has to be the same as the one installed on your server.
- Run User: This would be the user we created earlier (git).
- Domain and Application URL: The domain we want to link the service to. If we don’t have a primary domain for the service, we can use the server’s IP address.
If you are not using SQLite3, you may need to create the database and the database user. Below are two different ways to accomplish this.
MySQL/MariaDB
mysql> CREATE DATABASE gogs;
mysql> CREATE USER 'gogs'@'localhost' IDENTIFIED BY 'MY_PASSWORD';
mysql> GRANT ALL PRIVILEGES ON gogs.* TO 'gogs'@'localhost';
PostgreSQL
sudo -u postgres psql

postgres=# CREATE DATABASE gogs;
postgres=# CREATE USER gogs WITH ENCRYPTED PASSWORD 'MY_PASSWORD';
postgres=# GRANT ALL PRIVILEGES ON DATABASE gogs TO gogs;
Make sure to change ‘MY_PASSWORD’ to the actual password you want to use.
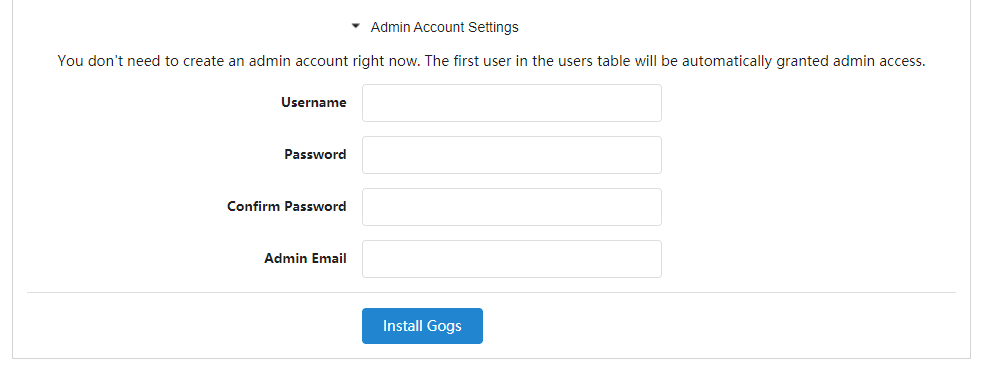
Alternatively, we can create the admin account right away, although we can set that up later. Once ready, click on the Install Gogs button.

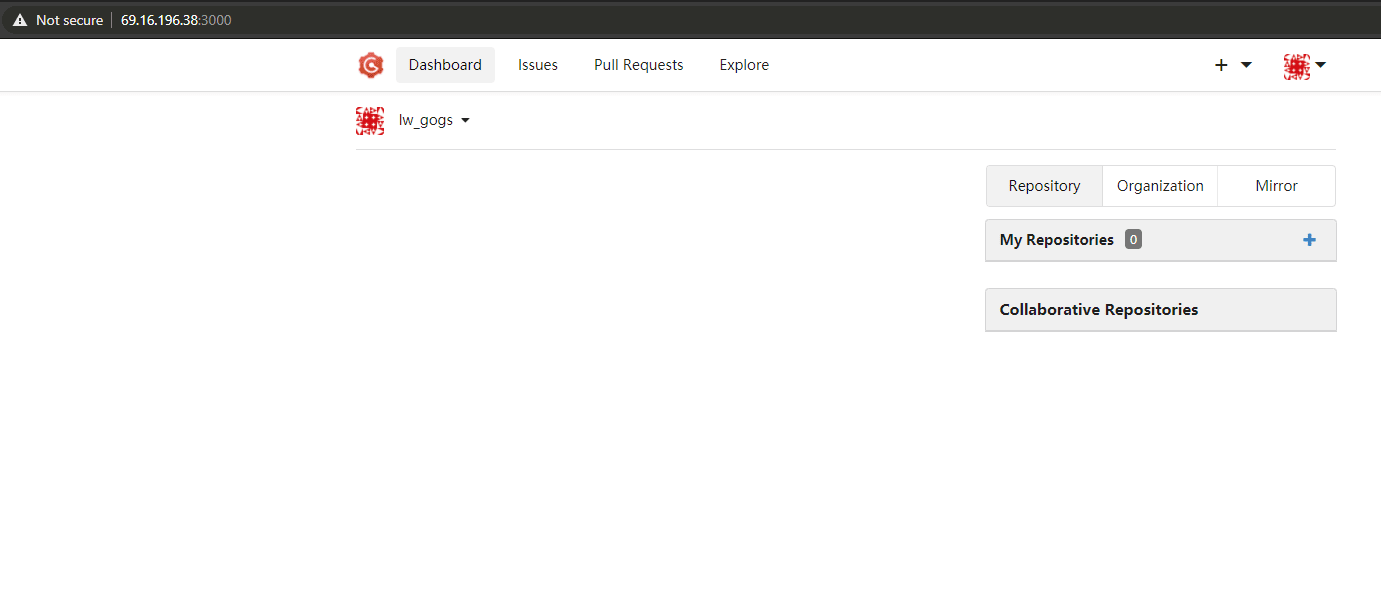
You will see the screen below after a successful installation.

3. Optional: Reverse Proxy
At this stage, Gogs is installed and working properly. While not mandatory, we can benefit from setting up a reverse proxy for our application. It can enhance security and performance while making auditing and logging much more straightforward. Plus, it's easier to access the domain without involving ports.
To set up the reverse proxy, we must use a domain name for the gogs service instead of the server's IP address. Once we have the domain, we just need to update the app's configuration file.
/home/git/gogs/custom/conf/app.ini
[server]
DOMAIN           = gogs.mydomain.com
HTTP_PORT        = 3000
EXTERNAL_URL     = http://gogs.mydomain.com:3000/
In this example, the goal is to access the app by typing gogs.mydomain.com in our web browser.
Once that is configured, let's move on to the reverse proxy itself. If we are using Nginx, we need to add this block to the domain's configuration file. The usual location is /etc/nginx/sites-available/mydomain.com (substitute mydomain.com for the actual domain).
server {
        listen 80;
        listen [::]:80;

        root /var/www/gogs.mydomain.com/html;
        index index.html index.php index.nginx-debian.html;

        server_name gogs.mydomain.com www.gogs.mydomain.com;

        location / {
               proxy_pass http://127.0.0.1:3000;
        }
}
For Apache users, the principle is the same, but the syntax is different.
<VirtualHost *:80>
ServerName gogs.mydomain.com
ProxyPreserveHost On
ProxyPass /  http://gogs.mydomain.com:3000/
ProxyPassReverse /  http://gogs.mydomain.com:3000/
</VirtualHost>
The configuration files are usually located in /etc/apache2/sites-available/mydomain.com for Ubuntu. If you are using cPanel, use /etc/apache2/conf.d/userdata/std/2_4/some_user/gogs.mydomain.com/gogs_mydomain.conf to create a custom entry.
4. Upgrading Gogs
The upgrade process is straightforward. We need to download the new core files and substitute the old installation. Using the Git user we created, we will move the old installation and then download the new files.
su git
cd /home/git
mv gogs gogs_bk

curl -O https://dl.gogs.io/new_version/gogs_new_version_linux_amd64.tar.gz
tar -xzvf gogs_new_version_linux_amd64.tar.gz

ls|grep gogs
gogs
Next, we sync all the custom data we had in the old installation folder.
rsync -avHl gogs_bk/{custom,data,log} gogsFinally, we restart the service to test our work, and if everything is good, we should be able to access the portal as usual.
systemctl restart gogs.service Conclusion
And that concludes the tutorial! At this point, Gogs should be operational. We covered the installation, setting up, and maintenance of Gogs. It’s a professional service that covers all the basics while maintaining an easy-to-use experience and little overall maintenance. While there are few reasons not to choose Gogs when looking for a private and self-hosted Git service, experienced users will reap the benefits that Gogs has to offer.
Related Articles:

About the Author: Misael Ramirez
A former support technician, I have a degree in mechatronics; the career suited me because I'm always trying new things. I have a wide range of interests, but mainly I love music, movies (old ones), and physics.
Our Sales and Support teams are available 24 hours by phone or e-mail to assist.
Latest Articles
How to use kill commands in Linux
Read ArticleChange cPanel password from WebHost Manager (WHM)
Read ArticleChange cPanel password from WebHost Manager (WHM)
Read ArticleChange cPanel password from WebHost Manager (WHM)
Read ArticleChange the root password in WebHost Manager (WHM)
Read Article


