


How to Install and Configure ClickHouse on Ubuntu 20.04
What is ClickHouse?
ClickHouse is an open-source column-oriented DBMS (or database management system) primarily used for OLAP (or the Online Analytical Processing of queries). It is capable of blazing fast generation of real-time analytical data and reporting utilizing SQL queries. It is fault tolerant, scalable, highly reliable and contains a feature rich tool set.
In a regular database, data is stored in tables, columns, and rows. In a table, the related values are physically stored side by side in one row, which is critical to how it operates. This is how most string type databases work.
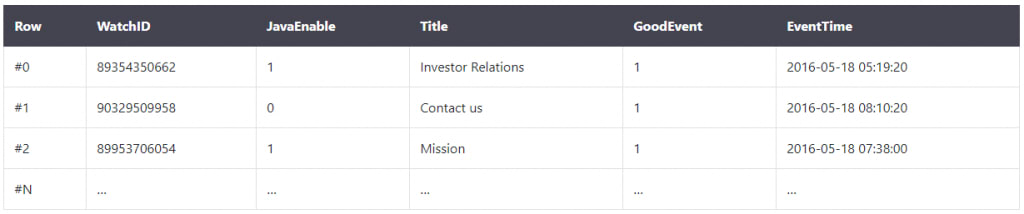
A few examples of this form of database are:
- MySQL
- Postgres
- SQLite
Data is stored as shown below in a columnar database:
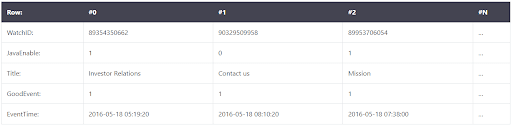
It looks similar, but the differences are as follows: values from different columns are stored separately, while data from one column is stored together. Examples of column-oriented tables:
- Vertica
- InfiniDB
- Google Dremel
Such DBMS's store records in blocks, grouped by columns rather than rows. By not loading data for the columns, they spend less time reading the data when running queries, allowing DBMS's to compute data and return results much faster than databases grouped in blocks. Typically, column-oriented databases are best applied in OLAP scenarios where they are usually 100 times faster in processing most queries compared to string type databases.
Credit to: ClickHouse.tech

Credit to: ClickHouse.tech
As we can see from the above illustrations, OLAP allows us to organize large amounts of data and perform complex queries multiple orders of magnitudes quicker than a typical database. Therefore, it is extremely useful for working with large amounts of input when analyzing data and or business analysis is required.
SQL Usage
ClickHouse uses a dialect of SQL, which is similar to the standard Structured Query Language, but it contains additional extensions: various arrays, higher-order functions, nested structures, functions for working with URLs, and the ability to work with an external dictionary, etc.
While we gain speed and big data processing, we also lose other aspects including the following options:
- Lack of transactions.
- Strong data types with the need for explicit casting.
- Must store intermediate data in RAM for some operations.
- Lack of a full-fledged query optimizer.
- Point reading of data in a database.
Despite this, ClickHouse demonstrates high performance and wins against its many competitors. ClickHouse was developed to solve problems in web analytics for Yandex.Metrica, the third most popular web analytics system in the world. It is also in use by Cloudflare to process website statistics for its users.
Prerequisites
To install, we need:
- A 2 cores server using a minimum of 2 GB RAM
- An Ubuntu 20.04 LTS OS
- Access to the root user account (as all actions performed as root).
ClickHouse Installation on Ubuntu 20.04
Before installing, we will update the system and packages on the server.
root@host:~# apt update && apt -y upgrade
Hit:1 http://by.archive.ubuntu.com/ubuntu focal InRelease
Hit:2 http://by.archive.ubuntu.com/ubuntu focal-updates InRelease
Hit:3 http://by.archive.ubuntu.com/ubuntu focal-backports InRelease
Get:4 http://security.ubuntu.com/ubuntu focal-security InRelease [109 kB]
Hit:5 https://download.docker.com/linux/ubuntu focal InRelease
Hit:6 https://debian.neo4j.com stable InRelease
Fetched 109 kB in 0s (231 kB/s)
Reading package lists... Done
Building dependency tree
Reading state information... Done
All packages are up to date.
Reading package lists... Done
Building dependency tree
Reading state information... Done
Calculating upgrade... Done
0 upgraded, 0 newly installed, 0 to remove and 0 not upgraded.
root@host:~#
Yandex maintains a repository with the latest version of ClickHouse, so we need to add it. Also, add a GPG key to check out the repository and safely install ClickHouse and future updates.
root@host:~#  apt-key adv --keyserver keyserver.ubuntu.com --recv E0C56BD4
Executing: /tmp/apt-key-gpghome.5KK4WZQb0R/gpg.1.sh --keyserver keyserver.ubuntu.com --recv E0C56BD4
gpg: key C8F1E19FE0C56BD4: public key "ClickHouse Repository Key <milovidov@yandex-team.ru>" imported
gpg: Total number processed: 1
gpg:               imported: 1
root@host:~#
Add the repository to the list of APK repositories.
root@host:~# echo "deb http://repo.yandex.ru/clickhouse/deb/stable/ main/" |  tee /etc/apt/sources.list.d/clickhouse.list
deb http://repo.yandex.ru/clickhouse/deb/stable/ main/
root@host:~#
Next, we update our server packages.
root@host:~#  apt update
Hit:1 http://by.archive.ubuntu.com/ubuntu focal InRelease
Hit:2 http://by.archive.ubuntu.com/ubuntu focal-updates InRelease
Hit:3 http://by.archive.ubuntu.com/ubuntu focal-backports InRelease
Get:4 http://security.ubuntu.com/ubuntu focal-security InRelease [109 kB]
Ign:5 http://repo.yandex.ru/clickhouse/deb/stable main/ InRelease
Get:6 http://repo.yandex.ru/clickhouse/deb/stable main/ Release [749 B]
Get:7 http://repo.yandex.ru/clickhouse/deb/stable main/ Release.gpg [836 B]
Hit:8 https://download.docker.com/linux/ubuntu focal InRelease
Get:9 http://repo.yandex.ru/clickhouse/deb/stable main/ Packages [152 kB]
Hit:10 https://debian.neo4j.com stable InRelease
Fetched 263 kB in 0s (536 kB/s)
Reading package lists... Done
Building dependency tree
Reading state information... Done
All packages are up to date.
root@host:~#
Finally, we can install ClickHouse. When prompted, enter a password.
root@host:~#  apt install -y clickhouse-server clickhouse-client
Reading package lists... Done
Building dependency tree
Reading state information... Done
The following additional packages will be installed:
  clickhouse-common-static
Suggested packages:
  clickhouse-common-static-dbg
The following NEW packages will be installed:
  clickhouse-client clickhouse-common-static clickhouse-server
0 upgraded, 3 newly installed, 0 to remove and 0 not upgraded.
Need to get 119 MB of archives.
After this operation, 401 MB of additional disk space will be used.
...
Preconfiguring packages ...
Selecting previously unselected package clickhouse-common-static.
(Reading database ... 164995 files and directories currently installed.)
Preparing to unpack .../clickhouse-common-static_20.12.5.14_amd64.deb ...
Unpacking clickhouse-common-static (20.12.5.14) ...
Selecting previously unselected package clickhouse-client.
Preparing to unpack .../clickhouse-client_20.12.5.14_all.deb ...
Unpacking clickhouse-client (20.12.5.14) ...
Selecting previously unselected package clickhouse-server.
Preparing to unpack .../clickhouse-server_20.12.5.14_all.deb ...
Unpacking clickhouse-server (20.12.5.14) ...
Setting up clickhouse-common-static (20.12.5.14) ...
Setting up clickhouse-server (20.12.5.14) ...
ClickHouse init script has migrated to systemd. Please manually stop old server
and restart the service:  killall clickhouse-server && sleep 5 &&  servi
ce clickhouse-server restart
Synchronizing state of clickhouse-server.service with SysV service script with /
lib/systemd/systemd-sysv-install.
Executing: /lib/systemd/systemd-sysv-install enable clickhouse-server
Created symlink /etc/systemd/system/multi-user.target.wants/clickhouse-server.se
rvice → /etc/systemd/system/clickhouse-server.service.
Copying ClickHouse binary to /usr/bin/clickhouse.new
/usr/bin/clickhouse already exists, will rename existing binary to /usr/bin/clic
khouse.old and put the new binary in place
Renaming /usr/bin/clickhouse.new to /usr/bin/clickhouse.
Symlink /usr/bin/clickhouse-server already exists but it points to /clickhouse.
Will replace the old symlink to /usr/bin/clickhouse.
Creating symlink /usr/bin/clickhouse-server to /usr/bin/clickhouse.
Symlink /usr/bin/clickhouse-client already exists but it points to /clickhouse.
Will replace the old symlink to /usr/bin/clickhouse.
Creating symlink /usr/bin/clickhouse-client to /usr/bin/clickhouse.
Symlink /usr/bin/clickhouse-local already exists but it points to /clickhouse. W
ill replace the old symlink to /usr/bin/clickhouse.
Creating symlink /usr/bin/clickhouse-local to /usr/bin/clickhouse.
Symlink /usr/bin/clickhouse-benchmark already exists but it points to /clickhous
e. Will replace the old symlink to /usr/bin/clickhouse.
Creating symlink /usr/bin/clickhouse-benchmark to /usr/bin/clickhouse.
Symlink /usr/bin/clickhouse-copier already exists but it points to /clickhouse.
Will replace the old symlink to /usr/bin/clickhouse.
Creating symlink /usr/bin/clickhouse-copier to /usr/bin/clickhouse.
Symlink /usr/bin/clickhouse-obfuscator already exists but it points to /clickhou
se. Will replace the old symlink to /usr/bin/clickhouse.
Creating symlink /usr/bin/clickhouse-obfuscator to /usr/bin/clickhouse.
Creating symlink /usr/bin/clickhouse-git-import to /usr/bin/clickhouse.
Symlink /usr/bin/clickhouse-compressor already exists but it points to /clickhou
se. Will replace the old symlink to /usr/bin/clickhouse.
Creating symlink /usr/bin/clickhouse-compressor to /usr/bin/clickhouse.
Symlink /usr/bin/clickhouse-format already exists but it points to /clickhouse.
Will replace the old symlink to /usr/bin/clickhouse.
Creating symlink /usr/bin/clickhouse-format to /usr/bin/clickhouse.
Symlink /usr/bin/clickhouse-extract-from-config already exists but it points to
/clickhouse. Will replace the old symlink to /usr/bin/clickhouse.
Creating symlink /usr/bin/clickhouse-extract-from-config to /usr/bin/clickhouse.
Creating clickhouse group if it does not exist.
 groupadd -r clickhouse
Creating clickhouse user if it does not exist.
 useradd -r --shell /bin/false --home-dir /nonexistent -g clickhouse clickhouse
Will set ulimits for clickhouse user in /etc/security/limits.d/clickhouse.conf.
Creating config directory /etc/clickhouse-server/config.d that is used for tweak
s of main server configuration.
Creating config directory /etc/clickhouse-server/users.d that is used for tweaks
 of users configuration.
Config file /etc/clickhouse-server/config.xml already exists, will keep it and e
xtract path info from it.
/etc/clickhouse-server/config.xml has /var/lib/clickhouse/ as data path.
/etc/clickhouse-server/config.xml has /var/log/clickhouse-server/ as log path.
Users config file /etc/clickhouse-server/users.xml already exists, will keep it
and extract users info from it.
 chown --recursive clickhouse:clickhouse '/etc/clickhouse-server'
Creating log directory /var/log/clickhouse-server/.
Creating data directory /var/lib/clickhouse/.
Creating pid directory /var/run/clickhouse-server.
 chown --recursive clickhouse:clickhouse '/var/log/clickhouse-server/'
 chown --recursive clickhouse:clickhouse '/var/run/clickhouse-server'
 chown clickhouse:clickhouse '/var/lib/clickhouse/'
Password for default user is already specified. To remind or reset, see /etc/cli
ckhouse-server/users.xml and /etc/clickhouse-server/users.d.
Setting capabilities for clickhouse binary. This is optional.
 command -v setcap >/dev/null && echo > /tmp/test_setcap.sh && chmod a+x /tmp/te
st_setcap.sh && /tmp/test_setcap.sh && setcap 'cap_net_admin,cap_ipc_lock,cap_sy
s_nice+ep' /tmp/test_setcap.sh && /tmp/test_setcap.sh && rm /tmp/test_setcap.sh
&& setcap 'cap_net_admin,cap_ipc_lock,cap_sys_nice+ep' /usr/bin/clickhouse || ec
ho "Cannot set 'net_admin' or 'ipc_lock' or 'sys_nice' capability for clickhouse
 binary. This is optional. Taskstats accounting will be disabled. To enable task
stats accounting you may add the required capability later manually."

ClickHouse has been successfully installed.

Start clickhouse-server with:
 clickhouse start

Start clickhouse-client with:
 clickhouse-client --password

Setting up clickhouse-client (20.12.5.14) ...
Processing triggers for systemd (245.4-4ubuntu3.3) ...
root@host:~#
Start ClickHouse Service
Now that we have installed ClickHouse let's run it in the background.
root@host:~#  service clickhouse-server start
root@host:~#
Verify Status
In this step, we simply check to make sure that everything is working as expected.
root@host:~#  service clickhouse-server status
● clickhouse-server.service - ClickHouse Server (analytic DBMS for big data)
     Loaded: loaded (/etc/systemd/system/clickhouse-server.service; enabled; ve>
     Active: active (running) since Wed 2020-12-30 22:08:26 +03; 25s ago
   Main PID: 5553 (clickhouse-serv)
      Tasks: 48 (limit: 9489)
     Memory: 45.8M
     CGroup: /system.slice/clickhouse-server.service
             └─5553 /usr/bin/clickhouse-server --config=/etc/clickhouse-server/>

сне 30 22:08:26 host clickhouse-server[5553]: Include not found: clickhouse_com>
сне 30 22:08:26 host clickhouse-server[5553]: Logging trace to /var/log/clickho>
сне 30 22:08:26 host clickhouse-server[5553]: Logging errors to /var/log/clickh>
сне 30 22:08:26 host clickhouse-server[5553]: Processing configuration file '/e>
сне 30 22:08:26 host clickhouse-server[5553]: Include not found: networks
сне 30 22:08:26 host clickhouse-server[5553]: Saved preprocessed configuration >
сне 30 22:08:28 host clickhouse-server[5553]: Processing configuration file '/e>
сне 30 22:08:28 host clickhouse-server[5553]: Include not found: clickhouse_rem>
сне 30 22:08:28 host clickhouse-server[5553]: Include not found: clickhouse_com>
сне 30 22:08:28 host clickhouse-server[5553]: Saved preprocessed configuration >
lines 1-19/19 (END)
The lines below are the ones we need to pay close attention to.
   Loaded: loaded (/etc/systemd/system/clickhouse-server.service; enabled; ve>
     Active: active (running) since Wed 2020-12-30 22:08:26 +03; 25s ago
Configure the Firewall
If you are not using a firewall, skip this step. If you plan to connect remotely and have a firewall enabled, then this step is necessary. Open and edit the configuration file, and uncomment the line below.
<!-- <listen_host>0.0.0.0</listen_host> →Once the edit is complete, save the file using the Ctrl+S and Ctrl+X keys, and then restart the ClickHouse service.
root@host:~#  service clickhouse-server restart
root@host:~#
Open Ports
Next, open port 8123 in the firewall to allow access for your IP address.
ufw allow from YOUR_IP_SERVER/32 to any port 8123Then, open port 9000 for the clickhouse-client’s IP address.
 root@host:~#  ufw allow from 192.168.13.1/32 to any port 8123
Rules updated
root@host:~#
root@host:~#  ufw allow from 192.168.13.1/32 to any port 9000
Rules updated
root@host:~#
Verify Connection
To check that everything works when connecting remotely, use the following query.
clickhouse-client --host 192.168.13.1 --passwordroot@host:~# clickhouse-client --host 192.168.13.1 --password
Password for user (default):
Connecting to 192.168.13.1:9000 as user default.
Connected to ClickHouse server version 20.12.5 revision 54442.
host :)Learning Base Commands and Interactions
In ClickHouse, we can create and drop databases using the modified SQL syntax. Let's take a look at the examples below. First, let's connect to ClickHouse.
root@host:~# clickhouse-client
ClickHouse client version 20.12.5.14 (official build).
Connecting to localhost:9000 as user default.
Connected to ClickHouse server version 20.12.5 revision 54442.

host :)
Create Database
Once we are in the ClickHouse command line, we create a database named liquidweb using the following syntax.
host :) CREATE DATABASE liquidweb;

CREATE DATABASE liquidweb

Query id: 9169dbaa-402e-4d37-828f-5fde43d4a91d

Ok.

0 rows in set. Elapsed: 0.004 sec.

host :)
In ClickHouse, the table is almost the same as in other databases with a set of related data in a structured format. We can specify columns and their types, add rows, and perform various kinds of queries against the DB.
Create Table
Before we create a table, it is important to know and understand the types of columns that are available to use. The following column types are viable:
- UInt64 — This table is used to store integers ranging from 0 to 18446744073709551615.
- Float64 — Each table that uses Float64 can store floating-point numbers like 10.5, 18754.067, etc.
- String — Here, the string table replaces VARCHAR, BLOB, CLOB, and other types from different DBMSs
- Date — This table is used to store dates in the YYYY-MM-DD format.
- DateTime — Here, the DateTime table is used to store dates and times in the more precise YYYY-MM-DD HH: MM: SS format
Data Structures
ClickHouse defines the structure of the underlying data by describing the exact data, the ability to query the table, its modes of concurrent access to the table, and support for indexes. ClickHouse has different capabilities that are suitable for different conditions of use.
MergeTree
The most widely used mechanism is the table engine operation called MergeTree. This function is designed for inserting large amounts of data into a table. It is highly recommended for production database use due to its optimized support for inserting large amounts of real-time assets, as well as its reliability and query support.
Select Database
Let's proceed to further practice. First, let's select a database in which we will create a table.
host :) USE liquidweb;

USE liquidweb

Query id: aba15bcb-224b-426d-9f74-350a88346115

Ok.

0 rows in set. Elapsed: 0.001 sec.

host :)
Create Table
Next, we create a table called colleagues.
host :) CREATE TABLE colleagues  (  id UInt64,  name String,  url String,  created DateTime ) ENGINE = MergeTree() PRIMARY KEY id ORDER BY id;

CREATE TABLE colleagues
(
    `id` UInt64,
    `name` String,
    `url` String,
    `created` DateTime
)
ENGINE = MergeTree()
PRIMARY KEY id
ORDER BY id

Query id: 08223a2f-d365-43cb-8627-d22674d1c47c

Ok.

0 rows in set. Elapsed: 0.004 sec.

host :)
Let's review out what values we added.
- id - This is the primary key column. Each line must have a unique identifier.
- name - A column with a string value.
- url - A column with a string value that contains a link to the profile.
- created - The date the employee appeared in the system.
After defining the columns in the table, we then specify the MergeTree mechanism for storing the table. Next, we designate the columns, and then define the table level columns.
- PRIMARY KEY - Specifies the primary key column.
- ORDERY BY - The stored table values are sorted by id column.
Add Data
Now we can work with the table. Let’s add some data to the colleagues table.
host :) INSERT INTO colleagues VALUES (1, 'margaret', 'http://1.com', '2021-01-01 00:01:01');

INSERT INTO colleagues VALUES

Query id: 42dbde52-6d7e-4849-ac5e-280590f3232d

Ok.

1 rows in set. Elapsed: 0.002 sec.

host :)
Let's add more data.
host :) INSERT INTO colleagues VALUES (2, 'john', 'http://2.com', '2021-01-01 00:01:01');

INSERT INTO colleagues VALUES

Query id: a9b34f78-2caa-4b41-bd4e-91bf8049a04b

Ok.

1 rows in set. Elapsed: 0.001 sec.

host :)
host :) INSERT INTO colleagues VALUES (3, 'kingsman', 'http://3.com', '2021-01-01 00:01:01');
INSERT INTO colleagues VALUES
Query id: df5133c1-b404-4569-8123-f0728c172c87
Ok.
1 rows in set. Elapsed: 0.003 sec.
host :) host :) INSERT INTO colleagues VALUES (4, 'tor', 'http://4.com', '2021-01-01 00:01:01');
INSERT INTO colleagues VALUES
Query id: 14f56b86-fae7-4af2-b506-18c351b92853
Ok.
1 rows in set. Elapsed: 0.001 sec.
host :) Add Column
While we added some values, we realized that we forgot to add another column, so we have to add it below.
host :) ALTER TABLE colleagues ADD COLUMN location String;

ALTER TABLE colleagues
    ADD COLUMN `location` String


Query id: 002900f4-9fd9-4302-a10f-6aa5b818f9ae

Ok.

0 rows in set. Elapsed: 0.005 sec.

host :)
Edit Data
Now we need to change the old data somehow. In version 19.13, ClickHouse does not support updating and deleting individual rows due to its implementation. But, ClickHouse supports bulk updates and deletions and also has its own syntax for these operations.
Now we update our lines.
host :) ALTER TABLE colleagues UPDATE url ='http://1.com' WHERE id < 15;

ALTER TABLE colleagues
    UPDATE url = 'http://1.com' WHERE id < 15


Query id: 6fc6620e-fd90-43aa-8d7f-8a34cfb73650

Ok.

0 rows in set. Elapsed: 0.004 sec.

host :)
After WHERE, we set the filter parameters and can also delete unnecessary parameters.
host :) ALTER TABLE colleagues  DELETE WHERE id < 2;

ALTER TABLE colleagues
    DELETE WHERE id < 2


Query id: 354e27fc-70c9-480b-bb1d-067591924c6e

Ok.

0 rows in set. Elapsed: 0.005 sec.

host :)
Remove Column
To remove columns from a table, do the following.
host :) ALTER TABLE colleagues DROP COLUMN location;

ALTER TABLE colleagues
    DROP COLUMN location


Query id: da361478-0619-4c31-8422-f59ee14a57d7

Ok.

0 rows in set. Elapsed: 0.008 sec.

host :)
Data Retrieval via Queries
Next, we move on to demonstrate data retrieval using queries. ClickHouse uses SQL syntax here with its additions. Let's try to gather some basic information.
host :) SELECT url, name FROM colleagues WHERE url = 'http://1.com' LIMIT 1;

SELECT
    url,
    name
FROM colleagues WHERE url = 'http://1.com'
LIMIT 1

Query id: 8a5cbf9a-f187-440c-9a60-2d23029b4bd1

┌─url──────────┬─name─┐
│ http://1.com │ john │
└──────────────┴──────┘

1 rows in set. Elapsed: 0.003 sec.

host :) - SELECT - Select several parameters.
- FROM - Determine which table we will receive values.
- WHERE - Set the parameters and filters regarding which value and how much.
We can also use additional search parameters, such as:
- count - Returns the number of rows matching the conditions.
- sum - Returns the sum of the selected values.
- avg - Returns the average of the selected items.
- uniq - Return the approximate number of matched single rows.
- topK - Returns an array of the most frequent values of a specific column using an algorithm.
Drop Tables and Databases
Next, we move on to dropping tables and databases. First, let's delete a table.
host :) DROP TABLE colleagues;

DROP TABLE colleagues

Query id: 21048fe4-d379-48ac-b9a7-71f0b3fe93e1

Ok.

0 rows in set. Elapsed: 0.001 sec.

host :)
Now, delete the database.
host :) DROP DATABASE liquidweb;

DROP DATABASE liquidweb

Query id: 4ad9a51a-f89d-4be5-be9c-92b8cb38614b

Ok.

0 rows in set. Elapsed: 0.001 sec.

host :)
To exit the database, enter the standard 'exit' value.
host :) exit
Bye.
root@host:~#
Create a User
Now that we have covered all the basic features, we will create several database users. The ClickHouse configuration file can be located in the following path /etc/clickhouse-client/config.xml. Go to this file, open it with vim or nano, and specify the values in the following order.
<config> <user>username</user> <password>password</password> <secure>False</secure></config>We will use the nano editor for editing the file.
root@host:~#  nano /etc/clickhouse-client/config.xml
root@host:~#
Enter the required information and then save the changes using Ctrl+S and Ctrl+X keys
Connect to ClickHouse
Finally, to connect to ClickHouse, enter the following command in the terminal.
root@host:~# clickhouse-client -u margaret --password
ClickHouse client version 20.12.5.14 (official build).
Password for user (margaret):
Connecting to localhost:9440 as user margaret.
Connected to ClickHouse server version 20.12.5 revision 54442.

host :)
Conclusion
In this tutorial, we discovered many aspects of ClickHouse. We discovered how it works, when it can be applied, and in what circumstances in is useful. We identified how to add a key, the repository, and then install the ClickHouse software. Likewise, we then we set up and configured the firewall to allow access. Furthermore, we created databases and tables, added columns and data, and then updated and deleted them. Lastly, we demonstrated how to create users in the configuration file.
We pride ourselves on being The Most Helpful Humans In Hosting™! Our Support Teams are filled with experienced Linux technicians and talented system administrators who have intimate knowledge of multiple web hosting technologies, including those discussed in this article.
Should you have any inquiries regarding this article, we are always available to provide information to any questions related to this article, 24 hours a day, 7 days a week 365 days a year.
If you are a Fully Managed VPS server, Cloud Dedicated, VMWare Private Cloud, Private Parent server, Managed Cloud Servers, or a Dedicated server owner, and you are uncomfortable with performing any of the steps outlined, we can be reached via phone at @800.580.4985, a chat or support ticket to assisting you with this process.
Related Articles:


About the Author: Margaret Fitzgerald
Margaret Fitzgerald previously wrote for Liquid Web.


Our Sales and Support teams are available 24 hours by phone or e-mail to assist.
Latest Articles
How to use kill commands in Linux
Read ArticleChange cPanel password from WebHost Manager (WHM)
Read ArticleChange cPanel password from WebHost Manager (WHM)
Read ArticleChange cPanel password from WebHost Manager (WHM)
Read ArticleChange the root password in WebHost Manager (WHM)
Read Article