Exploring the CloudFlare Dashboard
II. How to Configure Your DNS for CloudFlare
III. How To Configure Your Server to Log Real Visitor IPs
IV. Exploring the CloudFlare Dashboard
Pre-Flight Check
- This article assumes that you have already set up CloudFlare, added your domain and configured DNS.
Accessing the CloudFlare Dashboard
After logging into your Manage interface, click on Domains in the left menu and select the CloudFlare tab.
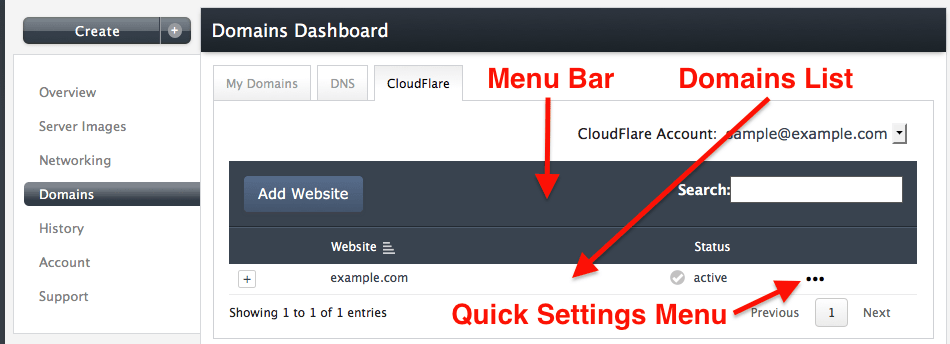
Each domain you’ve added to your CloudFlare account is listed here.

Menu Bar
The menu bar at the top allows you to add new sites to CloudFlare by clicking on the blue Add Website button, or quickly narrow the number of domains displayed through the Search field. The Website column header also can be sorted alphabetically by clicking on its icon.
Domains List
- The Status column shows at a glance whether CloudFlare is active on any listed domain, and can be clicked to quickly expand the domain’s dashboard.
- A Quick Settings Menu, labeled …, is located to the far right of the domain name. Clicking on it will allow you to pause CloudFlare, purge cached files, and perform other tasks without having to expand the domain’s dashboard.

- To expand a domain’s full CloudFlare dashboard, you can either select “CloudFlare Dashboard” from the Quick Settings Menu (…) or click the [+] button to the left of the domain name.
CloudFlare Dashboard

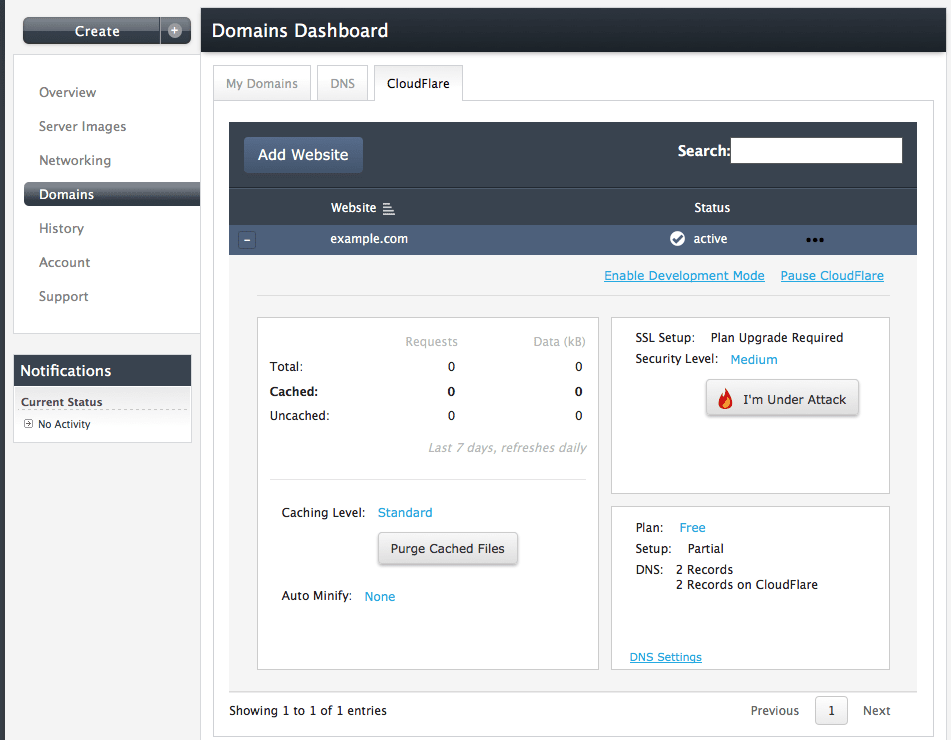
Once expanded, a domain’s CloudFlare Dashboard allows you to manage CloudFlare settings for the domain:
- The Enable Development Mode link in the top-right corner will temporarily pause edge caching and minification so that changes made on your site can be seen more quickly.
- The Pause CloudFlare link temporarily disables all CloudFlare services for the site.
- Site Statistics are available in the top left corner, allowing you to see the number of cached and uncached requests processed through CloudFlare, and the amount of data included in those requests.
- Clicking on the Caching Level setting allows you to choose between three levels:
- No Query String, which only serves files from the cache when there is no query string (example.com/photo1.jpg).
- Ignore Query String, which delivers the same resource to everyone, regardless of the query string (example.com/photo1.jpg?w=200&h=200).
- Standard, which delivers a different resource each time the query string changes. This is the level recommended by CloudFlare.
- The Purge Cached Files button clears any cached content from CloudFlare.
- Clicking on the Auto Minify setting allows you to choose whether to removes unnecessary characters from your source code (like whitespace, comments, etc.) to reduce file sizes and lower the amount of data, which helps to reduce page load times. You can enable Auto Minify for CSS, javascript, and HTML files.
- SSL Setup, available on paid plans, allows you to configure SSL settings on the domain.
- The Security Level setting allows you to choose between four levels of protection:
- Essentially Off: Provides a challenge to only the most grievous offenders.
- Low: Challenges only the most threatening visitors.
- Medium: Challenges both moderate threat visitors and the most threatening visitors.
- High: Challenges all visitors that have exhibited threatening behavior within the last 14 days.
- I’m Under Attack! Should only be used if your website is under a DDoS attack. Visitors will receive an interstitial page while CloudFlare analyzes the traffic and behavior to make sure they are a legitimate human visitor trying to access your website. This setting can be enabled quickly by clicking on the I’m Under Attack! button directly underneath the Security Level setting.
- Clicking on your current Plan allows you to change the level of your CloudFlare service, from free to paid and basic to advanced. Premium features, including the CloudFlare firewall, are managed via the interface at CloudFlare’s website.
- The DNS Settings link allows you to view and modify settings for the domain.
DNS Settings
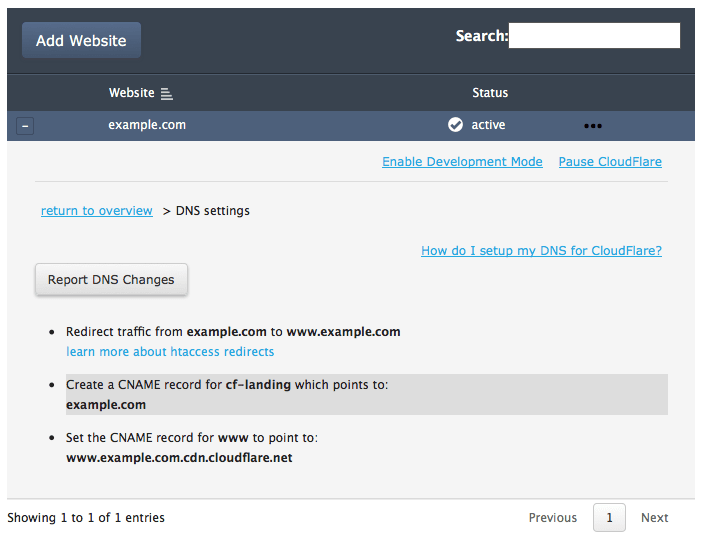
Clicking on the DNS Settings link in a domain’s CloudFlare Dashboard brings up the current settings for the domain.

The Report DNS Changes button will allow you to add new subdomains to the domain, such as “blog.yourdomainname.com” or “shop.yourdomainname.com”. The DNS record values needed to configure your domain name for CloudFlare also are listed on this page for your reference.
Related Articles:

About the Author: dpepper
Our Sales and Support teams are available 24 hours by phone or e-mail to assist.
Latest Articles
How to use kill commands in Linux
Read ArticleChange cPanel password from WebHost Manager (WHM)
Read ArticleChange cPanel password from WebHost Manager (WHM)
Read ArticleChange cPanel password from WebHost Manager (WHM)
Read ArticleChange the root password in WebHost Manager (WHM)
Read Article


