 Mohammed Noufal
 You can use the hosts file to map a domain to an IP address when you want to test your website without altering the domain DNS settings. This article will describe what is a hosts file, how it’s used, and how to edit hosts file in Linux, Windows, and macOS.
What is a Hosts File and What Does it Do?
A hosts file is a locally stored computer file that lists domain names and the IP addresses that correspond to them. The operating system uses it as a database of domain names to identify and locate hosts in an IP network. All commonly used operating systems include hosts files, which map a connection between an IP address and domain names. Each time you access a website, your computer first checks the hosts file to find the correct IP address to resolve the requested domain. If the domain is not listed, your internet service provider will check the DNS to find the necessary resources to load the website.
Why Modify the Hosts File?
By modifying your hosts file, you can override the DNS for a domain on a particular computer. It informs your computer which IP address should be associated with a domain name. This is frequently done before your domain name is modified to point to a particular IP address. This procedure is helpful if you want to change your domain after migration to see how it will appear on the new server. The hosts file is in plain text. As a result, you can edit hosts file using any text editor depending on your operating system, such as Notepad or the vi editor. Please keep in mind that the changes will only affect the system in which the hosts file is located.
How to Edit the Hosts File in Windows
You can use any text editor to complete the steps for editing the hosts file in Windows. This tutorial uses Notepad.
Step 1:
Click Start, then select Notepad. Click and choose Run as administrator.

Step 2:
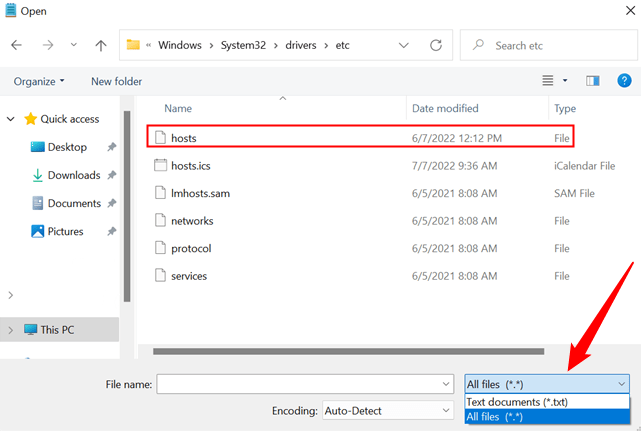
Once in Notepad, select File > Open. To locate the hosts file, navigate to C:\Windows\System32\Drivers\etc and choose All Files.
Step 3:
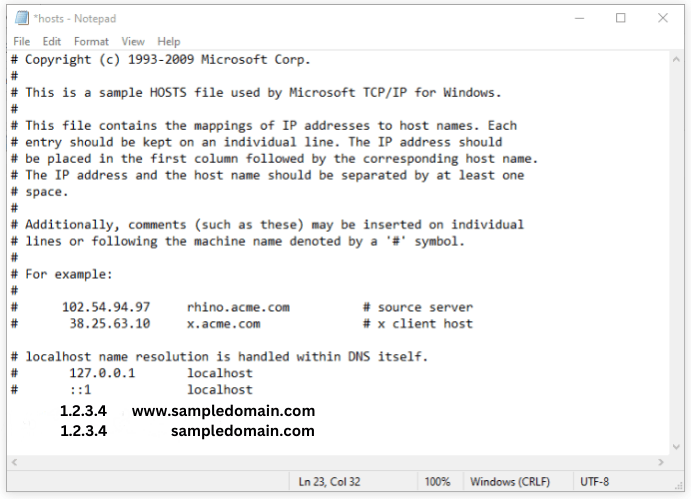
Add the custom IP address followed by a space and domain name to the host file.
Step 4:
Save the changes.
How to Edit the Hosts File in macOS
The instructions below will show you how to edit hosts file in macOS.
Step 1:
Open the Terminal Application. You can access the Terminal app by going to Applications, selecting the Utilities folder, or typing Terminal into the search box.
Step 2:
To open the hosts file, use the following command.
sudo nano /private/etc/hostsOn newer macOS devices, try this command.
sudo nano /etc/hostsStep 3:
Enter your Mac administrator password.
Step 4:
Enter the server IP address at the bottom of the hosts file, followed by a space, and then the domain name.
1.2.3.4 www.testdomain.com
1.2.3.4 testdomain.com
Here is the output.
noufal@Mac:~$ cat /etc/hosts
127.0.0.1	localhost

1.2.3.4 www.testdomain.com
1.2.3.4 testdomain.com
Step 5:
Save the changes.
How to Edit the Hosts File in Linux
You will learn how to edit hosts file in Linux by using the instructions in this section. The hosts file can be edited using any text editor, including vi and nano.
Step 1:
Press Ctrl+Alt+T to open the Terminal.
Step 2:
To open the hosts file in the vi text editor, type the following command.
sudo vi /etc/hostsStep 3:
Enter your administrator password.
Here is a sample output.
noufal@noufal:~$ sudo vi /etc/hosts
[sudo] password for noufal: **************
Step 4:
Enter the server IP address at the bottom of the hosts file, followed by a space, and then the domain name.
1.2.3.4 www.sampledomain.com
1.2.3.4 sampledomain.com
Here is the output.
noufal@noufal:~$ cat /etc/hosts
127.0.0.1	localhost
ff00::0 ip6-mcastprefix

1.2.3.4 www.sampledomain.com
1.2.3.4 sampledomain.com
Step 5:
Save the changes.
Common Problems and Solutions
Duplicate Bindings Problem
The duplicate bindings problem occurs when multiple entries have the same IP/hostname binding. This problem can be resolved by checking entries and deleting duplicate ones.
Conflict Bindings Problem
The hosts file contains entries for one domain that point to multiple IP addresses, which results in the conflict bindings issue. To fix the problem, you must check the hosts file and remove any incorrect entries.
What Causes Changes to Hosts Files Not to Take Effect?
The updated hosts should be used right away, but since Windows caches name resolution information, the previous records might be used for a while. Open a command prompt (Windows+R, cmd, Enter) and enter the following command to drop the old data.
ipconfig /flushdnsUse the following command to see if it works. For example, www.sampledomain.com.
ping www.sampledomain.com -n 1Check to see if it is using the correct IP address. If so, the issue is not with your hosts file.
You can also try the following command (open the console as an administrator, or it won’t work) to reset the NetBios cache.
nbtstat -RTo view the current data in the DNS cache, use the following command.
ipconfig /displaydns | moreHosts File Permissions Issues
There are occasionally problems with the hosts file’s permissions, file attributes, and other similar issues. By taking the steps listed below, you can quickly resolve this problem.
Step 1:
On your computer, make a new text file.
Step 2:
In this file in Notepad, copy and paste the content of your current host’s file.
Step 3:
Save the modified text file with the new name hosts.
Step 4:
Replace the existing hosts file in your drivers/etc directory by copying it there rather than moving it. Moving the hosts file does not work, but copying it does.
To resolve permission issues, try copying the file’s contents, deleting the entire file, creating a new file (with the name “File” rather than an extension), and pasting the contents into it. That may resolve some of the more unusual permissions problems.
Hosts File in macOS Not Working
The hosts file is most likely not working on macOS because it has been corrupted or is no longer in an ASCII file format. This issue can occasionally occur when you edit hosts file using any text editor or third-party application or if the incorrect file type is saved using vim, vi, nano, etc.
The steps listed below will help you solve the problem quickly.
Step 1:
Take a backup or rename the old hosts file to allow you to undo the change if necessary.
sudo mv /etc/hosts /etc/hosts_bakStep 2:
Using the cat command to select the text and then copy it to your clipboard will make it simple to copy the contents of the hosts backup file to your clipboard.
cat /etc/hosts_bakStep 3:
Using the vi text editor, create a new hosts file, and then paste the content of the existing hosts file into it.
sudo vi /etc/hostsStep 4:
For changes to be effective, save the file and flush the DNS cache using the following command.
sudo dscacheutil -flushcache; sudo killall -HUP mDNSResponderYou shouldn’t need to restart any browsers or internet-connected applications because that should be enough for the host change to take effect.
Host file FAQs
Conclusion
The hosts file can be helpful when you want to create a domain name mapping for your computer only without affecting other visitors. It’s easy to edit the hosts file in Windows, macOS, and Linux operating systems. No matter which version you’re using, it’s incredibly convenient that the file looks the same.
Liquid Web’s fully managed VPS hosting, VPS hosting solutions — including RDP and ASP.NET virtual private servers — managed cloud servers, and dedicated servers come with around-the-clock support on Windows and Linux platforms. Contact our sales team today for a consultation.