
When it comes to the preferred operating system for the backend or server-side of web hosting, CentOS (Community Enterprise Operating System) has long occupied the space. Released in 2004, CentOS is derived from Red Hat Enterprise Linux (RHEL) and, through the years, has strived to provide a free enterprise-class platform that has maintained 1:1 compatibility with RHEL.
In December 2020, the CentOS Project stunned both the open source and web hosting worlds with the news that it would shift focus to a new venture called CentOS Stream, a development branch of the OS. This is where AlmaLinux comes in. It is a drop-in replacement for CentOS and enjoys full support from cPanel.
Once your AlmaLinux server is set up, you need users with the appropriate permissions to administer the server. This tutorial details how to create a user in AlmaLinux and an explanation of file and directory permissions.
Requirements
- A server running AlmaLinux.
- Root level access to the server or sudo permissions.
- A fundamental understanding of directory traversal – specifically, knowledge of the list or ls command.
Create a User in AlmaLinux from the Graphical User Interface (GUI)
GNOME is the default desktop graphical user interface (GUI) for AlmaLinux, but end users are always free to install their favorite Linux desktop environment. The desktop makes it easy to locate key functionality in the operating system.
Step 1: Access Settings
To create a user, press the Superkey (or Windows key) and type settings into the search.

Step 2: Select and Authenticate an Administrator
From the Users section, select an account with administrative privileges and then click on the unlock button.
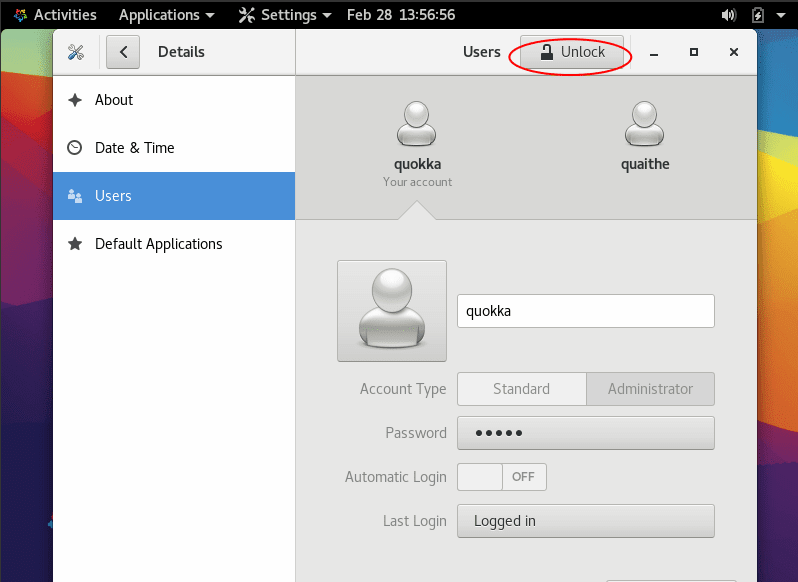
Authenticate the account by entering your password.
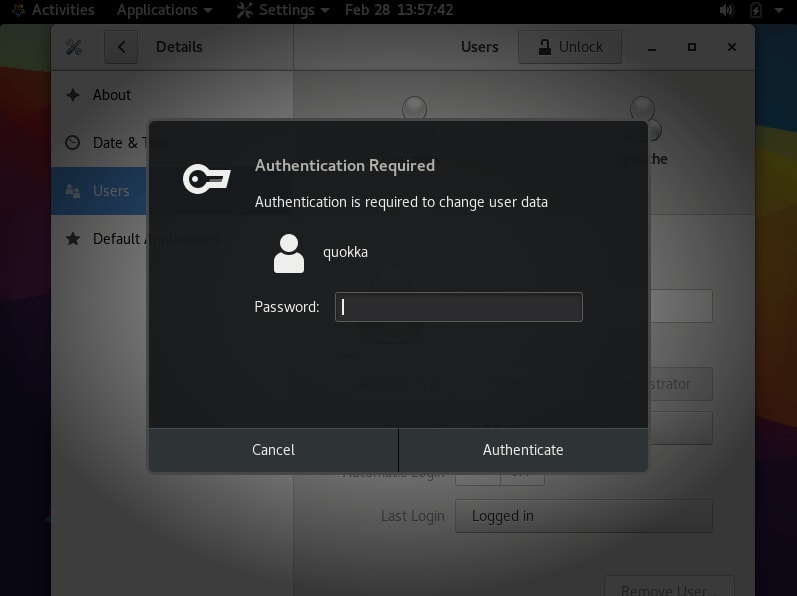
After you authenticate, click Add User.

Step 3: Create the New User
1. Select the account type. The choices are Standard or Administrator.
2. Type in the user’s full name and username.
3. Under Password, you can set a password or allow the new user to set one upon login.
4. Once all selections are made and fields completed, click Add.

You have created a new user on your AlmaLinux system.
Create a User in AlmaLinux from the Command Line
Step 1: Open a Terminal Session
Press the Superkey and type the word terminal into the search. Click the terminal icon when it displays.

Step 2: Create the User and Password in AlmaLinux
In the terminal session, type the following command.
$ sudo useradd -m quaitheThe system will add the user quaithe, and the argument, -m, will also create a home directory for the new user. If you would like to create the user and provide a home directory that is different from the default, use the following command.
$ sudo useradd quaithe -d /path/to/homeAlthough the user quaithe exists, it needs a password. Type the following command and then press Enter to set it.
$ sudo passwd userpassword[su_box title=”Note:” style=”glass” box_color=”#3ac6eb” radius=”20″]Replace the text, userpassword, with the password of your choosing.[/su_box]
Confirm that the user quaithe exists by typing the following command.
$ cat /etc/passwd | grep quaitheThis command will find the user and output the UID (user id) and GID (group id). When an interactive user is created, the system assigns a UID/GID starting at 1000. Anything below that UID is a system user account for processes. In the below example, the user quaithe was assigned 1001:1001 as the UID and GID respectively.

To confirm that the newly-created user has a home directory, we can run the ls -l /home command.

Understanding File and Directory Permissions
The ls -l command outputs the contents of the current working directory. In this example, the output is the home directory of the user quokka. The -l portion of the ls command gives a long output listing, which is relevant because it allows us to see the permission string for each item in the /home/quokka directory.

The first section of each row is the permission string and is broken down into four groups.
The first group is a single character, the very first character on the far left side, which will either be a d or a hyphen. The d denotes a directory or folder. The hyphen signifies a text file. In this example, it is a text file called sulphurpool-dark.txt.

The remaining groups in the permission string are broken down into the 2nd, 3rd, and 4th groups specifying the permissions associated with each group.
This example for the 2nd group looks at the user group on a directory called vbox. You can tell it is a directory because of the d on the far left side of the permissions string. The owner is cw and has rwx (read, write, and execute) permissions.

The 3rd group in the string is group permissions. The owner cw belongs to its own group also called cw and has rwx permissions. Any other user belonging to the cw group shares the same permissions.

The 4th and final group is known as world, other, or public and refers to a user who is not the owner and not explicitly assigned to the cw group. Notice that this group can read and write to the sulphurpool-dark.txt file but cannot execute it or navigate to the file, denoted by the hyphen at the end of the permissions string.
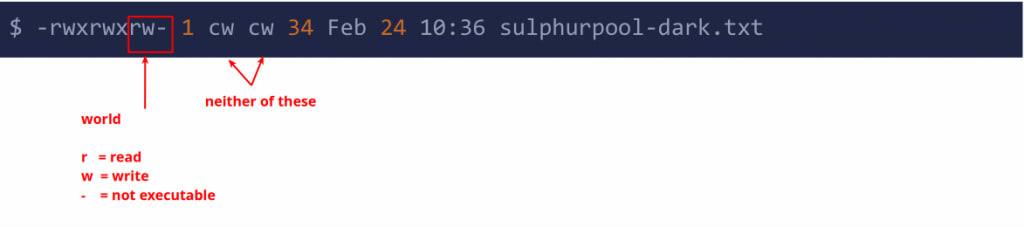
File security best practice is for the administrator or owner of the file to remove read and write permissions for world or public users. It doesn’t make sense for those permissions to be enabled if the group is unable to navigate to the file. Security via obscurity should never be relied upon to protect a file.
Wrapping Up
This tutorial took you through how to create a user and set permissions in AlmaLinux. The process for creating a user from the command line is very similar to CentOS, making the operational transition to AlmaLinux quite seamless. Also, the option of a GUI for managing users and permissions provides added flexibility for system administrators making quick changes.
Do you need to set up a server running AlmaLinux? Liquid Web’s VPS hosting, cloud dedicated servers, and dedicated servers offer AlmaLinux as a server image option. Contact our sales team today to determine which is right for you.