 Dean Conally
 Everyone likes a good control panel to manage their servers. When a control panel is built for maximum security and performance, supports major clouds such as Google Cloud or Azure, and is free, what else can one do but try it. In this tutorial, we will cover the installation and configuration of CloudPanel, which is a free control panel that focuses on PHP applications.
System Requirements
Here is what you’ll need for the successful installation of CloudPanel.
- Ubuntu 20.04.
- Root user access.
- Postfix, Node.js, Percona, and PHP.
- A server with 1 CPU core and 2GB RAM.
Prerequisite Installations
Update All Packages
First, let’s make sure that we have the necessary up-to-date packages by using the following command.
root@host:/# apt update && apt upgrade && apt install curlThe output will be rather lengthy. Confirm whether to proceed by responding to the following prompt. Pressing Y will allow the process to finish.
Do you want to continue? [Y/n]Once completed, all of the packages on your server will be up to date. Let’s proceed to the Postfix installation.
Postfix Installation
Postfix is an MTA or Mail Transport Agent, and its purpose is to handle emails. To install it, type the following two commands in your command line.
The first one is below.
root@host2:~# apt install gnupg apt-transport-httpsThis output is for the first command.
0 upgraded, 1 newly installed, 0 to remove and 0 not upgraded.
Need to get 1,704 B of archives.
After this operation, 161 kB of additional disk space will be used.
Do you want to continue? [Y/n] y
The output will ask again if you want to proceed (not pictured). Press Y on your keyboard to view the below window.
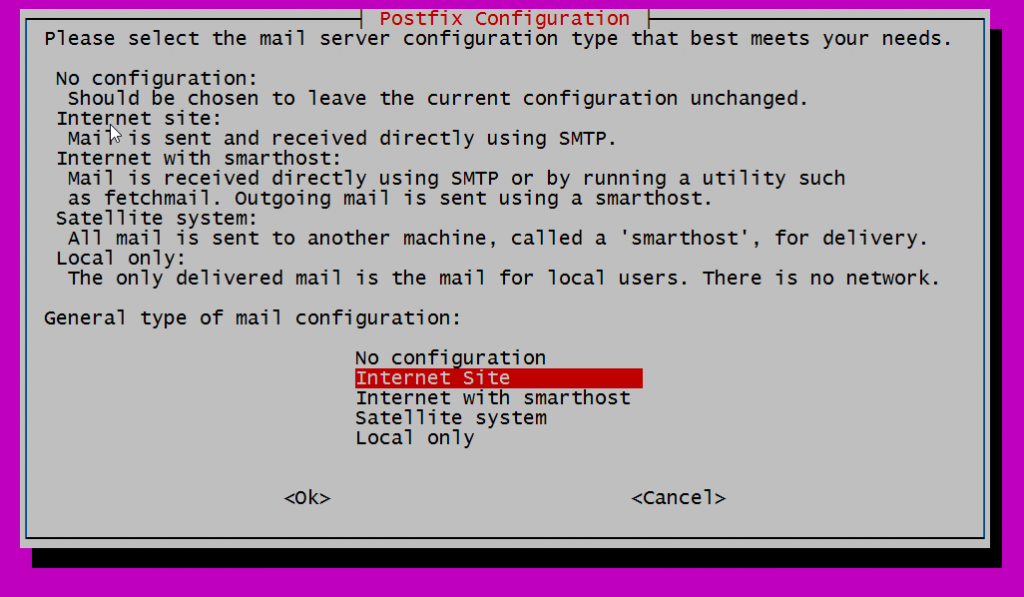
Leave the Internet Site option selected, and press Enter on your keyboard. The next screen will prompt you to enter the name of your mail server. In our case and for this tutorial, I used example.liquidweb.com. Keep in mind that the mail server name has to be a fully qualified domain name.
Now that Postfix is in place, we can continue in our process.
Node.js Installation
The next step is to install Node.js, which requires a few commands, the first two being similar. Both of these commands add necessary keys for the Node.js repositories but use different flags.
Run the below curl -s command first. The -s means silent and indicates a progress bar is not visible during the process. The output will be a simple OK.
root@host2:~# curl -s https://deb.nodesource.com/gpgkey/nodesource.gpg.key | apt-key add -
OK
The second command -sS will provide the same OK output. This command is silent in the same manner as the first, with no visible progress bar, but it will display in the terminal any errors that occur during the process. Just make sure that you run it after the first one.
root@host2:~# curl -sS https://dl.yarnpkg.com/debian/pubkey.gpg | apt-key add -
OK
Now we will run a simple echo command. It is a widely used command that passes strings into arguments, and it will add the Node.js repository to the list of available installation sources (actual URLs to be used in the examples provided are subject to change).
root@host2:~# echo 'deb https://deb.nodesource.com/node_14.x focal main' | tee /etc/apt/sources.list.d/nodesource.listThe output will provide a URL to confirm the exact location of the repository on the Internet.
Below is the last command that we will run for this particular installation. The output will also provide a URL that is part of the command.
root@host2:~# echo 'deb https://dl.yarnpkg.com/debian/ stable main' | tee /etc/apt/sources.list.d/yarn.listLet’s continue the installation of CloudPanel by adding PHP.
PHP Installation
We’ll add PHP with one simple command, and then we will run an update. First, let’s add the repository.
root@host2:~# add-apt-repository ppa:ondrej/php[su_box title=”Note:” style=”glass” box_color=”#3ac6eb” radius=”20″]If you are using Nginx, a lengthy output will inform you that a different command is required. [/su_box]
Use the below command if you are using Nginx.
root@host2:~# add-apt-repository ppa:ondrej/nginx-mainlineWith either option, you will be instructed to press Enter to continue.
More info: https://launchpad.net/~ondrej/+archive/ubuntu/php
Press [ENTER] to continue or Ctrl-c to cancel adding it.
The necessary packages will start to download at that time, and once the process is completed, you will see the following output.
Fetched 3,321 kB in 2s (1,944 kB/s)
Reading package lists... Done
Once the packages are downloaded, update them once more.
root@host2:~# apt-get updateNow it’s time to move on to the Percona installation.
Percona Installation
The first step is to download the latest Percona version by using the wget command (actual URLs to be used in the examples provided are subject to change).
root@host2:~# wget https://repo.percona.com/apt/percona-release_latest.$(lsb_release -sc)_all.debWhen the download finishes, we will run the apt install command to install Percona.
root@host2:~# apt install ./percona-release_latest.$(lsb_release -sc)_all.debA progress bar in the command line will indicate how the installation is progressing. In most cases, it installs in under 30 seconds.
The output of the installation should look like this once it is completed.
* Enabling the Percona Original repository
<*> All done!
The last thing that we need to do to get Percona up and running is to download additional packages by running this command.
root@host2:~# percona-release setup ps57The command’s output will look like this in the end.
Reading package lists... DoneNow that we made sure that we have all the necessary software on our server let’s install CloudPanel dependencies and CloudPanel itself.
CloudPanel Installation
Cloudpanel requires six additional dependencies to be installed. First, you need to move to /tmp directory with the cd command.
root@host2:/# cd /tmp/Let’s download those packages now. I will provide you with the command for all six of them. The output will always be the same for all of them and indicate the dependency has been downloaded (actual URLs to be used in the examples provided are subject to change).
root@host2:/tmp# wget http://ftp.us.debian.org/debian/pool/main/s/startpar/startpar_0.64-3_amd64.debroot@host2:/tmp# wget http://ftp.us.debian.org/debian/pool/main/s/sysvinit/sysvinit-utils_2.96-6_amd64.debroot@host2:/tmp# wget http://ftp.us.debian.org/debian/pool/main/l/lsb/lsb-base_11.1.0_all.debroot@host2:/tmp# wget http://ftp.us.debian.org/debian/pool/main/s/sysvinit/sysv-rc_2.96-6_all.debroot@host2:/tmp# wget http://ftp.us.debian.org/debian/pool/main/r/rcconf/rcconf_3.2+nmu1_all.debroot@host2:/tmp# wget http://ftp.us.debian.org/debian/pool/main/i/insserv/insserv_1.21.0-1_amd64.debAwesome! Now we are finally ready to install CloudPanel. Let’s add a repository first using the echo command.
root@host2:/tmp# echo "deb https://d17k9fuiwb52nc.cloudfront.net/ buster main" | tee /etc/apt/sources.list.d/packages.cloudpanel.io.listAnd let’s add a key for it with the command below.
root@host2:/tmp# curl -Lks https://d17k9fuiwb52nc.cloudfront.net/key.gpg | sudo apt-key add -
OK
Use apt update again to update all the necessary packages.
root@host2:/tmp# apt updateNext, we download the CloudPanel file with the wget command.
root@host2:/tmp# wget https://github.com/cloudpanel-io/cloudpanel-ce/releases/download/v1.0.5/cloudpanel.debLastly, use the apt install command to install the CloudPanel server panel.
root@host2:/tmp# apt install ./cloudpanel.debCongratulations! You installed CloudPanel on your server! You can access it through your browser by using your server’s IP address and port 8443 like as shown below.
http://your_server_ip:8443
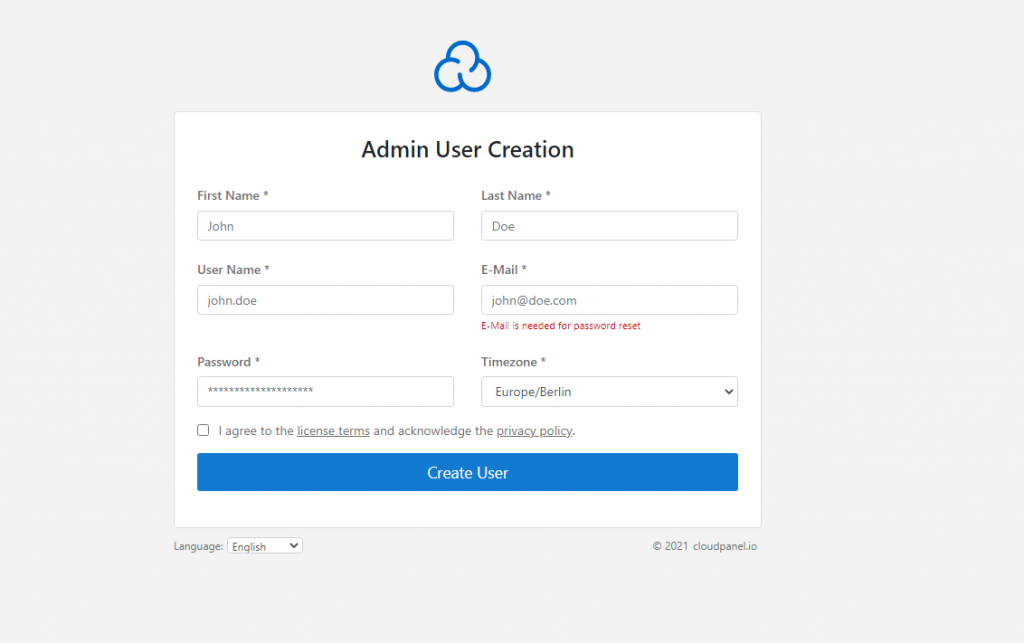
Once finished, you will be prompted to create your CloudPanel admin user. Complete all required fields, set a secure password, and click Create User.
Now you can enjoy CloudPanel, your completely free server control panel designed for maximum performance.
Conclusion
I hope this tutorial will help you and that you will have fun with the many benefits that CloudPanel is offering.
To learn more about all the different product offerings at Liquid Web, including our first-class VPS hosting and dedicated server hosting, visit our product overview page. Our Managed Hosting line of products is robust enough for businesses of every size, from early-stage startups to mature businesses requiring enterprise hosting environments.