
 David Singer
 Why should I change my admin URL?
Most Content Management Systems (CMS’s) have a unique identifying login URL. For example, WordPress uses
- domain.com/wp-admin.php
- domain.com/wp-login.php
for your admin login page. Because of this, hackers assume that is your login and can try to use this info, as well as the default username of admin. If you do not modify either of these, your potential risk for being hacked goes up exponentially. It is important that you select an administrative username that is unique to you or your business and create a secure password.
This tutorial will provide you with ways to change the login URL for the top CMS’s used today: Joomla!, Drupal, Magento, and WordPress. But before we get started, let’s look at the why.
Protect Your Site Against Brute Force Attacks
Security is the main reason to change the login page – doing so protects you against the most common type of website breach; a brute force attack. Because brute force attacks involve “guessing” login credentials, it needs three variables to succeed:
- Username – make sure you choose something unique to you or your business, don’t leave it as the default “admin.”
- Password – go for a complex password, the more generic it is, the easier it will be to guess.
- Your login URL – the admin page of your dashboard
When you use default URLs, you leave yourself more vulnerable, the hacker will only need your username and password to access a site. Changing the login URL makes hacker’s work much harder.
It is also important to note, that even if a hacker can’t correctly obtain your login credentials, the attempts use a lot of bandwidth and can slow down or crash your site during the attack. Moving your login page will help combat this problem.[
Hides Vulnerabilities
No CMS is perfect, like any software, a CMS is never 100% immune from bugs and vulnerabilities. The size of the communities using the most popular CMS’s means there are a lot of good people working hard to fix problems, but because of the number of websites running a CMS, any security vulnerability gets a lot of press. When news of a known vulnerability breaks, malicious hackers instantly know where your defenses are weak.
By changing the login URL, you can protect yourself against a tell-tale sign that your site is using a CMS, distancing yourself from any known problems. This won’t keep you 100% safe, but it’s a good place to start.
Changing Your Admin URL
Depending on the CMS you use, the process for changing the admin URL will be different. Use the links below to be directed to the CMS you use:
Before you save your changes, make sure you test the new URL to verify it works prior to saving and going live.
WordPress
Changing the login URL for WordPress can be accomplished two ways;
- by downloading and using a plugin
- Modifying the base code
There are many options for changing or hiding your login URL, but the plugin we found to work the best is the WPS Hide Login plugin. Luckily, the installation and activation for this plugin is quick and easy.
The use of a specific plugin is only a suggestion. Liquid Web is not affiliated and does not support any issues that may arise from using the WPS Hide Login plugin. You can read more about this specific plugin on their home page: https://wordpress.org/plugins/wps-hide-login/
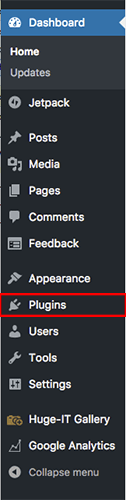
- Log into your WordPress dashboard.
- Click on the link for Plugins.
- Search for “WPS Hide Login” in the search bar at the top of the page.
- Select Install on the plugin when it appears in the list.

- Once the plugin is installed, go to your Active Plugins list and select Activate to activate it.

- After the plugin is activated, click on Settings to change the admin URL.

- Scroll to the bottom of the settings page, and change your admin URL in the section, then click Save Changes to save your new URL. You can choose any word to use, the more unique it is, the more secure it will be!

- Now when you log in, you will use that URL to be directed to the WordPress dashboard.
Joomla!
In order to change your admin URL with Joomla!, you will need to add an extension to your CMS called JSecure. This extension is a premium (paid) download to add to your Joomla! account, but it offers the protection from attack by changing the admin URL.
The use of the JSecure extension on Joomla is only a suggestion. Liquid Web is not affiliated with nor does it support any issues that may arise from the use of this the extension. You can read more about this specific extension on their home page:
https://extensions.joomla.org/extension/jsecure/
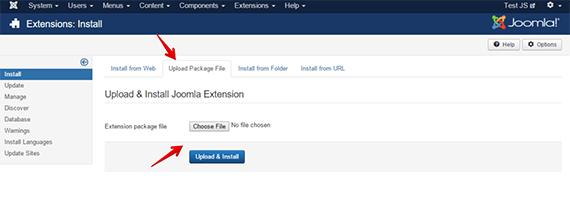
- Once you download the extension, log into your Joomla admin panel.
- Upload and install the build matching with your Joomla version.
- Click the Components link in the menu at the top of the page. Select jSecure Lite from the drop-down menu and go to Basic Configuration to configure the admin URL.
- Enable the Pass Key option and set a pass key in the Key section. The key will be your new login URL.

- Click Save and now, you will use the pass key as the ending to the login URL. It should look something like this: www.yoursite.com/administrator/?key”.
Drupal
Changing your admin URL in Drupal is not as straight forward as other CMS applications. It requires a module to be used to override the admin path. The modules will differ with different versions of Drupal, they are listed below with the instructions or link to the module file to download.
The use of a module is only a suggestion. Liquid Web is not affiliated nor does it support any issues that may arise from using this module for Drupal.
If you are unfamiliar with editing and configuring settings files within your CMS, please consult a developer before implementing this or any other modules.
Drupal 7
Version 7.x-2.x supports Overlay module, but you can get a 404 error only when enable/disable the module with overlay. You can find instructions for installing and using the Overlay Module here: https://www.drupal.org/docs/7/administering-drupal-7-site/working-with-the-overlay
Drupal 7.x-2.3
Drupal 7.x-2.3 uses a downloadable module that can be found here: https://www.drupal.org/project/rename_admin_paths/releases/7.x-2.3.
Drupal 8.x-1.1
Drupal 8.x-1.1 uses a downloadable module, you can find it here: https://www.drupal.org/project/rename_admin_paths/releases/8.x-1.1.
Running modules and scripts found on the internet can be dangerous. Make sure to work with a developer when deploying any modules found online to ensure that nothing malicious is contained within the module.
Liquid Web has no affiliation with the creators of these modules and is not responsible for any security issues when installing modules.
Magento
The Magento admin URL is changed either through the control panel or via command line.
Changing the admin URL requires editing your configuration files and must be within the same installation and, the same document root as your storefront. If the default base URL is https://yourdomain.com/magento, the Admin URL path is below this and will look something like, https://yourdomain.com/magento/admin.
It is important to keep this file path structure to make sure you can reach the admin panel once the URL is changed.
Change the Admin URL from Magento control panel:
- In the admin menu, select System. From the system menu, click on Configure.
- Select Admin in the panel on the left-hand side of the page.
- Expand the Admin Base URL section by clicking on it.
- Set the Use Custom Admin URL to “yes,” then enter the custom admin URL in the following format:
https://yourdomain.com/magento/

and set the Custom Admin Path to “yes.” Then enter the name of the path to your desired word.
- Click Save Config when you are done to save your changes.
- The last step in the process is to clear your cache. You can do this through the Magento admin menu selecting Cache Management from the System menu. Then select Flush Magento Cache.
Now when you log into Magento, you will use that path.
Change the Admin URL from Command Line:
- In the command line, open the app/etc/local.xml file to change the name of the admin path. Look for the <adminhtml>argument in the <admin> section. The default Admin Path will look like:
# <frontName><![CDATA[admin]]></frontName>The Admin URL is case-sensitive. Use only lower-case letters to rename the admin URL path.
- Once in the <admin> section, change the path, when you change it, it should look something like this:
# <frontName><![CDATA[backend]]></frontName> - The last step in the process is to flush your cache, this is accomplished by opening the var/cache folder and deleting its contents.
Need help with this change?
Our Support techs are on duty 24/7/365 and can provide a more in depth review of these and other web hosting technologies, especially those discussed in this article. If you are unsure about walking through the steps, or open a chat or ticket with us.
And if you’re looking for the best WordPress hosting to host your CMS login URL, you’re in the right place. Check out our variety of WordPress solutions, including WordPress VPS, dedicated WordPress hosting, and managed WordPress solutions.
Contact Us:
[email protected]