
 Don Pepper
 Denial of Service (DoS) and Distributed Denial of Service (DDoS) attacks are common threats that every publicly accessible web server faces. The purpose of such attacks, in the simplest terms, is to flood a server with connections, overloading it and preventing from accepting legitimate traffic.
Attacks increasingly have become automated instead of directly targeted and botnets (networks of infected computers that can be remotely controlled) continue to grow at a rapid pace, making DoS and DDoS attacks much more common.
Fortunately, CSF can be used to help mitigate small attacks.
Before proceeding, it is important to understand the following points:
- There is no way to prevent a DoS/DDoS attack against any server connected to the Internet; once in progress, the only thing that can be done is to try to mitigate its effects.
- There is no way to make a server respond normally when it is under attack; the most that can be done is to try to keep it online during the attack by reducing the impact of the incoming traffic.
- In some cases, the best way to deal with a large-volume attack is to null-route the server’s IP address. Effectively, that means temporarily taking it offline until the incoming traffic subsides.
- Any measures employed within CSF will be effective only against small attacks, and measures should be implemented in CSF only while the server is under attack. The firewall settings always should be restored afterward to minimize disruption of legitimate traffic, as the measures outlined below will slow incoming packets.
- CSF is not the only way to mitigate small-scale attacks. Services such as those offered by Cloudflare’s network also may help because they are external, buffering traffic to the server. And for maximum protection against large attacks (millions of incoming packets per second), a specialized DoS mitigation service may be necessary. You can read more about such protection at https://www.liquidweb.com/services/network/ddos.html.
Pre-Flight Check
- This series assumes you have the ConfigServer Firewall (CSF) installed on your cPanel server, and you have access to WebHost Manager (WHM).
- If your managed cPanel server currently uses APF but you’d prefer CSF, contact Heroic Support℠ and request a switch. There is no charge, it typically takes only a few minutes, and the only service that needs to be restarted as a result is the firewall itself. Our support technicians also can port your existing APF rules to CSF. If requesting an upgrade, please be sure to indicate whether your server uses the Guardian backup service so that its rules also can be configured.
If you have not already done so, be sure to first back up the current firewall configuration before making any changes. After the attack has subsided, you will want to restore the current firewall configuration using the instructions in that article.
Step #1: Open the Firewall Configuration
- In WebHost Manager, locate and select ConfigServer Security & Firewall under the Plugins section in the left menu. You also can begin typing “fire” into the search field at the top left to narrow down the options.
- Click on the Firewall Configuration button to open the configuration file.
Step #2: Rate Limit Incoming Traffic
The first thing that can be done to mitigate the effects of an incoming attack, is to limit the number of connections per IP address.
When properly configured, CSF will track the number of connections from IP address hitting the server and block IP addresses at the firewall level should they exceed a defined limit.
It’s important not to set the limit too low, as protocols such as FTP, IMAP, and even HTTP all legitimately make multiple connections. Also, remember that most companies as well as homes and public hotspots may have many different computers on their internal network which all share a single public IP address.
- To set the limit on connections per IP address, scroll down to the Connection Tracking section of the Firewall Configuration page and set CT_LIMIT to the desired value.
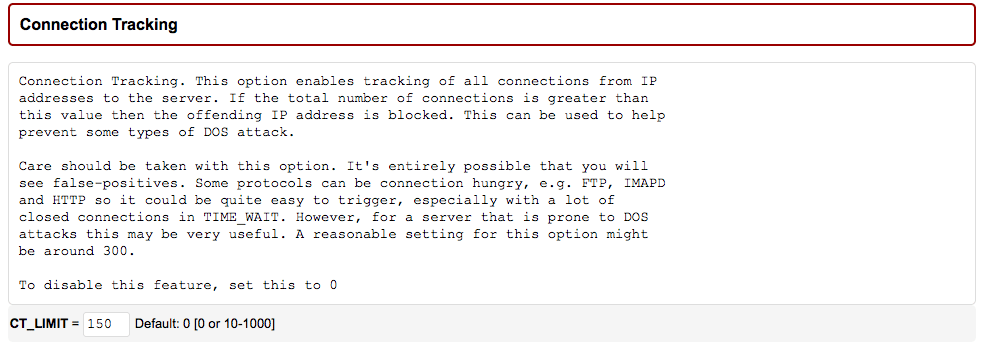
For the purposes of this tutorial, we’ll be using 150 connections per IP address as an upper limit. You may find that you need to lower or raise that number but, generally, you should never attempt to set it below about 100. - Assuming the server is under attack, you also will want to disable email alerts by setting CT_EMAIL_ALERT to “0”. Otherwise, the server will send an email every time it blocks an IP address, which will only add to load on the server.

- You also may wish to restrict rate limiting to specific ports, which can be done using the CT_PORTS setting. Multiple ports can be added in comma-separated format (with no space in between). In this example, we’re applying rate limiting only to HTTP ports:

With these settings, any IP address that makes more than 150 connections to the website on the standard and/or secure ports will be blocked in the firewall. By default, that will be a temporary block for 30 minutes. The CT_BLOCK_TIME setting can extend the block period, and by toggling the CT_PERMANENT setting you can arrange for the IP addresses to be blocked permanently.
Step #3: SYN flood Protection
A SYN flood attack is a DoS attack exploiting the TCP (Transmission Control Protocol) connection process itself.
In basic terms, a TCP connection is established using a three-way handshake:
- The client (incoming connection) sends a synchronization packet (SYN) to the server.
- The server responds with a synchronization acknowledgment (SYN/ACK) to the client.
- The client then responds with an acknowledgment (ACK) back to the server.
A SYN flood attack manipulates that three-way handshake by initiating multiple synchronization requests and then refusing to respond with any final acknowledgments. That causes the server, which is keeping a spot open waiting on the client’s final reply to complete their incoming connection, to eventually run out of available connections for the targeted service and appear to be offline.
On a Linux server, you can quickly check for SYN packets by running this command over SSH:netstat -nap | grep SYN -c
It’s important to note that the presence of SYN packets does not necessarily mean that a server actually is under SYN flood attack. For instance, if load on the server already is high or there is a great deal of incoming traffic, an elevated level is to be expected. Only the presence of a large number (in the hundreds) is likely to be indicative of a possible SYN flood attack.
If you know that the server is under attack, you can configure CSF to help mitigate this type of attack. Otherwise, skip to Step Three and restart the firewall to apply the rate limits you enabled in Step One.
- To enable SYN flood protection, locate the Port Flood Settings section of the Firewall Configuration page.

- You can enable SYN flood protection by setting SYNFLOOD to “1” and setting the maximum rate and burst:
- SYNFLOOD_RATE is the number of SYN packets to accept per IP, per second. For the purposes of this tutorial, we’ll be using a value of “75/s” on the assumption that a DoS attack is in progress.
- SYNFLOOD_BURST is the number of times the IP can hit the rate limit before being blocked in the firewall. A setting of 25 works for our purposes.
You likely will need to raise or lower these settings based on your circumstances. However, a setting above about 100/s for the rate (or 150 for the burst) could be too generous to be effective; Likewise, lowering the rate below about 50/s (or the burst below about 50) could prevent legitimate access to services.
Step #3: Save Your Changes and Restart the Firewall
- Scroll to the bottom of the Firewall Configuration page and click on the Change button.
- On the next screen, click the Restart csf+lfd button to restart the firewall with the new settings.
Next Steps
- Once the attack has subsided, you will need to restore the firewall’s previous configuration to avoid disruption of legitimate incoming traffic. If these “under attack” rules are left in place, the added packet scrutiny at the firewall level will slow traffic considerably and can lead to noticeably diminished web server performance.
- If you followed the instructions in Part One: How to Back up and Restore the Firewall Configuration to back up the previous configuration, you can easily use the same process to restore those saved settings. You also may wish to save these DoS/DDoS protection settings before restoring the original configuration so that they can be quickly employed in the future if necessary.