


Liquid Web Assisted Website Migration Service
How To Request Assisted Website Migrations from Liquid Web
The Migration team at Liquid Web is dedicated to providing you with an efficient and as uneventful a migration as possible. Whether you are migrating from a current Liquid Web server (internal migration) or from another host (external migration) into Liquid Web, it is important that we work together to ensure an effective transfer of information.
To request a server migration, please open a support ticket indicating that you are requesting a migration. If you are requesting a Windows migration, please open a support ticket with the Windows Team.
Otherwise, check out some helpful terms to know before your migration begins. Still have questions about what to expect? We have a handy guide called What to Expect During a Site Migration.
Before Your Migration Begins
Before you start your migration, there are a few terms that we use that you will need to be familiar with:
- Initial Sync — This is the first of three stages of a migration. In this stage, access levels are determined and tested, version matching occurs, and the initial seed of data for your websites being migrated is brought to the new server.
- Hosts File — The hosts file is a computer file used by an operating system to map hostnames to IP addresses. This file is a plain text file and stored on your computer or workstation, it is the first stop when your browser looks up a domain name via DNS. You can edit the hosts file to re-route requests for a particular domain name to a different IP Address. This is the preferred method of testing your site on your new server. This allows you to view the site as if it were live on the new server at Liquid Web and verify that all pages are working as intended before going live with a DNS update.
- Final Sync — The final sync is the last transfer of data in the migration process. This is completed after you confirm that all testing has come back without any major issues to fix before the site goes live. The final sync typically updates files, email, and databases that have been changed since the initial migration of data. This is done with the source server no longer serving requests and is most effective when a DNS update is performed in tandem.
- DNS Update — A DNS update is part of the final sync of your migration which makes the target server (the new server at Liquid Web) live. The DNS update can be performed with a final sync, or on its own if a final sync is not possible.
- Authoritative Nameservers — a specific nameserver which holds the authoritative DNS records for a specific domain. Authoritative nameservers are defined for a specific domain at that domain's registrar. A change to DNS at the authoritative nameserver will make its way around the internet through propagation. This is why it can sometimes take a little while for your DNS changes to take effect.
- Nameserver — A nameserver is computer hardware or software that implements a network service for providing responses to DNS queries. Nameservers serve several types of information for a certain domain name, including A Records, MX Records, and CNAME records.
- Nameserver Glue — Nameserver glue is a record which associates a named nameserver with an IP address on the internet, similar to how an A Record associates a domain name with an IP address. This record is stored at the domain registrar. During migrations, if nameserver authority is moving from one machine to another, the glue records at the registrar will need to be changed after the final sync and DNS update.
Requesting a Migration
Migrations begin by filling out our form through your Liquid Web account.
If you do not have an existing server, one should be ordered before starting this process. If you do not have an existing server, an option to order one will be presented.
Additionally, when attempting to select a source server (after a new server is ordered and configured), select the new server from the dropdown. If you get a message stating that a source has not been selected, click the button “Add a source” and select the new server from that list.
Steps
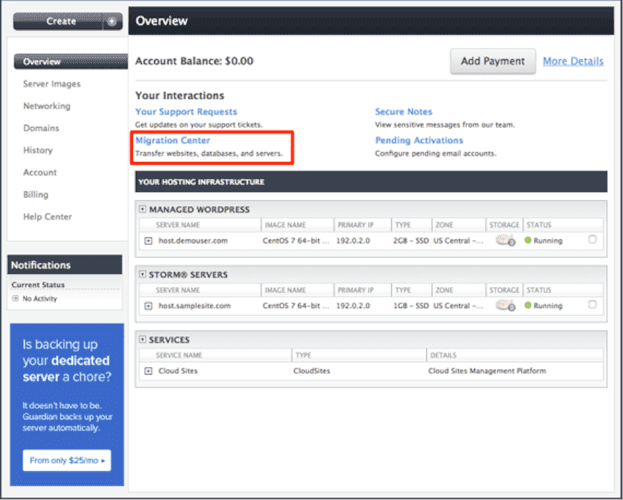
1. Once you log into your account, click on the Migration Center link at the top of the page.
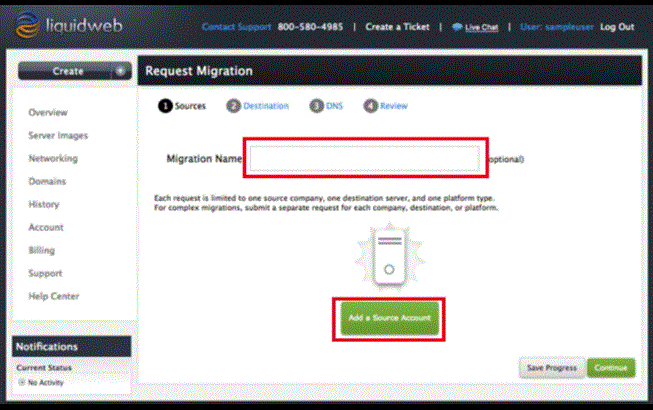
2. You will be directed to the Migration Center home page. Click on Create a Migration Request to begin filling out the form.
3. Once the Request Migration form opens, you will be given the option to name your migration and add your source account. Click on the Add a Source Account button to add information about the hosting account you are migrating from.
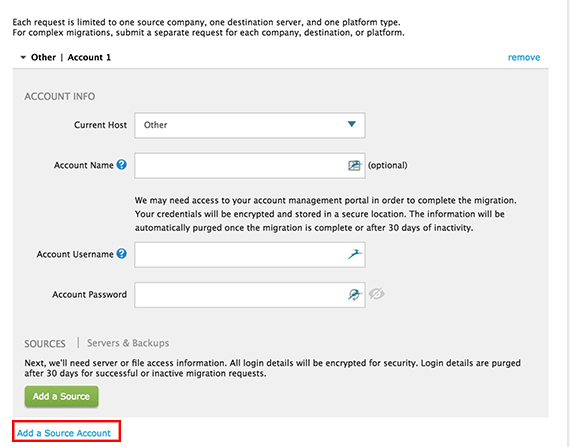
4. Click on the "Add a Source" button to add server access information for the source account. This is where you would add SSH or panel login details for the server or cPanel account you are migrating.

5. You can add more than one source by clicking the link "Add a Source Account" at the bottom of the section.
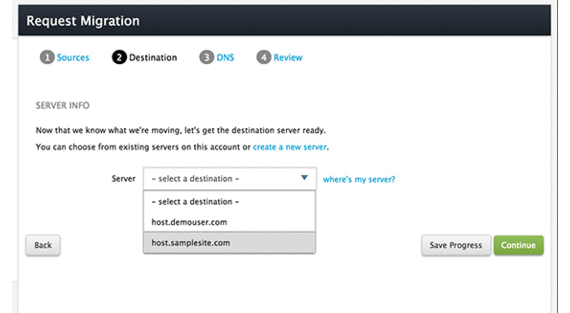
6. Next, you will select your destination. You can choose the server from the drop-down menu. If you do not currently have a server at Liquid Web, click on the "Create a New Server" link to be directed to a page for you to purchase and create a server.
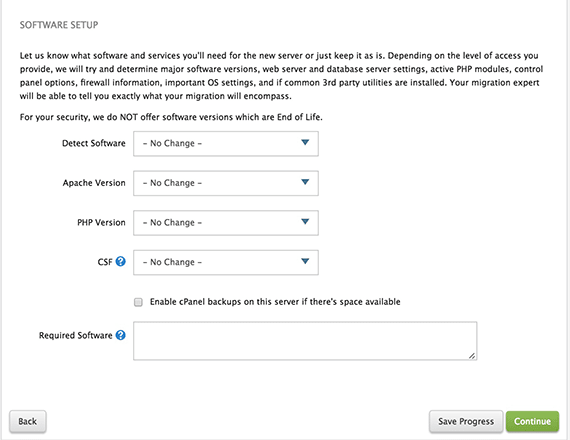
7. Provide us with information on what software you'd like to have updated with the migration, or if you don't need or want updates, you can leave this as it is.
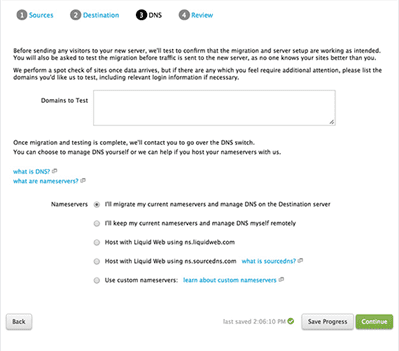
8. We will need information from you on the domains on the incoming server and DNS settings. You can choose what domains you want to be tested and how you want the DNS handled.
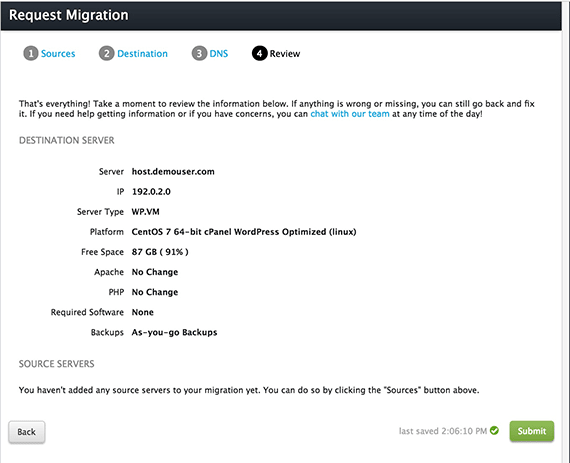
9. The final step before submitting your request is to review the information you've provided. When you are ready, click the Submit button and a ticket will be sent to our Heroic Migration team.
We will contact you to schedule the migration and stay in contact with you through the entire process. Once the migration is complete, the last step is to test your site.
Please see our article Editing Your DNS Hosts File for information on how to securely test your site. If at any time you have questions or concerns, please feel free to contact our Heroic Support team by chat, phone or support ticket.
Get Started Today!
We pride ourselves on being The Most Helpful Humans In Hosting™!
Our Support Teams are filled with experienced Linux technicians and talented system administrators who have intimate knowledge of multiple web hosting technologies, especially those discussed in this article.
Should you have any questions regarding this information, we are always available to answer any inquiries with issues related to this article, 24 hours a day, 7 days a week 365 days a year.
If you are a Fully Managed VPS server, Cloud Dedicated, VMWare Private Cloud, Private Parent server, Managed Cloud Servers, or a Dedicated server owner and you are uncomfortable with performing any of the steps outlined, contact us to assist you with this process.
Related Articles:


About the Author: Andrej Walilko
Andrej Walilko (RHCE6) is a seasoned Linux Administrator, and he is a Migration Project Manager at Liquid Web, developing specialized processes for complex migration types. He enjoys doing woodworking, home improvement, and playing piano in his free time.


Our Sales and Support teams are available 24 hours by phone or e-mail to assist.
Latest Articles
Managed Server vs. Unmanaged Server Defined
Read ArticleChange cPanel password from WebHost Manager (WHM)
Read ArticleChange cPanel password from WebHost Manager (WHM)
Read ArticleChange cPanel password from WebHost Manager (WHM)
Read ArticleChange the root password in WebHost Manager (WHM)
Read Article