
 Dan Silva
 If you need to access your Windows server remotely, one of the most convenient and secure methods is through Remote Desktop.
Whether you want to troubleshoot issues, perform routine maintenance, or just access specific files or applications, Remote Desktop makes it easy to connect to your server from anywhere.
In this guide, we’ll walk you through the steps to set up secure remote access to your Windows server from your local device using Remote Desktop.
Key points
- Remote Desktop allows you to access and control your Windows server remotely via a desktop interface on your local device.
- To create a remote connection to a Windows server, you’ll need a Remote Desktop client and username, your server’s IP address, your administrator password, and a stable Internet connection.
- Setting up remote access involves updating permissions on your local device, installing a Remote Desktop client, and then logging in to your Windows server.
What is Remote Desktop?
Remote Desktop is a powerful Windows feature that allows you to connect to and manage your Windows server from a remote endpoint, such as your personal computer (PC) or even a mobile phone, like an iPhone.
It gives you real-time access to the server’s desktop environment, including all of its functions, files, applications, and system settings. Essentially, you can interact with the server as if it were on your local device, enabling remote work and remote support.
The technology behind this seamless experience is the Remote Desktop Protocol (RDP) — Microsoft’s proprietary network communication protocol.
Remote Desktop is sometimes confused with a virtual private network (VPN), but the two are quite different. While Remote Desktop provides full control over a specific remote computer or server, a VPN gives you secure access to a network, enabling you to interact with its resources without directly controlling any one specific machine.
Requirements for remote access to your Windows server
To access your Windows server via Remote Desktop, you’ll need the following:
- An appropriate Remote Desktop client. Clients are available for various devices, including computers, smartphones (both iOS and Android devices), and tablets. Many free options exist, so pricing is typically not an issue.
- Your Remote Desktop username (typically “Administrator”).
- Your server’s IP address.
- The password for the admin account on your Windows server.
- An active internet connection.
While Liquid Web’s Windows VPS servers accept Remote Desktop connections, not all PCs or mobile devices do. So, before you begin, verify that your operating system is able to connect.
How to find your Liquid Web server’s IP address
If you’re using a Liquid Web-powered Windows server, you can easily find its IP address by following these steps:
- Log in to your Liquid Web account.
- Click on Servers from the main menu.
- You’ll see the primary IP address for each server displayed to the right of its name.
Alternatively, you can find your server’s IP address in both cPanel and Plesk.
cPanel
- Log in to cPanel.
- Under General Information (on the right-hand side), click Server Information.
- Find the IP address under Shared IP Address.
Plesk
- Log in to Plesk.
- On the left-hand menu, select Tools & Settings.
- Under the Tools & Resources section, click IP Addresses.
How to set up remote access to your Windows server
- Enable Remote Desktop connections on your local device.
- Download and install a Remote Desktop app.
- Connect to your server.
1. Enable Remote Desktop connections on your local device
The first step is to configure your remote PC or mobile device to accept remote connections. The process varies depending on whether you’re using Windows, macOS, or Linux. If you’re using a Windows machine, you can do it in any of the following ways.
Server Manager
- From the Start menu, go to Server Manager > Local Server.
- Locate the Remote Desktop section, which should display a status of Disabled.
- In the System Properties window that appears, select Allow remote connections to this computer.
- Apply the changes and close the window.
Control Panel
- Open Control Panel > System and Security.
- Under System, click on Allow remote access.
- Under Remote Desktop, select Allow remote connections to this computer, then click OK.
PowerShell
- In the start menu, search for Windows PowerShell and open it as an administrator.
- Enter the following command:
Set-ItemProperty -Path 'HKLM:\System\CurrentControlSet\Control\Terminal Server\' -name "fDenyTSConnections" -value 0You’ll also need to adjust your firewall settings to permit the connection. To do this, follow these steps:
- Go to Control Panel > System and Security > Windows Defender Firewall.
- On Allow an app or feature through Windows Defender Firewall, confirm the Remote Desktop option is checked.
2. Download and install a Remote Desktop app
To access your Windows server, you’ll need a Remote Desktop client. The appropriate client depends on your operating system.
- Windows: Remote Desktop Connection (Microsoft’s official client software, which comes preinstalled in many versions of Windows).
- macOS: Microsoft Remote Desktop (downloadable from the Mac App Store).
- Linux: Options here include rdesktop, Remmina, FreeRDP, and Vinagre.
3. Connect to your server
The steps for connecting to your server will vary depending on your operating system.
Windows
Press Windows + R on your local machine, type mstsc, and press OK to open the Remote Desktop Connection client.
- In the Computer field, enter the IP address of your server.
- Click Connect and enter your credentials when prompted (use the server’s username and password).
- Your server’s desktop interface will load, allowing you to manage it remotely.
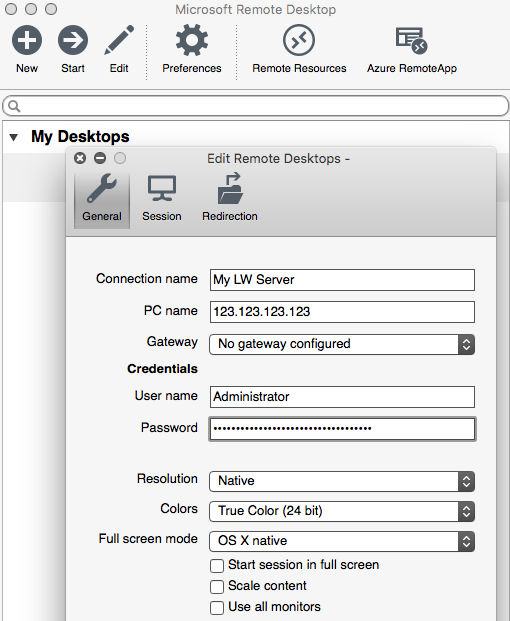
macOS
- Go to the Mac App Store and install Microsoft Remote Desktop.
- Open the app and click the button to add a new connection.
- Choose an appropriate connection name for your server.
- In the PC name field, enter your server’s IP address.
- In the User account field, toggle to ”Add user account,” then enter “Administrator” in the Username field and your main administrator password in the Password field.
- Save the connection and close the window.
- Go to My Desktops to access your newly added server.
Linux
- Install your preferred Linux Remote Desktop Client. For this guide, we’ll use rdesktop.
- To launch the rdesktop client, open your terminal program and type the following command (replacing 123.123.123.123 with your server’s actual IP address):
- rdesktop 123.123.123.123
- When the Windows login prompt appears, enter “Administrator” as the username and your main administrator password.
- The Windows server desktop will appear on your Linux machine.
Final thoughts: How to use remote access on your Windows server
Remote Desktop allows you to access and control your Windows server from any location as if it were running on your local machine.
This is especially useful if you are using a cloud-based server, where the server’s physical location could be thousands of miles away.
All Liquid Web VPS servers support Remote Desktop VPS connections. What’s more, they provide root access, which means you have complete control over your server environment.
And if you encounter any issues or have a question, our knowledgeable support team — aptly named “the most helpful humans in hosting” — is available 24/7 to provide assistance.
Whether you’re hosting a SaaS application or deploying ASP.NET on VPS, Liquid Web’s Windows VPS hosting offers unparalleled performance, security, and expert support.