A Beginner’s Guide to Managed WordPress
Thank you for choosing Managed WordPress at Liquid Web! We hope this guide will help you get started in making the most of your experience with the Managed WordPress Portal. There are some great features in the portal, and we’ve worked hard to make sure site maintenance is a cinch.
Quickly Jump To A Subject By Clicking its Link:
Login to MWP Portal and the Wordpress Backend
Forgotten Password
Add a User to the MWP Portal
Granting SFTP Access
Migrate a Site
Create a New Site
Taking a Site Live
Managing DNS
Backups
The fastest and easiest way to log into the Managed WordPress Portal is to first log in to your Liquid Web Manage account at https://manage.liquidweb.com.
Once logged in you will see that you are on the Overview page. Here you will see your Managed WordPress server. Just click the plus sign next to that server to reveal the LOGIN button and click it.
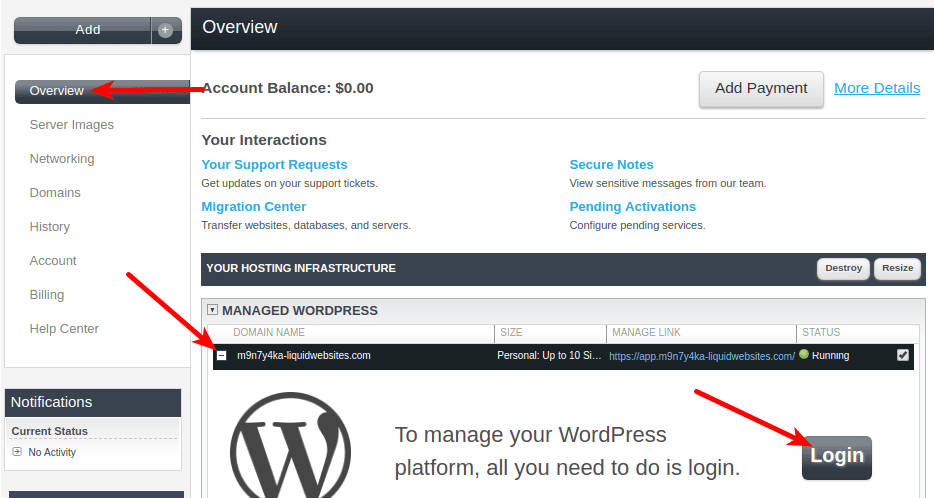
Once logged into the Managed WordPress Portal you will see the Welcome Screen which will ask you for a nickname and an email address to create your first site. Just be sure to follow the guidelines on what characters you can or cannot use in a nickname.
When the site is finished deploying, the portal will now show one default WordPress installation that you can work with pictured below. This WordPress installation is called MyNewSite.You can simply click on the WP-Admin button, and that will take you directly to the WordPress login page for the new default site.Alternatively, click the blue link and append the default site URL with /wp-login.php. In the above example this would be: https://mynewsite.m9n7y4ka-liquidwebsites.com/wp-login.php
When you create a new site in Managed WordPress Portal, you will be emailed an administrative user and password so you can access the site right away. It is recommended that you login and change the password immediately for security reasons.
If you forget your password, you can always access the login page and click on the “Lost Your Password” link under the login area. Clicking that link will send an email used to create the new default site, allowing you to change your password.

As a best practice, you will always want to make sure you never use default usernames like “admin” or “user” or simple passwords (like English words) as they can be easily guessed using brute force methods. We have created some best practice for securing WordPress to help you add some extra security to your site.
Since you will be working with different areas that can be confusing we’ll be using the following terminology to differentiate between them.
- Managed WordPress Portal - the custom control panel for your WordPress sites in Managed WordPress. The Portal is where you will add sites, work with those sites, access and adjust the setting for your websites. It’s also where you can find your backups! The Portal will have a URL that begins with the word “app,” uses a custom string, and ends in “liquidwebsites.com” Example = https://app.m9n7y4ka-liquidwebsites.com/
- WordPress Dashboard - the traditional term for the back end of all WordPress sites. When you log in into a specific WordPress site to perform maintenance on pages or plugins, you are accessing the WordPress Dashboard for that site.
- Liquid Web Account Management - this is the primary account area at Liquid Web where you log in to view all your products and services at Liquid Web, such as your invoices, your credit card payment, DNS zones, and other settings or tools that we provide for you.
You can add users to Managed WordPress Portal by logging into the Portal and then clicking on Users in the left menu. On that page, you will find a default “liquidweb_staff” user, used by our support staff, but feel free to add on any co-workers who need access to all the sites.
To add a new user click the blue Create User button to the far right.

If you want to restrict site access for a single team member, it’s best to create a WordPress Dashboard user (a WordPress user) allowing access only to that specific WordPress site.
If you wish only to give SFTP access to a team member (and not portal access or WordPress Dashboard access) you can provide the SFTP credentials to that team member.
- You can find those SFTP credentials by logging in to the portal and clicking on the blue Manage Site button for the specific site.

- You will now find many portal tools and settings for that specific site. Scroll down the page until you come to the SFTP/SSH Credentials area. This area will initially provide the user, IP, and port information for accessing the site over SFTP.
- Click on the blue Generate New Password button. When the popup window appears and asks, "Are you sure?" click the OK button.
- The page will refresh, revisit the SFTP/SSH Credentials area to find a new password was generated for that specific site.
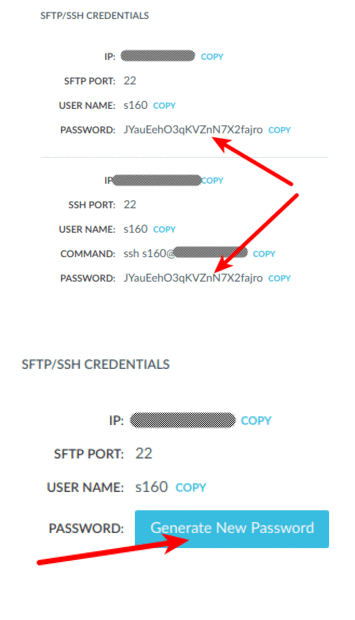
For your convenience, use the blue COPY links to copy the information. When you are ready to revoke SFTP access for a team member access the SFTP/SSH Credentials area again and click the blue Generate New Password button to reset the password to something new. Here are some things to know regarding SFTP.
- Passwords can be changed at any time.
- Each site in Managed WordPress portal only comes with one SFTP user and that username cannot be changed.
We have a custom plugin that will allow you to migrate any live, public-resolving site into Managed WordPress Portal. You can find the plugin in the WordPress repository or even search it from a WordPress Dashboard on the Plugins page. The plugin is called Migrate to Liquid Web. This plugin was built with ease-of-use in mind and works great for anyone who wishes to migrate their own site.
Instructions for downloading and using the plugin are here: /kb/migrating-to-liquid-web-with-managed-wordpress-portal/
Some things to know about using this plugin are:
- Implement the migration plugin on the source, live site. It uses a push method, and thus, the source site must be publicly reachable by DNS. The plugin will not work on a local WordPress copy that is not opening accessible through a URL.
- It can only push a copy of a site into our Managed WordPress and Managed WooCommerce product at Liquid Web. It is not compatible with migrating into other products at Liquid Web.
We are happy to perform a migration for you as well, even for multiple sites. Here is how you can submit a request for a migration to have our team migrate a live site for you into Managed WordPress Portal: /kb/free-website-migration-service/

To create a new site in Managed WordPress Portal simply log in to the portal and then click the Create New Site button in the upper right of the portal.
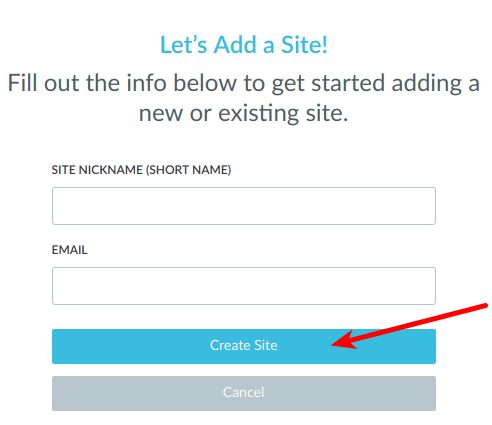
The portal will then ask you for a nickname for the site along with an email address. Fill out both fields and then click the Create Site button.
It’ll take a minute or two to see the new site in the portal. An email will shortly arrive with a username and password to access the WordPress Dashboard (also known as the WordPress backend) of the new site. Each WordPress site created in the portal installs with the default TwentySeventeen theme and comes fully prepared with its SFTP/SSH credentials.
The email address used to install a new site is the same one used for important future updates to our portal, reports and other administrative WordPress tasks for that specific site.
With a new site deploys you'll be provided a temporary URL to access the site. The URL will include both the nickname of the site and the default temporary URL that is a part of your specific Managed WordPress Portal.
When a site is migrated into Managed WordPress Portal it is copied to a temporary URL that is publicly resolvable over DNS. The temporary URL provides a means to test the functionality and before taking it live. This testing time provides an opportunity to get the site ready with all changes before it needs to be taken live with the real URL.
Two essential and sequential steps are necessary before publishing a site to the Internet.
- Change the A record for the domain to the IP address within your Managed WordPress Portal. DNS does have to be taken care of first for the second step to work.
- Change the name in the Primary Domain field in the portal (under Site Details) from the temporary URL to the actual domain name. That can be done by logging into the portal, clicking on Manage Site, and then find the Primary Domain field. Just replace the temporary URL with the straight domain name and click UPDATE.
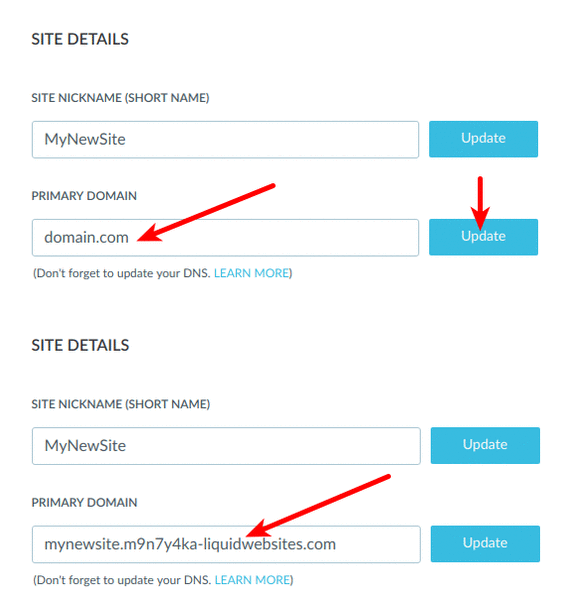
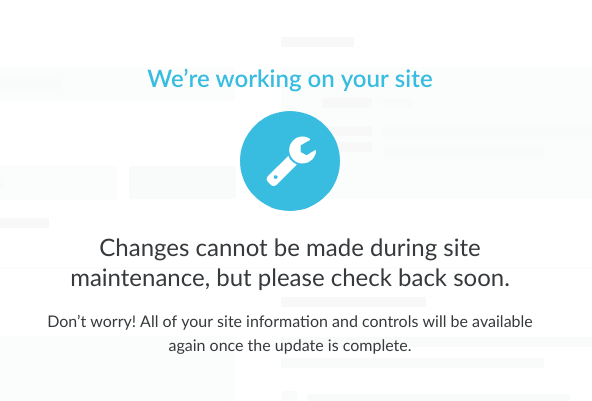
The portal will put the site into maintenance mode as it runs the update and gets the site ready to be live with the real domain name.
Here are some things to note about the renaming process.
- DNS does have to resolve to the IP address of the server to deploy our automatic SSL (Secure Sockets Layer) application. Our SSL implementation runs a public DNS lookup to retrieve the IP address.
- The renaming process will automatically replace the temporary URLs in the database to ensure menus and image links will work with the real domain.
- If you wish for the site to resolve to the www version of the domain you will need to include that in the Primary Domain field in the portal. In that case, you would set the primary domain field to www.domain.com instead of domain.com
- The site will be issued an automatic SSL during this process that will programmatically stay up to date!
- Once the renaming process has finished the portal will leave maintenance mode, and you will see the portal tools and features again for the site. At this point, the site will now be live on Managed WordPress Portal.
You can find more information documented here, on going live on a new site using this link /kb/going-live-site-managed-wordpress-portal/
Many times customers wish to have Liquid Web host all their DNS records for a domain. You can do this by using Liquid Web’s name servers.You can use the following process to migrate all DNS records to Liquid Web: /kb/migrating-your-dns-to-liquid-web/

We know that backups are critical, so we provide those for you in Managed WordPress.Just click on Manage Site for the site you wish to work with and then click on Backups in the left menu.
Here are a few aspects to note on our backups.
- Backups run nightly and are secured off-site location, so they don’t take up any space on the server where your site lives, meaning better performance for your websites.
- We keep 30 days of nightly backups, and while they are remote, you do have access to them on the Backups page.
- On the Backups page, you can manually create a new backup, download a backup from a specific date, or restore a backup from a particular time.
- If you choose to restore a backup from a specific date, it will restore right on top of the live site and revert the site to how it looked and operated on that date and time.
Learn more about the benefits of Managed Hosting in our Definitive Guide to Managed Hosting. If you're interested in fully managed WordPress hosting services, check out our sister brand Nexcess.
Related Articles:

About the Author: John Datema
John Datema shares his skills with our Knowledge Base center. Showing you how-to articles on Ubuntu, CentOS, Fedora and much more!
Our Sales and Support teams are available 24 hours by phone or e-mail to assist.
Latest Articles
How to use kill commands in Linux
Read ArticleChange cPanel password from WebHost Manager (WHM)
Read ArticleChange cPanel password from WebHost Manager (WHM)
Read ArticleChange cPanel password from WebHost Manager (WHM)
Read ArticleChange the root password in WebHost Manager (WHM)
Read Article


