Skip to content
Nexcess.comServers.comLiquidWeb.com
Search our site for answers
Login
  • Help Docs
  • API Docs
  • liquidweb.com
  • Hosting Services
    • Cloud VPS Hosting
    • Dedicated Servers
    • GPU Hosting
    • Hosting For WordPress
    • Hosting For WooCommerce
    • Email Hosting
    • VMware Hosting
    • Add-ons
  • Security & Compliance
    • SSL Certificates
    • Firewalls
    • Cloud Hosting
    • Two Factor Authentication
    • DDoS Protection
    • Compliance
    • Malware Protection
  • Domain & DNS
    • Domain Registration
    • DNS Settings
    • Nameservers
    • Subdomains
    • Domain Forwarding
    • Email DNS Setup
  • Account & Billing
    • Account Setup
    • Payment Methods
    • Billing Cycles
    • Refunds Cancellations
    • Invoices Receipts
    • Account Security
  • Email Hosting
    • Email Setup
    • Email Forwarding
    • Spam Protection
    • Microsoft 365
    • G Suite Setup
    • Account Security
    • Email Troubleshooting
  • Performance & Optimization
    • Server Optimization
    • Caching Strategies
    • Content Delivery Network
    • Database Performance
    • Image Optimization
  • Server Administration
    • Server Setup
    • SSH Access
    • Command Line Basics
    • Database Management
    • CRON Jobs
    • Apache Nginx Setup
    • Log Analysis
  • CMS & Applications
    • WordPress
    • WooCommerce
    • Magento
    • Joomla
    • Drupal
  • Backups & Recovery
    • Backup Strategies
    • Cloud Backups
    • Disaster Recovery
    • Restoring Backups
    • Raid Configurations
  • Reseller & Partner Support
    • Reseller Program
    • White Label Hosting
    • Partner Portal
    • Client Management
  • Policies & Compliance
    • Terms Of Service
    • Privacy Policy
    • GDPR Compliance
    • Acceptable Use Policy
Help Docs Liquid Web Portal Using the Project Dashboard

Using the Project Dashboard

Managing your servers, domains, and services has never been easier thanks to the Projects Dashboard in your Liquid Web account. Organize all of the assets for a project into one, easy to use dashboard.
Account
2 min read

If you have a single server with a few domains to manage, you can probably access all your resources from the main section of your Liquid Web account portal in portal.liquidweb.com. However, what if you have a dozen servers, hundreds of domains, and many other related services that you need to manage? How can you keep track of which servers are attached to which load balancers, or where all of the domains for one of your clients are located?

The Projects Dashboard allows you to group any assets in your account together into a single project dashboard, making it easy to organize and find any related servers and services.

Creating a New Project

  1. Login to your Liquid Web account.
  2. Click on Projects at the left of the screen.
  3. Click Create Project (either from the dropdown menu or from the link at the top of the Projects page).
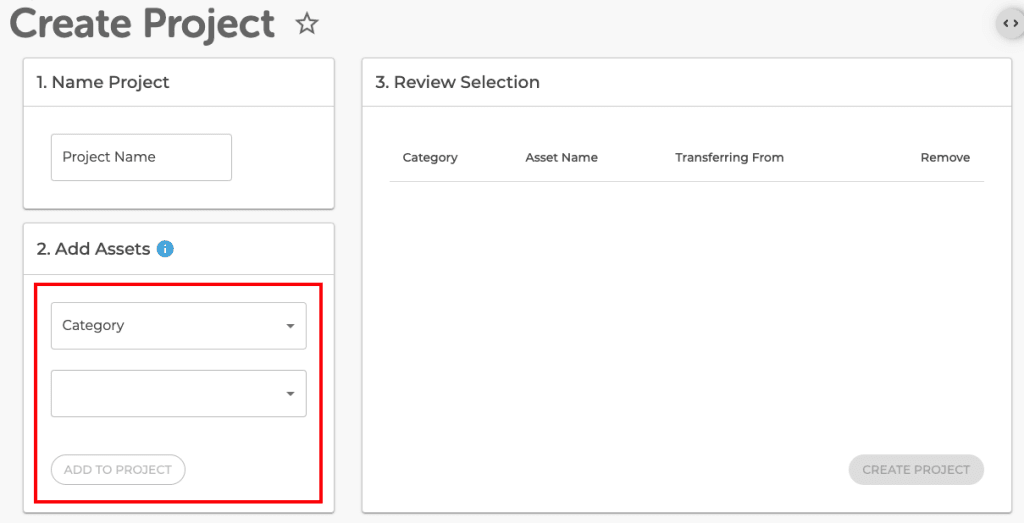
  4. Name the Project.
name project screen highlighted
  1. Add an Asset by clicking on the dropdown menus and selecting the category and asset you want to add to the project. Click Add To Project. Repeat for each asset you want to add to the project.

NOTE:

Adding a Domain to a project will also add all the services that are associated with the domain, such as DNS zones and SSLs.
adding an asset to project screen
  1. Once you’ve selected all of the assets for a project, Review your selections, then click Create Project to create your new project.
create projects link highlighted
  1. Your new project will be displayed on the Projects screen.

Editing a Project

  1. Go to the Projects Dashboard.
  2. Click on the name of your project.
  3. Your project dashboard will list all of the assets associated with your project.
  4. To add additional assets to your project, click Add Existing Asset. A dialog box will open and you can add an asset from the dropdown menus.

NOTE:

Assets can only be associated with one project at time. If you attempt to add an asset that is already associated with a different project, you will be asked to transfer that asset to the new project.
  1. You can edit your project name or delete the project by clicking on the three dots to the right of the project name.
edit project name links highlighted
Was this article helpful?
Thank you for your input.
Thank you for your feedback.
Table of Contents
  • Creating a New Project
  • Editing a Project
Get hosting news and tips straight to your inbox
Join our community today.
Loading form…
Essential hosting resources to help your business stay ahead
Get the guides
Related hosting content
  • How to Check if a WordPress Plugin is Active
  • WordPress Upgrade and Downgrade | Liquid Web
  • Nexcess Hosting and Nexcess Client Portal Guide

Solutions

Managed DedicatedCloud DedicatedManaged VPSWordPress ManagedManaged MagentoManaged WooCommerceSignature ServicesAdd-ons

Company

ContactAboutTerms of ServicePrivacy PolicyCustomer StoriesGlobal Cloud Platform

Resources

Help DocsResource CenterWeb Hosting ToolsSitemap

Partnerships

Hosting Affiliate ProgramPartner ProgramsRefer-a-Friend
HIPAA logo.
RedHat logo
cPanel and WHM certified.
SSAE-16 audit compliant hosting provider.
CCNA Cisco certified routing and switching for servers and hosting.
Microsoft Partner Silver Hosting.
AICPA service organization, SOC compliant.
2025 Best Performance and Reliability Award from HostAdvice.com.
Liquid Web reviewLiquid Web review
BBB Accredited Business logo with A+ rating.

©  Liquid Web, LLC by Nexcess Corp.

Privacy Policy

  • Solutions
  • VPS Hosting
  • Dedicated Servers
  • Managed Hosting
  • WordPress
  • GPU Hosting
  • Products
Log in
  • System status
  • Support | Get Help