

Setting Up Your DNS to Use Your Own Domain Name
Using your custom domain name with LearnDash Cloud is a simple process. This guide will walk you through the two-step process of configuring your domain: first by updating your DNS (Domain Name System) settings, and then connecting the domain to your LearnDash Cloud site.
Why should I use my own domain name?
Using your own domain name offers several important benefits for your LearnDash site:
- Professional Credibility: A custom domain (like
yourschool.com) instantly makes your site appear more established and trustworthy, compared to a generic subdomain (yourschool.learndash.cloud). - Brand Building: Your domain is a key part of your brand identity. It helps students remember your site and makes your courses more marketable.
- Marketing Flexibility: Having your own domain gives you complete control over your web presence. You can create memorable subdomains, redirect URLs, and manage email addresses under your domain.
- Long-term Value: While you may start with LearnDash Cloud, owning your domain means you maintain control of your web address regardless of which platform you use in the future.
- SEO Benefits: Custom domains can improve your search engine visibility and make it easier for potential students to find your courses through organic search.
Step 1: Configure the DNS Record
This step involves adding an A record to point your custom domain to your LearnDash Cloud site. Heres how to get that done:
- Find Your LearnDash Cloud IP Address:
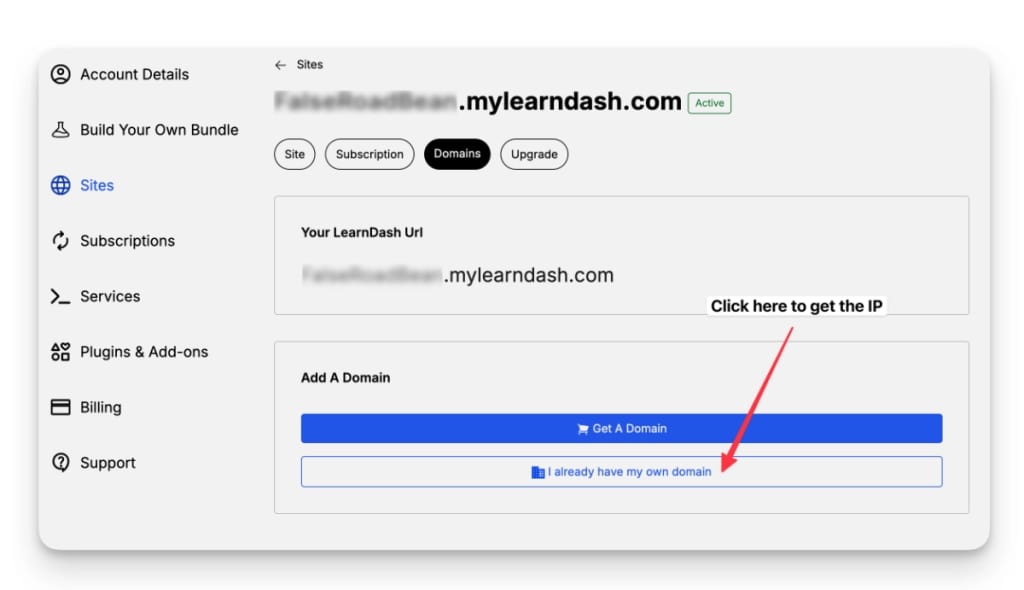
- Log in to your LearnDash account and go to your LearnDash Cloud site details.
- Click on Domains.
- Choose I already have my own domain and copy the IP address shown there (but don’t click Connect just yet!).
Update DNS Settings in Your Domain Registrar Account:
- Log in to your domain registrar’s account (e.g., GoDaddy, Namecheap).
- Look for options like DNS Zones, Manage DNS, Domain Zones, or Host Records. Different registrars may use slightly different names, but they all point to the same place where you add DNS records.
- Click on Add a New Record .
- Enter the following:
– Type: A Record
– Host: @
– Value/Target: Paste the IP address you copied from LearnDash.
– TTL: Automatic
Add the www Version:
Its good practice to include the www version of your domain. Add another A record with these details:
– Type: A Record
– Host: www
– Value/Target: Paste the IP address you copied from LearnDash.
– TTL: Automatic

Waiting for Propagation
After you’ve updated these records, the changes need some time to fully take effect. Depending on your domain registrar, this can be quick, or may take up to 72 hours as the DNS propagates across the internet.
Step 2: Connect Your Domain in LearnDash Cloud
Once the DNS has propagated:
- Go back to your LearnDash Cloud domain settings.
- Click I already have my own domain again.
- Confirm that youve updated the DNS by checking the box, then click Connect to finish connecting your domain
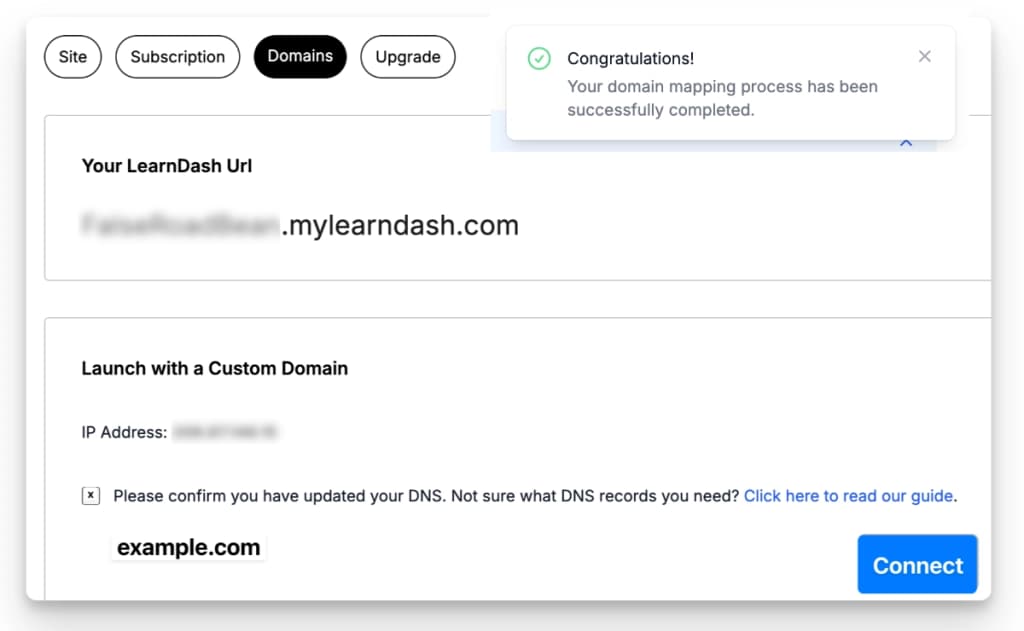
If youre not seeing changes immediately, dont worryÔÇöpropagation can sometimes take a while, but your domain should be connected within that 72-hour window.
Troubleshooting Tips
If it’s beyond 24 hours and the changes haven’t propagated yet, this is likely caused by an A record collision. This happens when there are two A records (Host = @) pointed to different IP addresses. In this case, please remove the other A record (Host = @) and only retain the A record pointing to our Cloud server.
You can find detailed guides for your specific registrar in your hosting provider’s documentation.