Customizing Event Data in Elementor
When you’re using Elementor with The Events Calendar, the default widgets cover the common cases — but sometimes you need finer control over which event data appears and how. This article collects snippets for a few common customizations that go beyond what the standard widget settings allow.
See also:
Show Only the Next Upcoming Instance of a Recurring Event
When Elementor’s Loop Grid or Loop Carousel widgets are used to display events, every instance of a recurring event appears separately. If you’d rather show only the next upcoming instance and hide subsequent recurrences, the snippet below handles it.
function hide_subsequent_recurrences( $query ) {
    $query->set( 'hide_subsequent_recurrences', true );
}

add_action( 'elementor/query/hide_subsequent_recurrences', 'hide_subsequent_recurrences' );
Here’s the full flow using Code Snippets:
- Install and activate the Code Snippets plugin from the WordPress plugin repository.
- Go to Snippets → Add New in your WordPress dashboard.
- Paste the snippet above into the code editor.
- Name the snippet (e.g., “Hide subsequent recurrences in Elementor loop”) and click Save and Activate.
- In Elementor, edit the Loop Grid or Loop Carousel widget and set its Query ID to
hide_subsequent_recurrences.
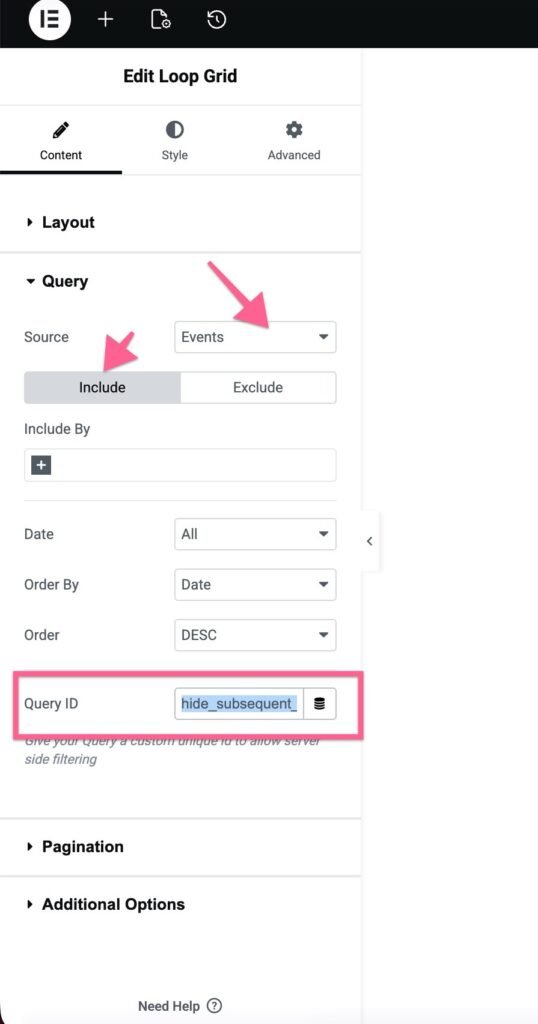
Once the Query ID matches the action hook in the snippet, only the next upcoming instance of each recurring event will display in the widget.
Display Individual Additional Fields with a Shortcode
The Elementor Additional Fields widget (from Events Calendar Pro) renders every Additional Field for an event in a single block. If you’d rather place specific fields in specific spots on the page — or scatter a few of them across different sections — the snippet below registers a shortcode that outputs one field at a time.
Although this guide is written for Elementor, the resulting shortcode works anywhere on a single event page, with or without Elementor.
Step 1: Add the Shortcode to Your Site
// Define the shortcode
function custom_event_custom_fields_shortcode( $atts ) {
    // Get the current event ID
    $post_id = get_the_ID();

    // Get the custom fields for the event
    $custom_fields = tribe_get_custom_fields( $post_id );

    // Get custom field name from the shortcode attribute
    $atts = shortcode_atts(
        array(
            'field' => '', // Default is empty
        ),
        $atts
    );

    // Initialize the output string
    $output = '';

    // Check if the custom field exists based on the attribute 'field'
    if ( ! empty( $atts['field'] ) && isset( $custom_fields[ $atts['field'] ] ) ) {
        $output .= '
';
        $output .= '
' . esc_html( $atts['field'] ) . '
';
        $output .= '

' . esc_html( $custom_fields[ $atts['field'] ] ) . '
';
        $output .= '
';
    }

    // Return the output
    return $output;
}

// Register the shortcode
add_shortcode( 'event_custom_fields', 'custom_event_custom_fields_shortcode' );
Step 2: Add the Shortcode in Elementor
With the shortcode registered, you can drop it in anywhere on a single event page:
- Edit the event in Elementor.
- Add the Shortcode widget. Drag Elementor’s Shortcode widget into the section where you want the field to appear.
- Insert the shortcode. In the widget’s settings, enter
[event_custom_fields field="Custom Field"]. - Replace Custom Field with the exact name of the Additional Field you want to display (for example, Event Website or Location). The field name must match what’s defined in Events → Settings → Additional Fields.
Step 3: Display Multiple Fields
Add as many Shortcode widgets as you need — one per field. Just change the field attribute each time. For example, [event_custom_fields field="Dress Code"] in one section and [event_custom_fields field="Parking"] in another.
Step 4: Customize the Output Markup (Optional)
If you’re comfortable with HTML, you can change the markup the shortcode emits by editing the output block inside the function:
// Check if the custom field exists based on the attribute 'field'
if ( ! empty( $atts['field'] ) && isset( $custom_fields[ $atts['field'] ] ) ) {
    $output .= '';
    $output .= '' . esc_html( $atts['field'] ) . '';
    $output .= '' . esc_html( $custom_fields[ $atts['field'] ] ) . '';
    $output .= '';
}
Swap the div, h3, and p tags for whatever structure and classes match your theme.