Installing an SSL Certificate on a Windows Core Managed Server
Installing an SSL on a Core-Managed server is a multi-step process that involves creating the Certificate Request (CSR), obtaining the SSL, completing the certificate, and binding the certificate to the website(s). We’ll walk through those steps together so you can be confident completing this process yourself.
Step 1: Creating the CSR
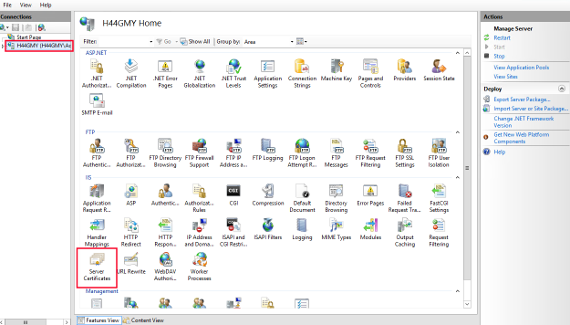
- Open Internet Information Services by typing “IIS” into the start menu on your server.
- With IIS open, click on the server name, then double-click Server Certificates.

- On the right side of the screen, click Create Certificate Request.
- Fill out the information requested in the pop-up window Note: common name is the name of the site for which you are ordering the SSL.
NOTE: |
The CSR form will generally require the following information:
|
- Click Next once you’ve filled out the required information to move to the next section..
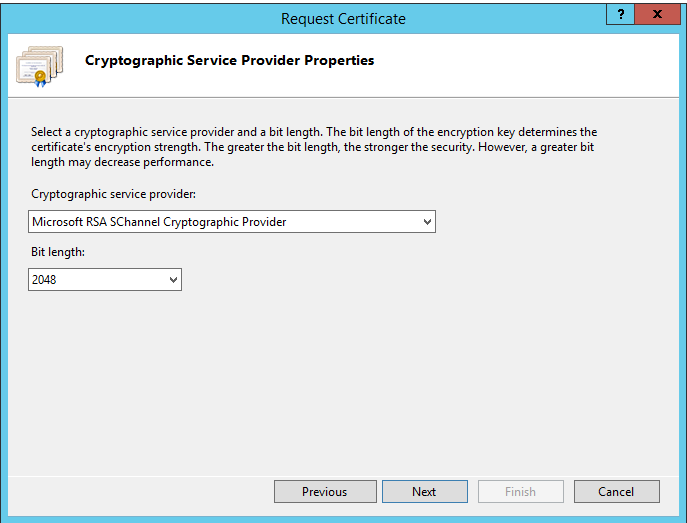
- Choose the Cryptographic Service Provider select the Microsoft RSA Schannel with at least 2048 bit length from the dropdown menu:

- Choose a file name and location for the CSR, generally the name of the domain.csr.txt, saved where you can find it easily, like the documents folder.
Step 2: Order the SSL
You can order the SSL from Liquid Web or a third-party. In either case, you’ll need to use the text of the CSR you created in the first step to order the SSL. These directions assume you are ordering the SSL through Liquid Web.
- Log in to your Liquid Web account.
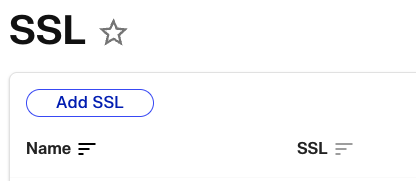
- Click SSL and select Add SSL from the SSL page (Prices are removed from this article as they are subject to change).

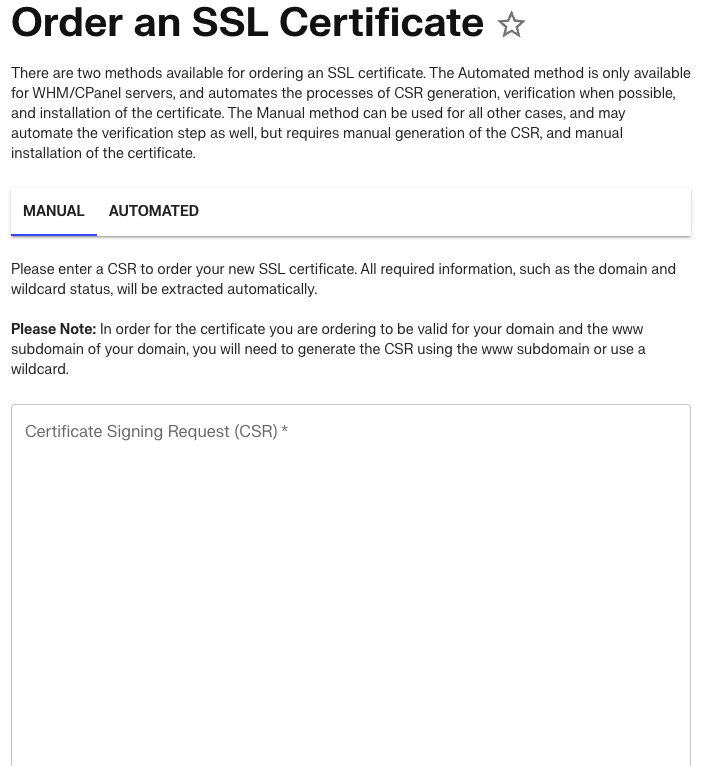
- Copy the contents of the txt file you created in Step 1 and paste it in the box provided.

- If your DNS is hosted with Liquid Web or if it is hosted elsewhere, you will need to add the TXT provided in your account to the domain’s DNS records, or choose an alternative verification method. If you need more help verifying the SSL, see Verifying an SSL Certificate.
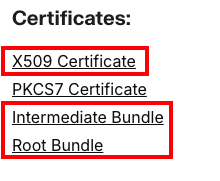
- Once the SSL is verified, copy the contents of the X509 Certificate link and the Intermediate and Root Bundle links into a text file on your server.

- Save the text file with the name domain.com.cer, where domain.com is your domain name.
Step 3: Complete the Certificate Request
- Go back to IIS on your server, click the server name, and double-click Server Certificates (just like you did in Step 1).
- Now click Complete Certificate Request.
- For the first field, find the .cer file that you created in Step 2 click the … button and browse to the file.
- Enter a name for the certificate, usually the name of your domain, and choose a certificate store (generally “Personal” is a good choice).
- Click OK.
Step 4: Binding the SSL to your site
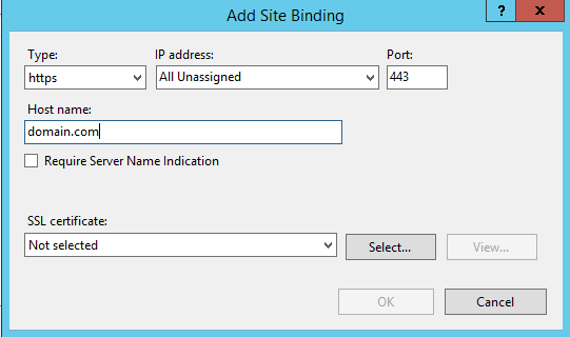
- Click on the name of the site in IIS for which you want to apply the SSL.
- Click Bindings on the right side of the screen.
- Click Add and choose Type https, add the IP address, Host name which is your site name, and select the SSL you created from the drop-down list.

- If you also want users to be able to browse to your site by using www.domain.com, create another binding with www.domain.com as the host name.
That’s everything! Your site should now be protected with the SSL that you ordered. You can verify that the site is using the SSL by using our SSL checker in our Internet Web Hosting Toolkit or going to a third-party SSL checker, like SSL Shopper.
As always, feel free to contact our Support team to assist with this process if needed.