Setting Up and Using SSH Keys
In addition to securing your computer, creating a secure password and using CSF to help protect your server and websites, you can also use SSH Keys to add another layer of security to your SSH connections. SSH Keys are created in pairs, a public key that is installed on your server and a private key that is installed on your computer. They work together to create a secure connection so that only users with SSH key access can log into the server.
Warning: |
| While you can create an SSH Key without a passphrase, it is not a recommended method. Allowing for login without any security precaution can make you vulnerable to malicious users if the user’s computer is compromised. |
This tutorial assumes that you already have a .ssh directory in the user directory of your server. The file path would look something like this: /home/myuser/.ssh/ . If you do not have a .ssh directory, you will need to use normal user/password authentication to connect to the server for the first time. For instructions on how to do this, see our article Logging into Your Server via Secure Shell (SSH).
You can create an SSH key in two ways, use the links below for the method you’d like to use:
Add SSH Key by Command Line
Generate SSH Key
- The first step is to create your personal key using your hostname. Run the following command in your terminal/shell:
ssh-keygen -f ~/.ssh/host.example.com
- You will be asked where you would like to save the key. You can just press Enter to use the default setting but if you are setting up a key as root user, you will want to store it in a different location.
Generating public/private rsa key pair.
- Next, you will be prompted to enter a passphrase. This will be needed every time you use the key to connect to a server.
Enter passphrase (empty for no passphrase):
Enter same passphrase again:
Your identification has been saved in /home/user/.ssh/host.example.com.
Your public key has been saved in /home/user/.ssh/host.example.com.pub.
The key fingerprint is:
bf:7b:63:a8:91:29:76:2b:03:ac:21:8c:91:4a:fa:11 $USER@server.domain.com
Note:
If you ever need to change your passphrase, you can do it at any time with the following command: ssh-keygen -p -f ~/.ssh/host.example.com
Copy SSH Key to Server
Now you can copy the public key to the server. In a typical server, every user has their own .ssh directory and authorized_keys file. Generally, your user accounts are located in the /home directory. Once you determine which user you want to login as, you can copy the public key. This will determine the user file you copy the key to.
- When you know the user and are ready to copy the key, use the following command ($user indicates where to input your user):
ssh-copy-id -i ~/.ssh/host.example.com.pub $USER@host.example.com
/usr/bin/ssh-copy-id: INFO: attempting to log in with the new key(s), to filter out any that are already installed
/usr/bin/ssh-copy-id: INFO: 1 key(s) remain to be installed -- if you are prompted now it is to install the new keys
stdin: is not a tty
Number of key(s) added: 1
- Now try logging into the machine, with: “ssh ‘$USER@host.example.com'” and check to make sure that only the key(s) you wanted were added.
Create SSH Key in cPanel
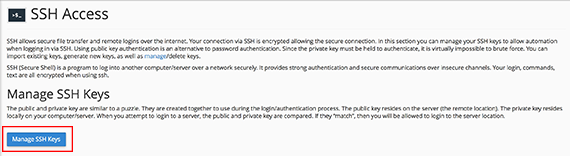
- Log into your cPanel user account.
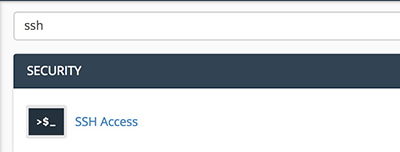
- Type ssh into the search bar at the top of the page and click SSH Access when the button appears.

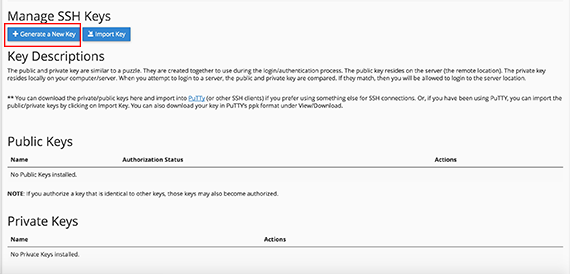
- Select Manage SSH Keys to generate a new SSH key.

- Click on Generate a New Key to create a new public key.

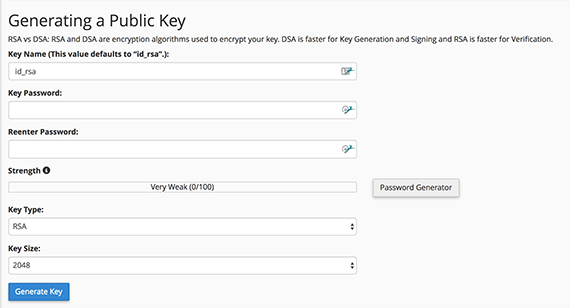
- The key name will default to id_rsa, but you can set this to a specific username or whatever name you’d like to save the key as.

Note:
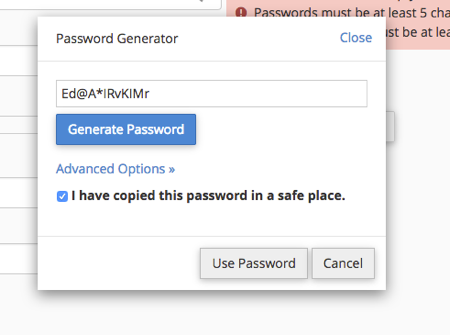
If you’d like cPanel to automatically generate a strong password, click Password Generator, copy the password to a secure location and click Use Password to have it automatically populate the password section. If you’d like to set your own password, please see our article Best Practice: Creating a Secure Password.

- Once you’ve entered the key name and password, click the Generate Key button and you will see the key ready for you to use.
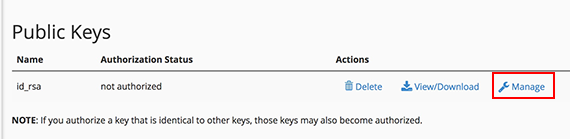
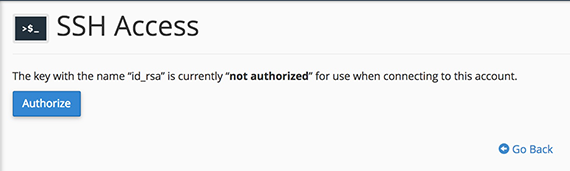
- Once the key is generated, you will need to authorize the user. Click the Manage link under Actions.

- Authorize the key and return to the SSH Access home page.

Add Key to Your Computer
Once your SSH Key has been created in cPanel, you need to add the private key that was created to your computer or workstation. In order to do this, you will need to open a Command Line Interface or Terminal window.
- From your terminal window, type the following command to change to the .ssh directory:
cd .ssh
- Create a file for your key:
vim id_rsa.key
- Copy and paste the key into the file you’ve created. (Save using :wq).
ssh-rsa AAAAB3NzaC1yc2EAAAADAQABAAABAQCZwtpMkdjbqaVCEjS6HDQZflsJuOiHcukUQw+
SvcArtC7+hVWqK9vV87+v4AlIrMVclKH/1tRjf2+K8J4SolkGQU60NG3LuSPc0ywFTcr0C
HRmGTByap74OWtuFNlhAxcQmYQNMmx2UZ9J
/9HTT5uIBgEz9v2BLRyiliHfcf5jX6dxaehRa9cTqI
/v3+1d2bobv4inxhnmD51pEsLvErtesnG+o4IQxheesg0RMp6SjS9ErN1Re9iWZE8g0EhBjnb
PcENOkFetP6dEEGX4rm9BlpyJcZk9QPr+zB
/M/AtY13A0lLeUbTu0V7033fYpaEb3AjFJ5lHN4hYVUOLKMDaN
- Give the key the permission 600:
chmod 600 id_rsa.key
- Now you can log in using your key:
ssh -i $username@example.com /.ssh/id_rsa.key
When it asks for your Passphrase, use the password that was used when you created the key in cPanel.
Public Key Storage
You can store your public SSH key in your Liquid Web account so that you can install it on any new servers that you create within your account.
Note: |
| You cannot generate an SSH key using your Liquid Web account, only store the public key for easy access on a new server configuration. |
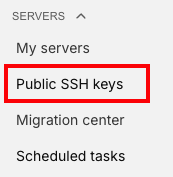
Using portal.liquidweb.com
- Log into your Liquid Web account.
- On the Servers tab, click on Public SSH Keys in the drop down menu.

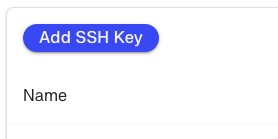
- On the SSH Keys screen, click Add SSH Key to add a new public key.

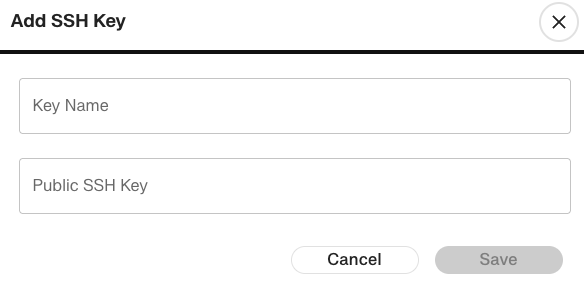
- Enter a Key Name and the Public SSH Key that you generated. Click Save to save the key.