Password Help
Passwords are an important part of maintaining a secure server environment. However, finding passwords associated with a new system and resetting passwords to maintain good security can be frustrating. This article will provide you with the information you need to find and/or reset the most commonly used passwords in our systems.
Finding your server passwords
- When you order your server from Liquid Web, you should receive a Secure Note in your Account Portal that provides detailed information on the server, including the initial password.
- If you need to find your server’s username and password after the Secure Note has been dismissed, you can find it on the Server Details page in your Account Portal.
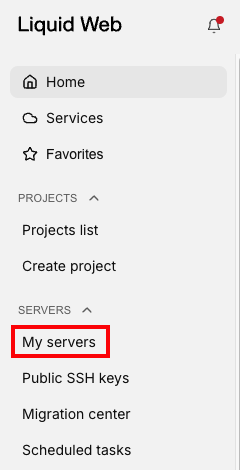
- Click on My Servers to the left side of the home page.

- Click on the name of the server for which you want to find the password.
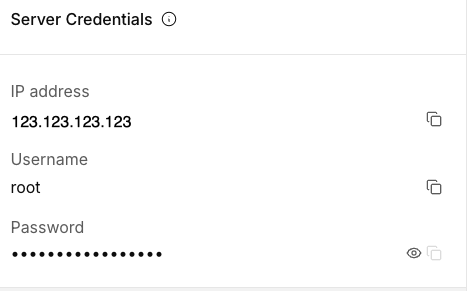
- On the Server details page, scroll down to the Server Credentials block (NOTE: this will display the password that is current in our records. If you’ve changed the password since last updating our records, this password may be out of date. For a complete walkthrough, see Finding your server password.

Changing your Linux root user password
Changing your password regularly helps improve the security of your system. In general, you can follow these steps to change your Linux root (primary user) password. Because you use the root user to login to WHM on a cPanel server, changing the root password here would also reset the WHM password.
- Login to the server as root using SSH.
- Use the following command to change the root password.
passwd- You will be prompted to enter a new password and confirm it by typing it again. (NOTE: for security reasons, you may not see any indication that you are typing while entering the password).
- Remember to report your new password using the Support Access button in your Liquid Web account when you change your root password.
Resetting your Linux root user password
If you have lost or forgotten your Linux root password and the password on file with Liquid Web is out of date, you may be able to reset the password if you have console access to the server by following these steps. Remember to report your new password using the Support Access button in your Liquid Web account when you change your root password.
Please reach out to our Support Team if you need additional help.
Step 1: Access the Console
Begin by accessing your Liquid Web account. From there, go to the Servers section, and click on the appropriate server from the list to go to the server detail page and go to the console.
Step 2: Reboot the server
With the console open, issue a reboot for the server via the Reboot button in my.liquidweb.com for the server and go back to the console.
You may need to do this from the server detail page if the reboot button in the console is greyed out.
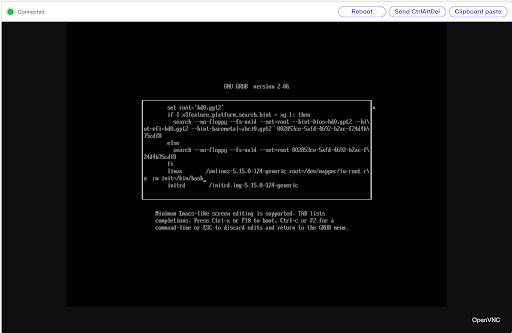
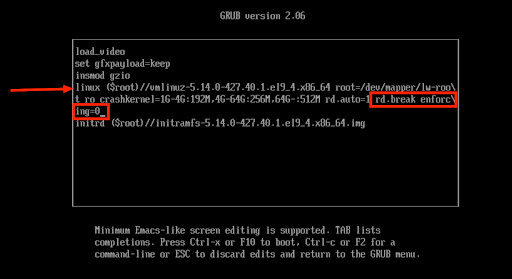
Step 3: Access the grub menu
When the server is starting, press the down the shift key and repeatedly press the F1 key until you hit the grub screen as shown below:

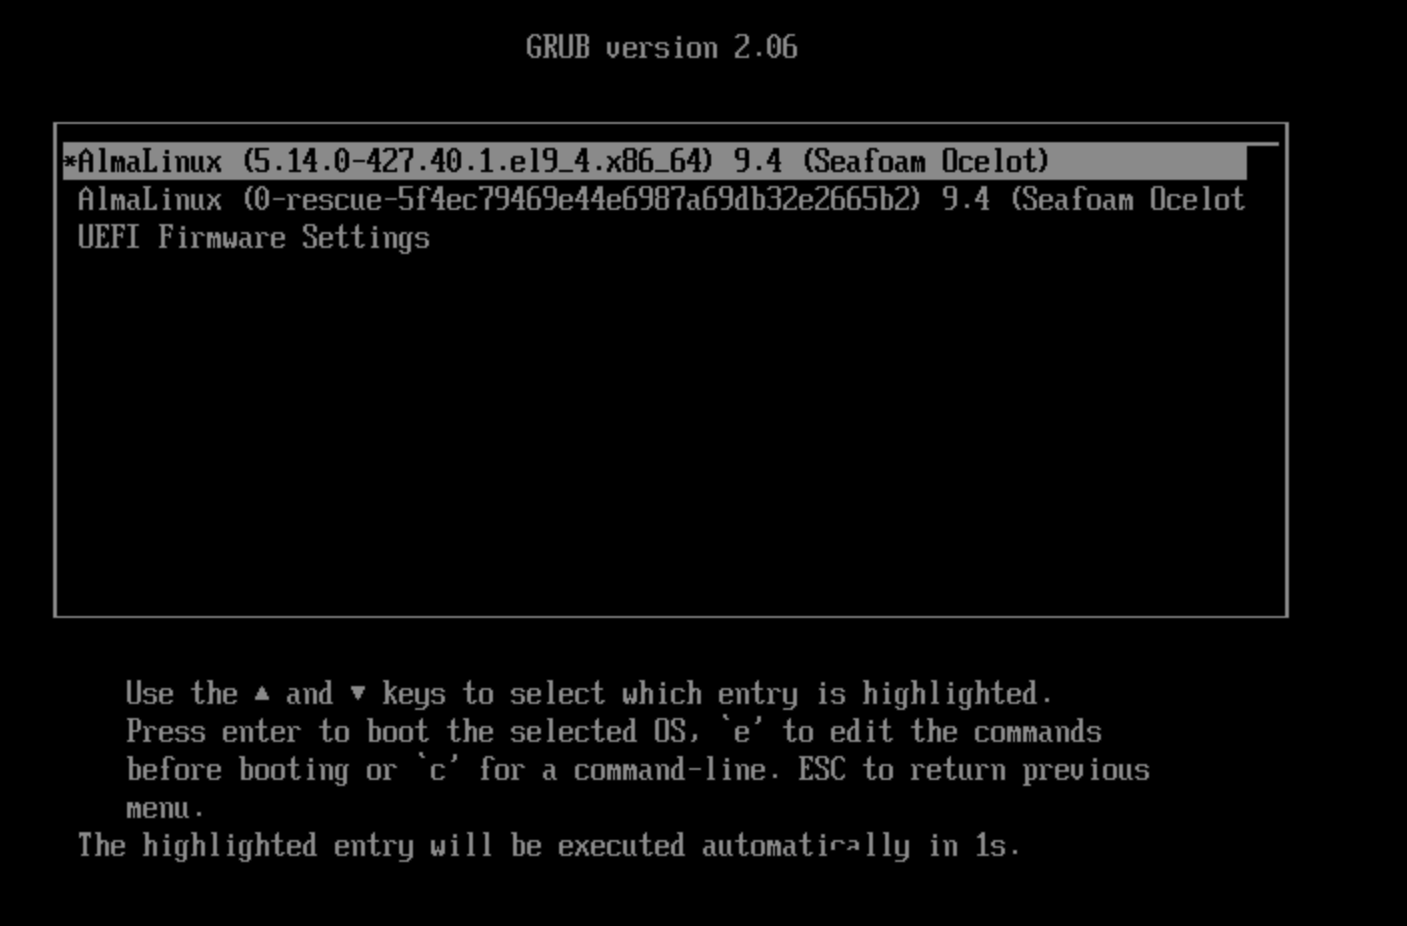
From this screen, ensure the latest kernel is selected (usually the top one labeled “Ubuntu” or “Debian”) and press the e key on your keyboard while inside the console.
Step 4: Edit Boot Commandline Parameters
From here, use the arrow keys on your keyboard to go to the line that starts with linux (you may need to scroll down by pressing the down arrow to see it) and move your cursor to the very end of the line (recommend pressing the End button on your keyboard), then add the following to the end of that line after a space:
rw init=/bin/bash
As shown in the screenshot below:
Then press ctrl x or F10 on your keyboard to continue booting.
Step 5: Set a new root password and reboot
Now, we can set a new root password. Create a secure password, then run the following:
passwd root
Enter the new password twice as prompted.
Next, reboot the server by typing:
exec /sbin/init
Step 6: Final steps
After the server reboots, test your new root password via SSH to ensure access. Don’t forget to report your new password via the Support Access button so our team can provide help in the future.
Step 1: Boot into Rescue Mode
- Restart Your System: Begin by rebooting your machine.
- Access GRUB Menu: As your system starts up, press any key when you see the GRUB menu prompt.

- Edit Boot Parameters:
- Highlight the default boot entry using arrow keys.
- Press e to edit the selected entry.
- Find the line starting with linux or linux16.
- Append rd.break enforcing=0 at the end of this line after a space.

- Boot into Rescue Mode: Press Ctrl + X or F10 to boot with these parameters.
Step 2: Remount File System
Remount with Write Permissions:
mount -o remount,rw /sysroot
Step 3: Change Root Directory
Chroot into Sysroot:
chroot /sysroot
Step 4: Reset the Root Password
- Change Password:
passwd root
- Enter New Password: You will be prompted to enter a new password twice for confirmation.
Step 5: Relabel SELinux Contexts (if enabled)
Create .autorelabel File:
touch /.autorelabel
Step 6: Reboot Your System
Exit Chroot Environment and Reboot:
reboot
Step 7: Final steps
After the server reboots, test your new root password via SSH to ensure access. Don’t forget to report your new password via the Support Access button so our team can provide help in the future
Please reach out to our Support Team if you need additional help.
Changing your Windows administrator user password
The primary user of a Windows server is generally the administrator user. Always remember to update our records with the Support Access button in your Liquid Web account when you change your administrator password.
- Log into your Windows server using RDP with the “Administrator” user.
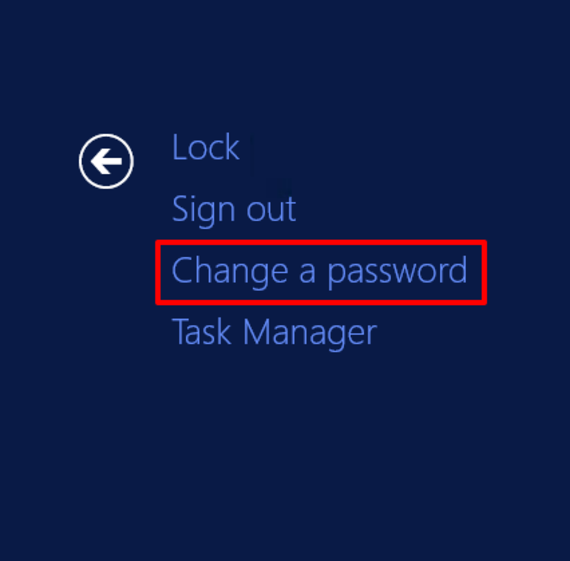
- Press the key combination CTRL + ALT + End. The End key is usually to the right of the Enter key, often above the arrow keys. In RDP, this is the equivalent of CTRL + ALT + Delete. (If you’re using RDP on a Mac, you’ll still use CTRL + ALT + Delete.)
- Click Change a password.

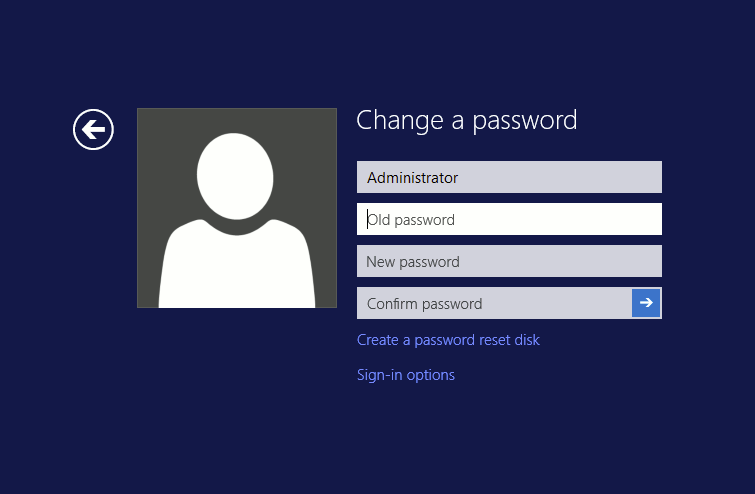
- Enter your Old password. Then enter and confirm a new password.

- Click the arrow to confirm your password change.
- You’ve successfully changed your administrator password! Click OK to exit the password interface. Don’t forget to report your new password!
If you’ve lost or forgotten your Windows administrator password, please reach out to our Support Team for assistance.
Liquid Web account passwords
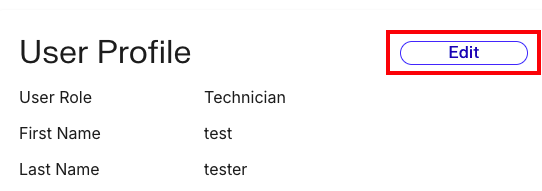
Changing your Liquid Web portal passwords regularly is another important step in keeping your account secure. You can update the password for any user on your account by following these steps.
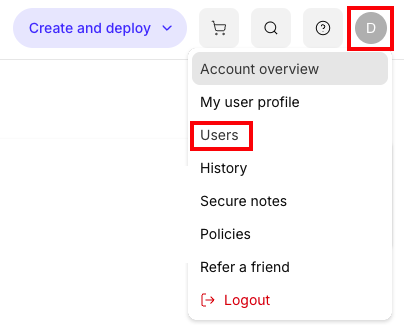
- Log in to your account.
- Click on the Account button at the top of the screen then click on the Users link in the drop down menu.

- Click on the username for which you would like to update the password.
- Click the edit button to the right of the username.

- Enter the new password and confirm it. Then click Save to update the password.

For a complete walkthrough, see Changing Your Liquid Web Account Password. If you are unable to login to your account and there are no additional account owners on the account, please contact our Support Team for assistance.
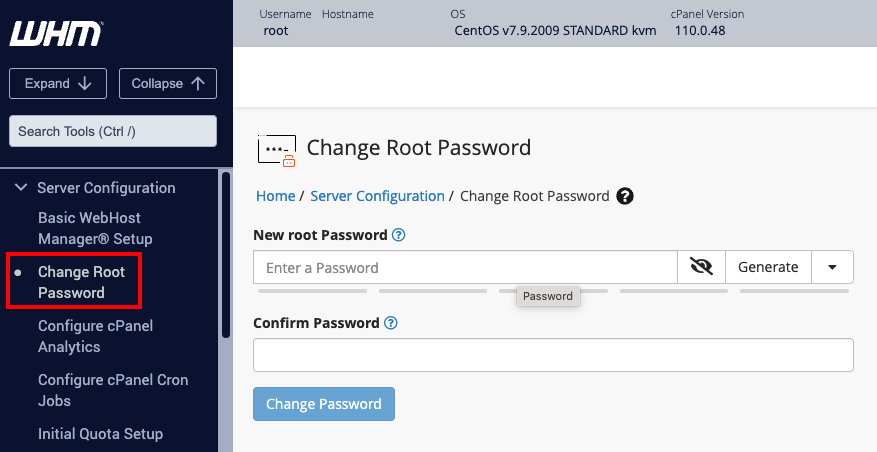
WHM Passwords
WHM generally uses the root user to manage settings and accounts. You can find your root password in your Liquid Web Account (see above). You can update your root password directly from WHM. For more information, see Changing Your Root Password in WHM.
- Log in to your WHM account.
- Under Server Configuration, click Change Root Password.

- Enter and confirm the new password and click Change Password.
- Always remember to update our records with the Support Access button in your Liquid Web account when you change your root password.
cPanel passwords
You can change passwords for cPanel accounts both from WHM and from within the cPanel accounts themselves. For complete walkthroughs, see Changing cPanel Passwords in WHM and Changing Your cPanel Password.
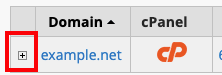
- Log in to WHM as the root user.
- Click the search bar at the top left and type List Accounts.
- Click the List Accounts link.
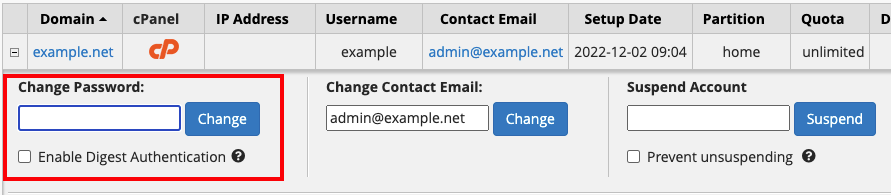
- Find the account you want to update and click the Plus sign at the beginning of the row.

- This will expand the user row. Enter a new password in the Change Password box and click Change to save the new password.

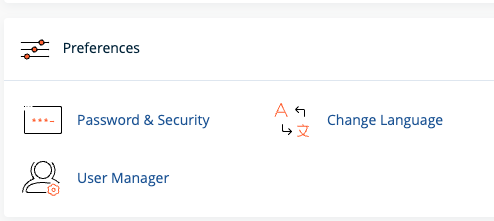
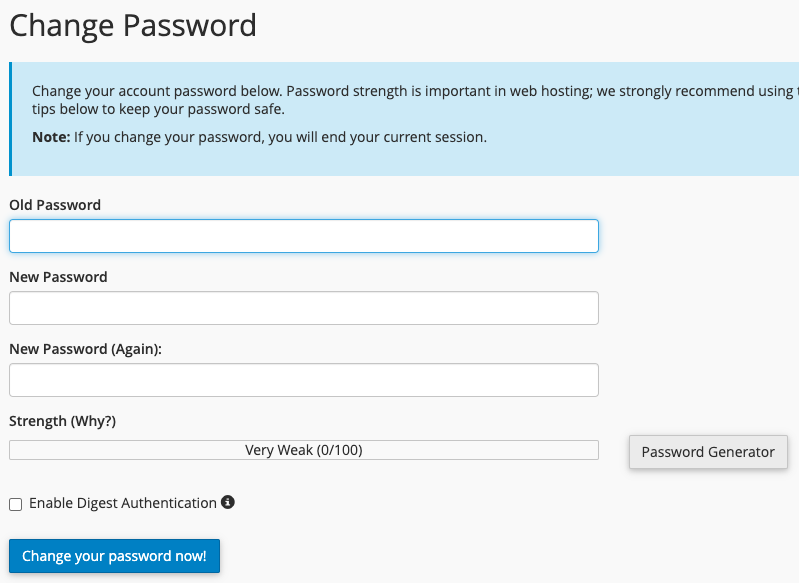
- Log in to cPanel with the user you want to update.
- Scroll down to find and click the Password and Security button.

- Enter the old password, then enter the new password and enter it again to confirm. Click Change your password now! to save the changes.

Plesk passwords
The plesk administrator is usually named “admin”. On Liquid Web servers, the same password is initially used for the windows administrator account and the Plesk admin account. You can change your Plesk admin account password from the main page of the Plesk control panel. For a complete walkthrough, see Changing Your Plesk Administrator Password.
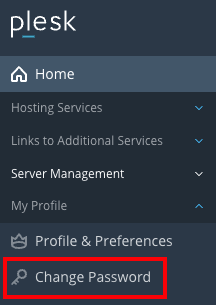
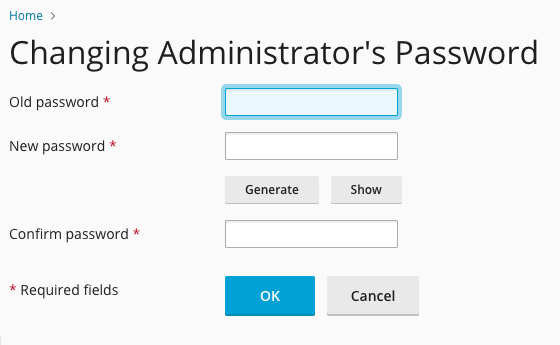
- Log in to Plesk using the admin account credentials. (NOTE: this will be the same as the server password found in your Liquid Web account. See Server Passwords at the top of this article).
- On the bottom of the left navigation bar, click Change Password to update the admin password.

- Enter the old password. Then enter and confirm the new password. Click OK to save your changes.

If you’ve lost the Plesk admin user password, you can reset it by logging into the Windows server via RDP using the administrator account and following the directions from Plesk.
Interworx passwords
Interworx is a control panel much like cPanel that is offered by Liquid Web. The primary user for Interworx is set by default to use the main email address of your Liquid Web account as the user. The password is the same as the password of the root user for the server. You can follow these instructions for changing passwords in the Interworx panel.
CMS passwords
One of the most dangerous ways to operate a website is using a Content Management System (or CMS) with weak or shared passwords. You should always use a unique, strong password for your CMS administration. Listed below are links to documentation from some of the most popular CMS systems in use today.