Securing your Cloud VPN using IP Access Control Lists (ACLs)
Improve Cloud VPN security by enabling Two-Factor Authentication and setting ACLs. Add, edit, or remove IP addresses in the Users section of your Liquid Web Account.
The purpose of connecting to your server using the Cloud VPN is to improve security. You can set up Two-Factor Authentication for your Cloud VPN users to strengthen that security. ACLs (or Access Control Lists) provide yet another option for improving the security of your Cloud VPN connection. Using ACLs, you can create IP whitelists of address(es) your Cloud VPN users can use to connect. These IP addresses would typically be your office IP range or a specific developer’s primary IP address. You can add ACLs for your Cloud VPN in the Users section of your Liquid Web Account. Follow these steps to add or modify ACLs for Cloud VPN users.
- Login to your Liquid Web Account.
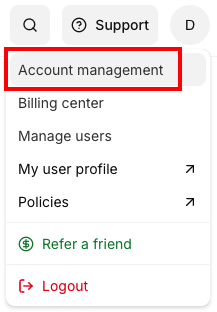
- Go to the Account drop down menu and click on Account Management.

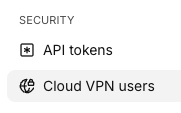
- Click on the Cloud VPN Users link in the Security section of the menu.

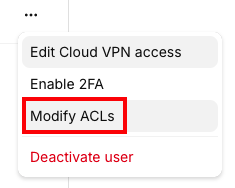
- Click on the three dots to the right of the Cloud VPN user for whom you want to modify ACLs.
Click Modify ACLs to add, modify, or remove existing ACLs.
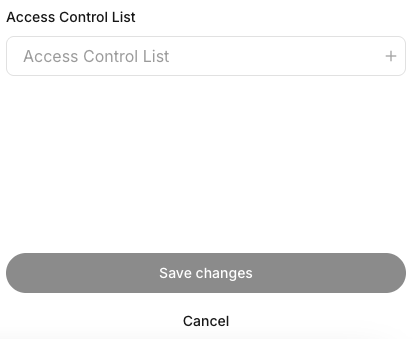
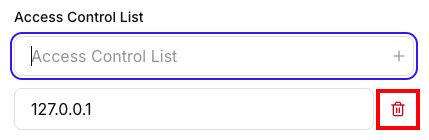
- Enter the IP address you want the Cloud VPN user to connect from in the box provided. You can find your public IP address by visiting Liquid Web’s IP tool. (Note: local IP addresses like 192.168.x.x or 10.10.x.x are not routable over the internet and should not be included). Click Save changes to save your changes.

- You can also remove authorized IP addresses by clicking the Trash icon or add additional IP addresses by entering additional IP addresses and clicking Save Changes.

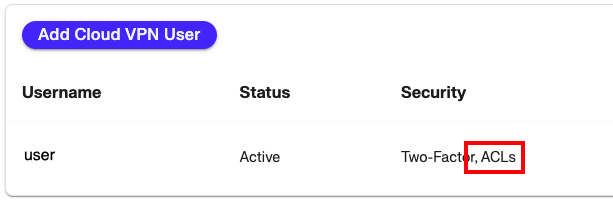
- The Security field of your Cloud VPN user will now show that ACLs are active for that user.